Format & Import Workforce Data
Once you have exported or gathered your data from your HRIS, payroll, or other electronic source, follow the steps below to prepare the data for import.
- Format Workforce Data
- Have your Workforce Data Template open. It is recommended that you save the template file in .xlsx format and in a location readily accessible from within The Complete AAP.
- Copy and paste data values from your exported payroll or HRIS file into the appropriate columns in the template file.
- The program’s import process involves an automatic data-checker that can alert you to inconsistencies in data, but you might save yourself some time by reviewing items in the list below before attempting to import data.
- Review These Data In Your Import File
-
- if you copied a prior year company to create the current company file, ensure that the location codes for preexisting locations in column A of your import file match those in the Locations table of the company you created; new locations should be assigned new and unique location codes;
- sort by Employee ID or run a pivot table to check for and eliminate duplicate employee records;
- ensure that every unique employee ID, location code, department code, job group code, and job code code has only one consistent title/name; TCAAP will choose only one title/name per code upon import;
- ensure that each job group code has the same consistent EEO code assigned.
- ensure that each unique job code has the same consistent job group assigned;
- make sure that all employees have a Base Salary reported (exceptions can be made for executive-level employees);
- ensure that Salary Basis describes the Base Salary (e.g. Base Salary of $15.00 has an associated Hourly Salary Basis; Base Salary of $190,000 has an associated Annual Salary Basis);
- ensure that each employee has a Supervisor ID included;
- ensure that supervisor ID’s are the employee ID’s (from column C) of the supervisor; supervisor ID’s must tie back to actual employee ID’s in order to report employees correctly;
- Save your changes in Excel, and then, before saving the file in the required .csv format review these items:
- Review These Formatting Details In Your Import File
-
- remember that only the active tab will be saved, so click on the tab that actually holds the correctly formatted data that you want to import prior to saving as a .csv;
- remember that all formulas will be converted to text values when the file is saved to .csv format;
- remove all filters and unhide any hidden columns or rows; if you want to prevent certain records from importing delete them from the file prior to saving;
- ensure that all of the columns are visible and remain in the same order as the original import template, even if not populated with data other than the header;
- ensure that there are no blank rows between data; The Complete AAP will read and import data down to the first blank row it encounters;
- ensure that all relevant compensation data columns are formatted as number rather than currency;
- it is recommended that you keep the first row of headers in your import file; it’s just easier to know what’s in your file should you have to refer to it later;
- if your file has leading zeroes on any codes (e.g. 00123) you should include an apostrophe before the first zero in order to retain the leading zeros during import (e.g. ’00123) or use a custom format for those cells to retain the correct number of characters.
- Save your changes in .csv format in the original location where the template automatically saves.
- Close your file and follow instructions below to import your workforce data.
- Have your Workforce Data Template open. It is recommended that you save the template file in .xlsx format and in a location readily accessible from within The Complete AAP.
- Import Workforce Data
-
After populating and formatting your import template, follow the instructions in this section to import your file.
- Open the company into which you wish to import.
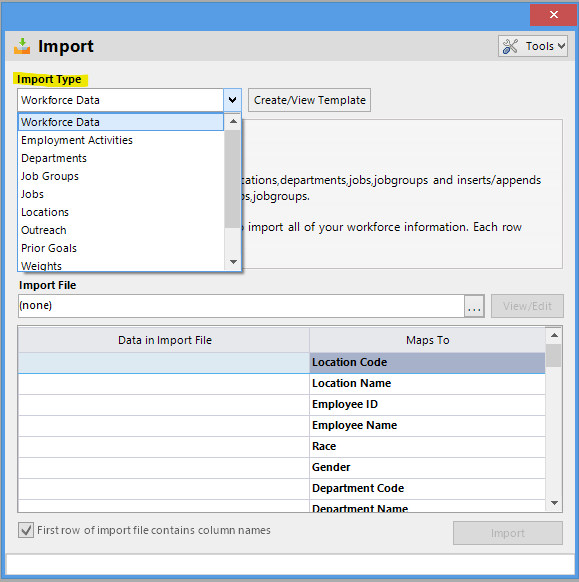
- Click the Import icon.
- Select Workforce Data as the Import Type.
- Click the
button just below Import File to locate and select the file you wish to import.
- The selected file’s path will appear in the Import File box.
- Click Import.
- Respond to any pop-up messages generated by the software during import; see the Pop-Ups section below if you encounter messages during import.
- An Import Finished window will appear when the import has completed.
- Proceed to Review Workforce Data.
Pop-Ups
You may receive multiple pop-ups, one at a time, during the workforce import process. The pop-ups provide either notice of data inconsistencies or prompts to slot or map data into values that the program recognizes. Whether you run across mapping prompts or Data Inconsistency notices, it is important to read the messages closely before proceeding with the import.
Click below on Data Inconsistencies and/or Mapping Prompts to learn more about each type of pop-up.- Data Inconsistencies
-
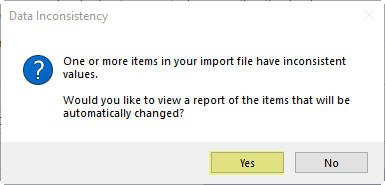
The Data Inconsistency message signals conflicts in data in the file that you are attempting to import.
When you get the Data Inconsistency pop-up, follow these steps:
- Click Yes to view the Automatic Import File Changes report for a listing of changes that the software recommends.
- When the preview of the Automatic Import File Changes report appears, save the report as PDF in an accessible location, and then glance through the preview. The length of the list depends on the number of inconsistencies the program finds, but it is typically no longer than a page long. If you find that it’s longer, it may be best to halt the import process and revisit step 3 in the Format Workforce Data steps earlier in this chapter.
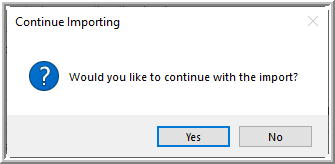
- When you close the preview, the following message appears.
- Choose one of the following:
- Click No to stop the import, and then continue to the next step in these instructions.
- Click Yes if you agree to the program’s proposed fixes, and then return to the import process.
- Locate the Automatic Import File Changes report that you saved or printed.
- Open your import file and the_Auto Import File Changes_ pdf. that you saved.
- Carefully review Auto Import File Changes. Click Most Common Data Inconsistencies and Their Fixes below to see the most common Data Inconsistency messages.
- After fixing data inconsistencies, return to the import instructions earlier in this chapter to complete the import process.
- Most Common Data Inconsistencies and Their Fixes
To determine where your inconsistency lies, open your import file and have it ready. Find the message below that matches each of the items on your Automatic Import File Changes report. You will need to sort your import file according to the instructions in each message below; “X” denotes your data. If you don’t see your message on the list below, please reach out to us for clarification.- Change all job codes [XXXX] to have a job group code of [X] because that code appears in XX.X percent of the employee records. This will affect X employee record(s).
-
A real-world example would look something like this:
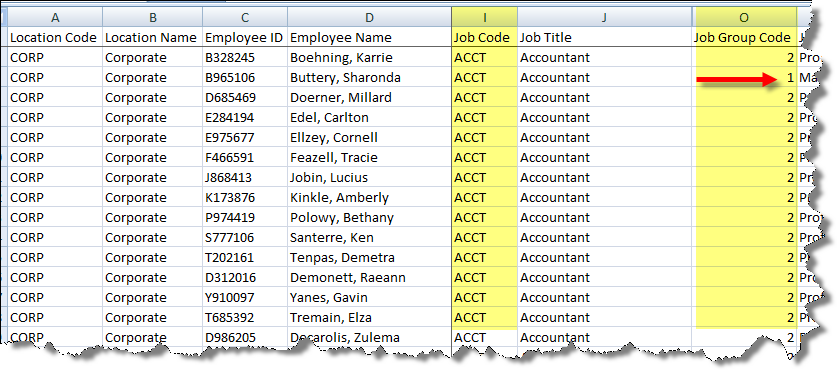
- Change all job codes [ACCT] to have a job group code of [2] because that code appears in 93.8% of the employee records. This will affect 1 employee record(s).
Sort the import file by the following columns in the order shown: Location Code, then Job Code, and then Job Group Code.
Focus on columns I and O to locate the inconsistency in the job code in question. In my sorted import file, all instances of ACCT in the CORP location are assigned Job Group Code 2 except the record belonging to Sharonda Buttery.
I can either change Sharonda’s job group code to match the others’, or I can add a character to Sharonda’s job code so that it imports as a separate record and will retain the job group selection. If the latter, I might consider also changing her job code and title to reflect her status as a manager.
Make adjustments to you file accordingly, and consider carrying over any adjustments into your HRIS or payroll records from which you pulled the data.
- Change all job codes [ACCT] to have a job group code of [2] because that code appears in 93.8% of the employee records. This will affect 1 employee record(s).
- Change all job codes [XXXX] to have a job title of [X] because that title appears in XX.X percent of the employee records. This will affect X employee record(s).
-
A real-world example would look something like this:
- Change all job codes [ADMIN] to have a job title of [Administrative Assistant] because that title appears in 83.3% of the employee records. This will affect 1 employee record(s).
Sort the import file by the following columns in the order shown: Location Code, then Job Code, and then Job Title.
Focus on columns I and J to locate the inconsistency in the job code in question. In my sorted import file, all instances of ADMIN in the CORP location are assigned the Job Title Administrative Assistant except the record belonging to Florentina Blaine.
I can either change Florentina’s job title to match the others’, or I can add a character to Florentina’s job code so that it imports as a separate record and will retain the job title Executive Assistant.
Make adjustments to you file accordingly, and consider carrying over any adjustments into your HRIS or payroll records from which you pulled the data.
- Change all job codes [ADMIN] to have a job title of [Administrative Assistant] because that title appears in 83.3% of the employee records. This will affect 1 employee record(s).
- Change all job codes [XXXX] to have an EEO code of [X] because that code appears in XX percent of the employee records. This will affect 1 employee record(s).
-
A real-world example would look something like this:
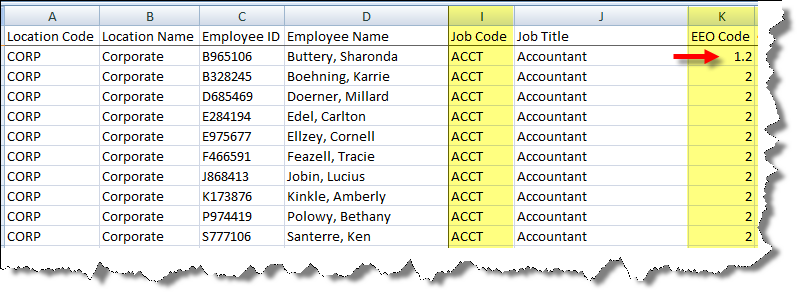
- Change all job codes [ACCT] to have an EEO code of [2] because that code appears in 93.8% of the employee records. This will affect 1 employee record(s).
Sort the import file by the following columns in the order shown: Location Code, then Job Code, and then EEO Code.
Focus on columns I and K to locate the inconsistency in the job code in question. In my sorted import file, all instances of ACCT in the CORP location are assigned the EEO Code 2 except the record belonging to Sharonda Buttery.
I can either change Sharonda’s EEO Code to match the others’, or I can add a character to Sharonda’s job code so that it imports as a separate record and will retain the EEO Code 1.2. If the latter, I might consider also changing her job title to reflect her status as a manager.
Make adjustments to you file accordingly, and consider carrying over any adjustments into your HRIS or payroll records from which you pulled the data.
- Change all job codes [ACCT] to have an EEO code of [2] because that code appears in 93.8% of the employee records. This will affect 1 employee record(s).
- Change all job group codes [X] to have a job group name of [X] because that name appears in XX.X percent of the employee records. This will affect X employee record(s).
-
A real-world example would look something like this:
- Change all job group codes [2] to have a job group name of [Professionals] because that name appears in 78.6% %(color-orange)of the employee records. This will affect 3 employee record(s).
Sort the import file by the following columns in the order shown: Location Code, then Job Group Code, and then Job Group Name.
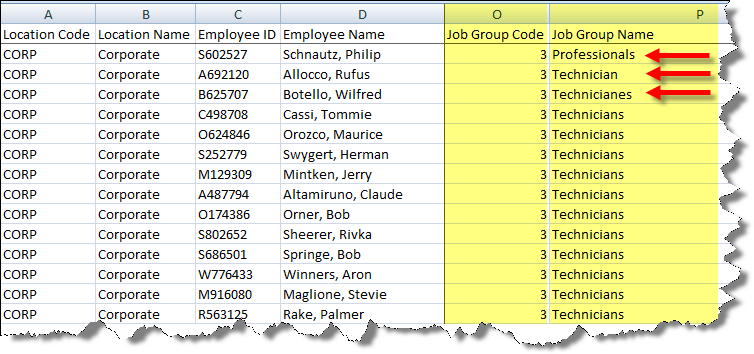
Focus on columns O and P to locate the inconsistency in the job group code in question. In my sorted import file, all instances of job group code 3 in the CORP location are assigned the job group name Technicians except the records belonging to Philip Schnautz, Rufus Allocco, and Wilfred Botello.
In the case of Philip Schnautz, the job group name inconsistency is due to his assigned job group name Professionals. I can either change Philip’s Job Group Name to match the others’, or I can change his Job Group Code to match his Job Group Name.
In the case of Rufus Allocco and Wilfred Botello, the differences are caused by misspellings; the program will indeed consider even small variations inconsistencies, and you may either fix the inconsistencies in the import file before trying to import again, or you can just allow the program to fix the inconsistencies when it runs across them.
Make adjustments to you file accordingly, and consider carrying over any adjustments into your HRIS or payroll records from which you pulled the data.
- Change all job group codes [2] to have a job group name of [Professionals] because that name appears in 78.6% %(color-orange)of the employee records. This will affect 3 employee record(s).
- Change all location codes [XXXX] to have a location name of [X] because that name appears in XX.X percent of the employee records. This will affect X employee record(s).
-
A real-world example would look something like this:
- Change all location codes [CORP] to have a location name of [Corporate] because that name appears in 99.9% of the employee records. This will affect 1 employee record(s).
Sort the import file by the following columns in the order shown: Location Code, and then Location Name.
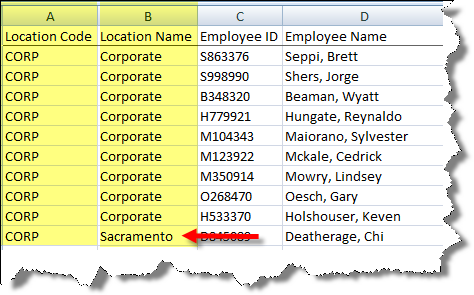
Focus on columns A and B to locate the inconsistency in the location code in question. In my sorted import file, all instances of location code CORP are assigned the location name Corporate except the records belonging to Chi Deatherage.
I can either change Chi’s Location Name to match the others’, or I can add a character to Chi’s Location Code so that it imports as a separate record.Make adjustments to you file accordingly, and consider carrying over any adjustments into your HRIS or payroll records from which you pulled the data.
- Change all location codes [CORP] to have a location name of [Corporate] because that name appears in 99.9% of the employee records. This will affect 1 employee record(s).
- Click Yes to view the Automatic Import File Changes report for a listing of changes that the software recommends.
- Mapping Prompts
-
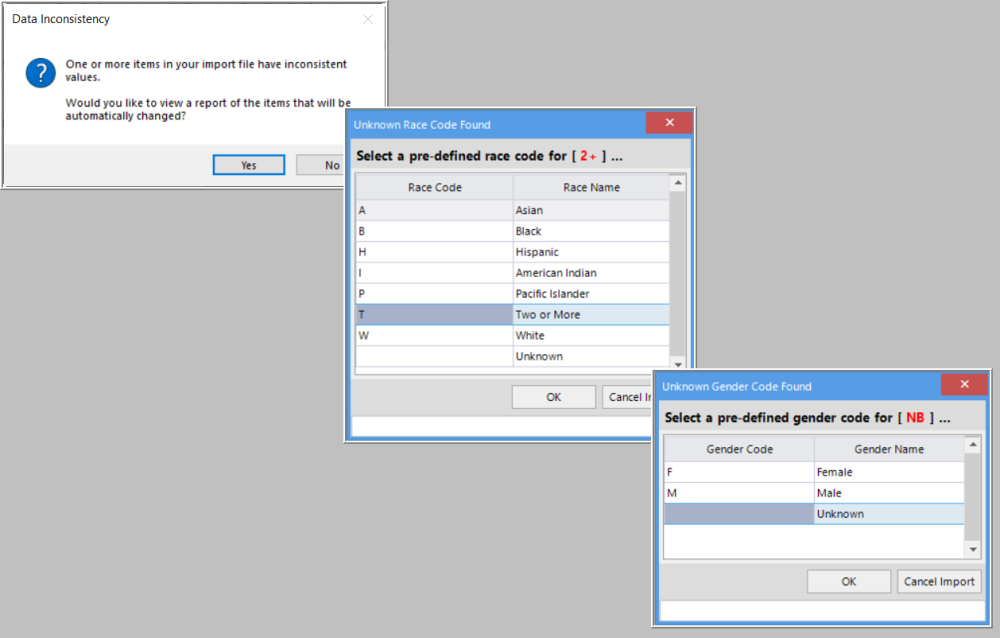
Some mapping prompts are designed to be resolved within the message window, such as identifying a race or gender code when the Unknown [Data] Found message appears, but mapping prompts can also be indicators that the column order is incorrect in your import template.
Below are some of the most common mapping prompts. Click on each one to expand it.
- Duplicate Employee IDs
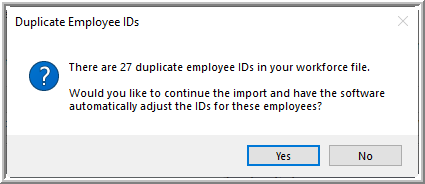
If there are duplicate employee IDs in your workforce import file a message similar to the one below one appears.
- Click Yes if you want the software to fix the IDs for you. The IDs that end up in the Employees table will naturally be different than those in your import file.
- If you click No the import stops so that you can find and correct the issues in your import file. After correcting the Employee IDs you must start the import process again.
- Unknown Race, Gender or EEO Codes
-
Because employee databases all use different coding systems for race, gender or even EEO-1/EEO-4/IPEDS codes, The Complete AAP may ask you to define them during import. Race will be used in the examples in this section, but the same concepts apply to gender and EEO Code.
The popup header in the image below reads “Unknown Race Code Found,” and the text below that explains what needs to be defined. In this example, the program has come across the unrecognized race code “2+,” in my import file and it is asking me to select one of the race codes that it recognizes. I will click T for Two or More, and then I’ll click OK to continue the import.
I may then receive more popups that ask me to map more data until my import successfully concludes.
When Something Looks Off
If the software asks you to clarify information that clearly does not correlate to the information below it, cancel your import and correct your import file. In the image below, “Accountant” is clearly not a race, so I will click Cancel Import to abort the import process.
To address this inconsistency, I will open my import file and ensure that the column order in my file matches the column order in the workforce import template. If the column order doesn’t match, I’ll rearrange misplaced columns to match the template. Once I’ve rearranged the columns in my import file, I will start the import process anew.
If the column order is not the issue, I will sort by the relevant column to locate the rogue record. I’ll fix the record and will then start the import process anew.
When an Unknown is Truly Unknown
If your import file truly does include blank or unknown races or genders, define them as Unknown and then later define their definite race or gender in the Employees table to avoid data errors and, ultimately, incomplete reports.
If your import file contains unrecognized EEO codes, you may either select a pre-defined code, or select Keep Original Code. Keeping an original code will generate an error in the Jobs table that you will address during Review of Workforce Data.
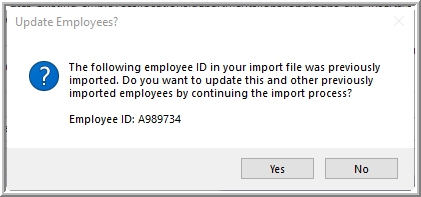
- Update Employees?
The Update Employees popup occurs when the program recognizes employee IDs that already exist in the Employees window. This usually occurs when a file is being re-imported after a previous, successful import. The reason this popup occurs is because the workforce data re-import process overwrites existing data. In doing so, the program will overwrite data tied to codes, and will create new records for any unrecognized codes. See the “What do I need to know about re-importing?” FAQ below for a more in depth explanation of this concept
- Click Yes if you wish to continue the import and overwrite the previous employee data.
- Click No if do not wish to continue the import and overwrite the previous employee data.
But I’m Not Trying to _Re_-Import Anything
If you are not in the process of re-importing data when you receive this popup, this means that you may be attempting to import into a prior AAP. Halt the process and create a Company Shell using the proper instructions in Create a Company File before returning to the import process.
- Open the company into which you wish to import.

Proceed to Review Workforce Data.
Frequently Asked Questions
- Why does the program search for inconsistencies during workforce import?
-
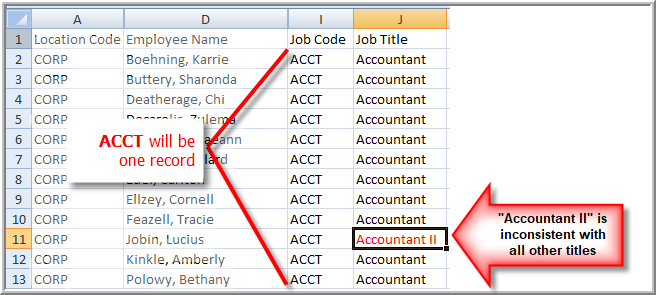
To understand why the program searches for inconsistencies in the workforce data, it’s necessary to understand that the program takes multiple instances of codes in an import file and consolidates them into one record to store in the appropriate data table. For example, in the image below, there are several employees with the job code ACCT. During import, the program attempts to create one record in the Jobs table for job code ACCT, but in order to do so, every job title assigned to that code must be the same. In the example below, Accountant II is the odd man out. The program must verify with you that it is okay for it to change the one instance of “Accountant II” to “Accountant.”
The data inconsistencies are not limited to job-related issues; anywhere the program runs across codes in the workforce data, it will check for inconsistencies within. Keep reading to find out what to do when you run across data inconsistencies during import.
- To avoid data inconsistencies from arising, can’t I just eliminate codes from my import file?
Eliminating codes from your import file will definitely prevent the program from finding data inconsistencies, but it may cause even worse data-consistency issues down the line.For example, say you have a job title that has inconsistent job groups such as those shown in the image below. Because the program doesn’t have codes to work with, it cannot discern where there are inconsistencies, and it updates records during import as it runs across information. In the case below, the program could well assign the job title Assemblers I the job group 8 Laborers even though only one instance of that title holds that designation.
- What do I need to know about re-importing?
Re-importing data will either overwrite existing data, or will create new records; how the program decides this is all due to whether it recognizes previously imported data.
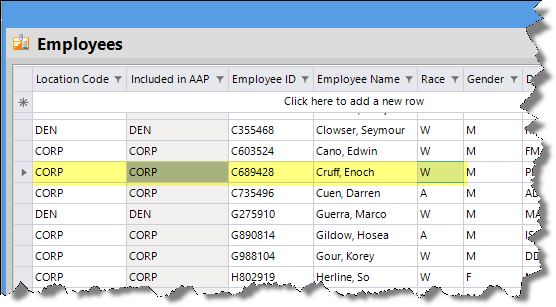
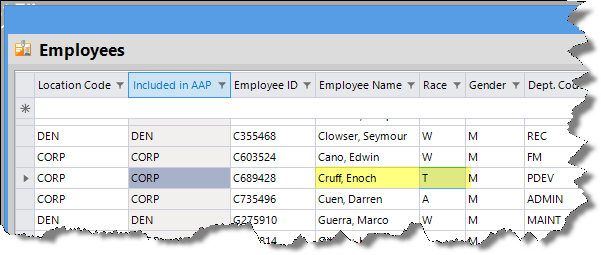
Let’s say for example that I complete my workforce import, and then notice in the Employees window that some data are wrong. The issues are too abundant to fix within the program, so I open my import file and make adjustments there with the intent to re-import. For data with associated codes, as long as I don’t change any codes, the program will overwrite existing data associated to those codes. If I didn’t import codes for employee names, job titles, departments, or job groups, the program creates them upon import. For example, if I change the race from White to Two or More for an employee named Enoch Cruff, during import the program will recognize Enoch’s Employee ID and will overwrite his original race (White) with the updated Two or More race.
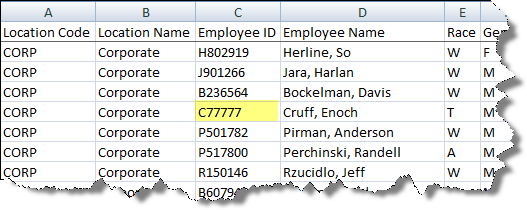
However, if I change Enoch’s employee ID or, if no codes, the spelling of his name in the import file that I intend to re-import…
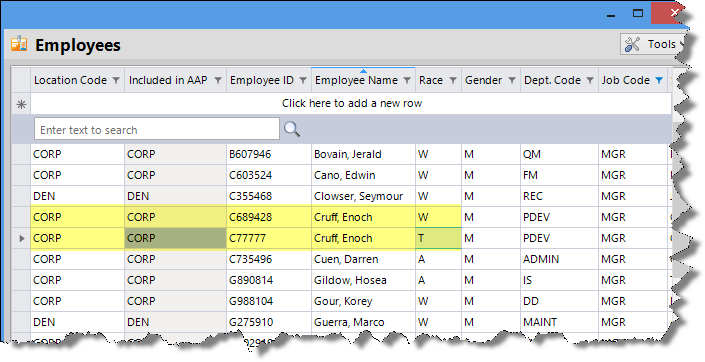
…upon re-import the program will not recognize his new employee ID or, if no codes, his altered name as having been previously imported. The program will create a new record for Enoch.
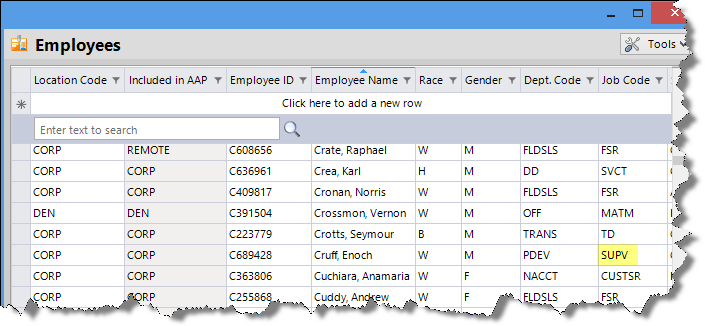
Let’s say that instead of changing Enoch’s employee ID or the spelling of his name in the import file, we change his job code, or, if no codes, his title to one not previously imported.
Upon re-import, the program will recognize his new job code (or job title) as not having been previously imported, and will create a record for it in the Jobs table. Enoch will appear in the Employees table with his brand new job code…
…but because the program created a new record for the new job over in the Jobs window, I must open the Jobs table to ensure that all associated information (EEO Code, Job Group Code, Census Codes) are assigned:
The same is true if, before re-importing, I change any employee’s associated departments, job groups, etc. The program will overwrite previously-imported codes’ associated information, but will create new records for any codes or titles that didn’t exist before.
- Can I import an .xslx file?
No, the software requires import files to be saved as a .csv file.
- What do I do with “unknown” race and/or sex?
You can import blank or “unknown” race or sex, but you should at some point before publishing your reports fill in the missing data. The OFCCP encourages visual identification of race and sex of employees who decline to self-identify.
- What do I do with “unknown” Veteran and/or Disability status?
The OFCCP does not allow employers to visually identify either of these statuses and you may leave the statuses blank or indicate “unknown”.
- Do I have to convert all employees’ salaries to be consistently annual, hourly, etc.?
No. As long as the Salary Basis for each employee describes the rate of pay in the Base Salary column, the program can distinguish between types of pay.
- Do I have to include all of those additional compensation fields?
You must include Part-time and Hours Worked Per Week for the program to annualize salaries in compensation-related reports. The other compensation-related fields are a roll of the dice. Commissions, Overtime, Bonuses, Merit Increases, Locality Pay, and Incentives are fields that the OFCCP requests from contractors under audit. You can pull the data and import it now, or try adding it later if and when you receive a scheduling letter. Benjamin Franklin would not approve of the latter.
- Does The Complete AAP have character limits?”
- There are no character limits in The Complete AAP, but lengthy codes or titles/names can affect the aesthetics of published reports.


 button just below Import File to locate and select the file you wish to import.








Post your comment on this topic.