Review Remaining Data and Fix Errors
Click on each of the secions below titled Review Employment Activities, Review Weights, Review Prior Goals, Review Outreach, and Other Items to Review sections to discover how to address existing data errors. If you did not gather and import employment activity data, skip to Review Weights below. Once you’ve cleared up all remaining errors, you’ll be ready to publish AAP documents.
Review Employment Activities ![Activities Icon Activities Icon]()
Unless your company consistently retains its workforce and has few promotions annually, by far the bulk of the data that you must gather will be the employment activities, so it stands to reason that the potential for data errors increases with the volume of employment activity data. Whether you have few or thousands of employment activity records, you can likely clear up most data errors by running an automatic error check and/or by spot-checking data, but you won’t discover the bigger picture until you run the Disparity Analyses in the Support Data document. To fine-tune data, you may need to return to this section of the manual after running and reviewing your AAP reports.
- Run Automatic Error Check
-
TCAAP has an Error Check tool available that searches the Activities data table for missing or invalid data. Follow the steps below to run an Error Check on remaining data.
- Click the Error Check icon to open the Error Check window.
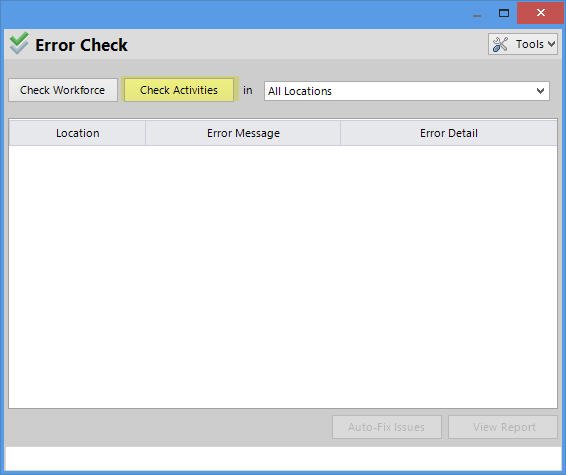
- In the Error Check window, click the Check Activities Data button. The program works its way through the Activities table to find errors. while cross-checking all data tables to search for fixes.
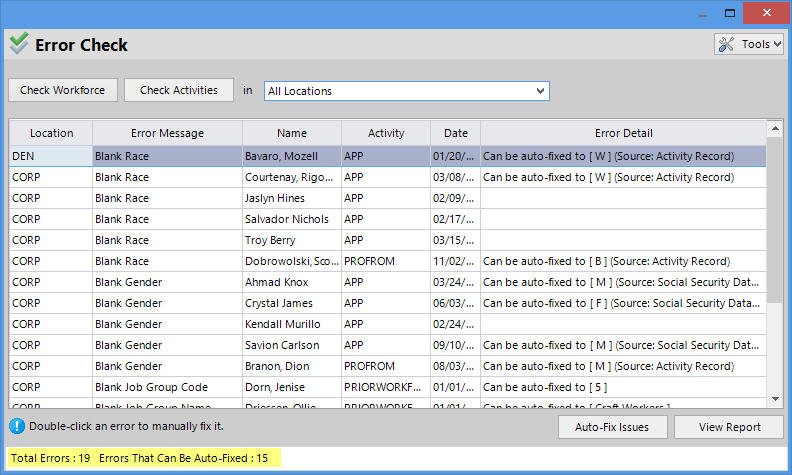
- When the program finishes its run-through, a list of errors appears (skip to Review Weights if no errors arise). The program has the ability to auto-fix some data, but only if it finds a reference source within the workforce-related and available Activities data. If it can auto-fix data, the Auto-Fix Issues button becomes active. If the program cannot auto-fix errors, the button remains gray.
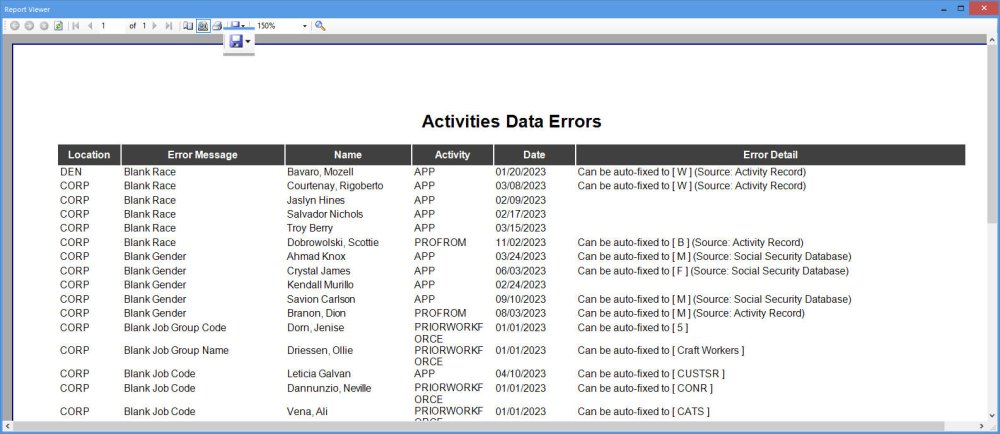
- Click View the Report to preview the list of errors on screen, and save the document in PDF format for later reference.
- Close the preview.
- Open the saved Activities Data Errors pdf file and review it to determine how you wish to proceed. Use one of the following instructions to proceed, and then use the Activities Table Fields list further below as a guide to determine what must be fixed and why.
- If you decide that you want the program to Auto-Fix the issues:
- Click the Auto-Fix Issues button.
- Click Yes in the confirmation pop-up.
- Wait for the Activity Data Errors – Fixed report to appear.
- Save the Activity Data Errors – Fixed report to PDF so that you can refer to it later if necessary.
- Close the preview.
- Wait for the Auto-Fix Results pop-up to appear, and click OK.
- Investigate remaining errors to determine whether they can be manually fixed. Refer to the Activities Table Fields list below to determine what must be fixed and why.
- Click the Auto-Fix Issues button.
- If you decide that errors are minimal and can be fixed manually:
- Double-click on the first data error that you wish to fix.
- The table where the error is located will pop-up. Follow the Add, Edit, or Delete Activities Records instructions below to fix the error.
- Close the data table to return to the Error Check list.
- Repeat the process to address all errors. If you are not able to obtain missing information immediately, you may close the Error Check and re-run it later after finding your answers.
- Double-click on the first data error that you wish to fix.
- If you decide that the errors are too numerous:
- Investigate the errors to determine what caused them.
- Follow the Export, Fix, & Re-Import Employment Activity Data instructions below, or
- Follow the Add, Edit, or Delete Activities Records instructions below to delete all imported records and start from scratch.
- Investigate the errors to determine what caused them.
- Click the Error Check icon to open the Error Check window.
- Activities Table Fields
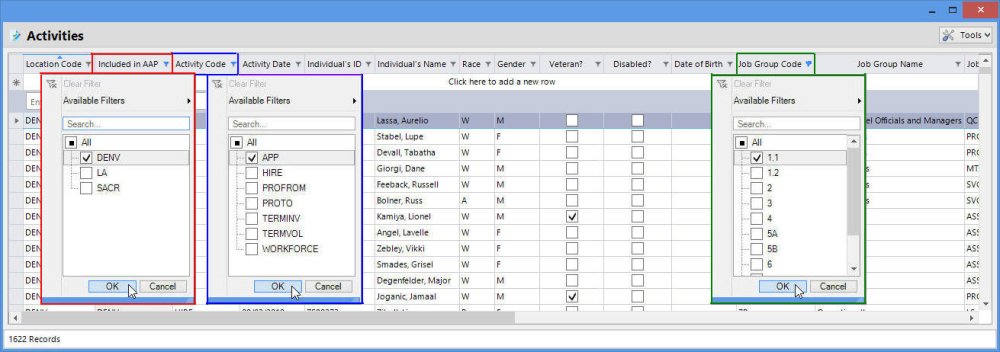
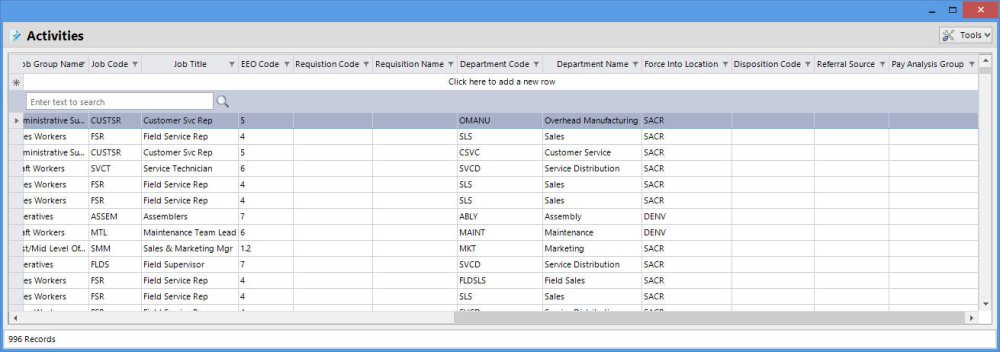
To review employment activities within the program, you may need to know a little bit about the filter tool in the Activities window. Follow the instructions below to learn how to filter Activities data, and refer to the table below it to understand the contents of each field.- How to Filter Employment Activities
-
To filter a column, click on the small filter
symbol beside the first header by which you wish to filter. Uncheck the items in the displayed filter list to narrow down your review, and then click OK. The program allows for multiple filters at one time. Again, a good place to start is to filters activities by Included in AAP OR Location Code, then Activity Code, then by Job Group Code.
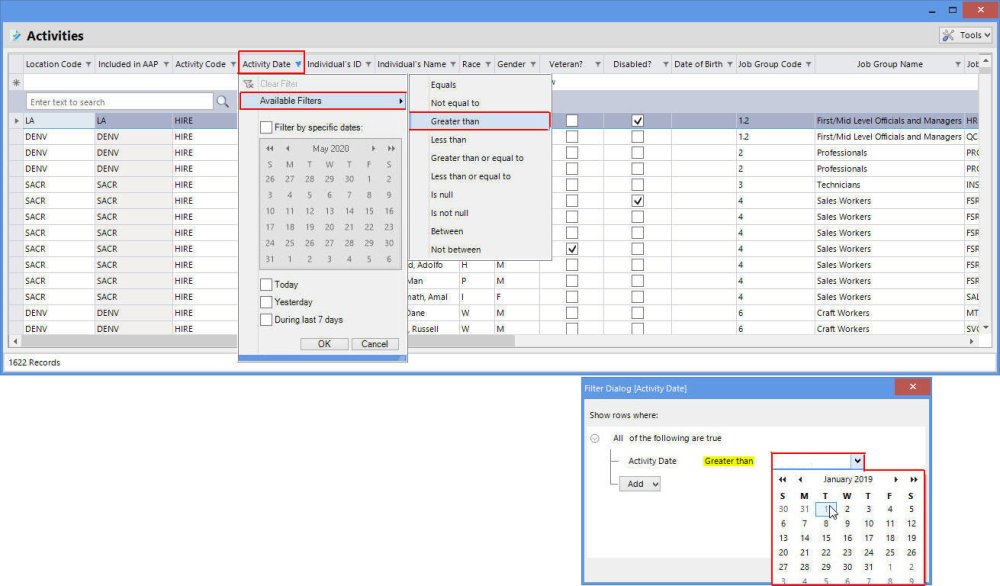
You may need to filter by date as well if you have multiple years’ worth of data in the table.
- Location Code: the codes in this field indicate the location where each activity occurred, not necessarily where they will be counted.
- Included in AAP: the codes in this field indicate in which location’s Disparity Analysis the activities are counted. In order to be considered in a Disparity Analysis, activities must be included in a location that has a written AAP; ensure that each activity is accounted for in a location with a written AAP. Revisit the Locations Table section in the Review Workforce Data chapter if something is amiss.
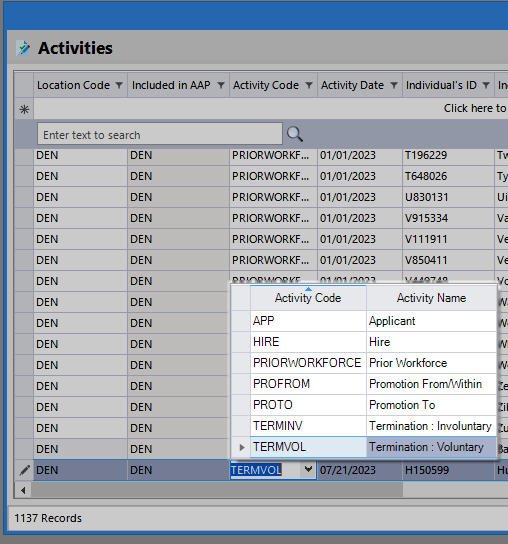
- Activity Code: only Priorworkforce, Applicant, Hire, Promotion From and Termination (Involuntary and Voluntary) data are analyzed by default in the Disparity Analysis Reports. Promotion To activity is included in the Goals Progress Reports. Use column filters to compare totals in each activity within the reporting period to the totals in your import file.
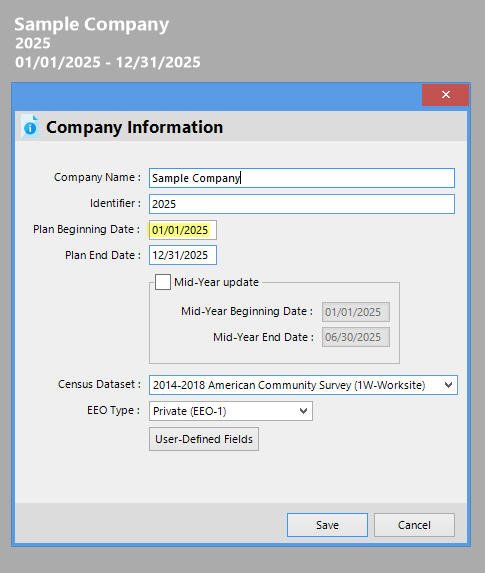
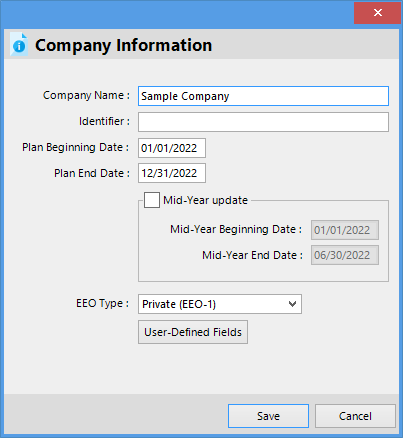
- Activity Date: this is the date the activity occurred. The program by default pulls by date the data to be analyzed in the Disparity Analyses and Goals Progress Reports, using data only within the 12 months prior to the beginning date of your AAP. The beginning date of your AAP is shown on the main screen (see yellow highlighted dates in the image below), and can be adjusted by clicking File and selecting Company Information. This will pull up the Company Information window wherein you can click into the Plan Beginning Date and Plan End Date to adjust them.
In the image above, the beginning date of the Sample Company’s AAP is January 1, 2025, so the program will by default pull activities data for analysis within the period January 1, 2024 to December 30, 2024.
- Individual’s ID: employee ID’s are not used in reports; instead, the program uses individuals’ IDs in the Error Check process to cross-reference and glean missing demographic information. For this reason, employee IDs for all except applicant records should be consistent with all workforce data. Applicants may have different or no ID.
- Individual’s Name: the names of individuals are not required and are not published on any required report, but they are useful for data investigation by you and by the Error Fix function.
- Race: races are the EEOC-recognized race/ethnicity designations. Except for applicant race data, which is provided to companies voluntarily, race is required in all other activities in order to run valid Disparity Analyses and Goals Progress reports. If an employee has not disclosed his or her race, visual determination is permissible.
- Gender: gender refers to the binary gender designations recognized by the EEOC: male and female. All activity records except applicants require race in order to run valid Disparity Analyses and Goals Progress reports.If an employee has not disclosed his or her gender, visual determination is permissible.
- Veteran?: this field displays employees’ and applicants’ Protected Veteran status. These are included in the Data Collection Analysis of Protected Veterans. The records of individuals who have not disclosed their Protected Veteran status will be counted as “Not a Protected Veteran.”
- Disabled?: this field displays the required Individuals With Disabilities status. These are included in the Utilization Summary and Data Collection Analysis of Individuals with Disabilities.
- Date of Birth: this optional field can be used to run not-required Disparity Analyses by age.
- Job Group Code: Disparity Analyses and Goals Progress reports are by default run by Job Group Code; any activity lacking a code will be excluded from reports. Job Group Codes should be consistent among all data in order to be analyzed correctly.
- Job Group Name: Job Group Names are displayed on various reports and should therefore be spelled consistently within the Activities table, as well as in comparison to the job groups in the Job Groups table.
- Job Code: the program runs Disparity Analyses by Job Code if statistical disparity is found on the Job Group level; any activity lacking a code will be excluded from reports. Job Codes should be consistent among all data in order to be analyzed correctly.
- Job Title: Job Titles are displayed on Disparity Analyses by Job Code and should therefore be spelled consistently.
- EEO Code: EEO-1 Codes can be used to run not-required supplemental Disparity Analyses, but otherwise do not appear on reports.
- Requisition Code: the program runs Disparity Analyses by Requisition Code if statistical disparity is found on the Job level.
- Requisition Name: Requisition Names are displayed on Disparity Analyses by Requisition Code and should therefore be spelled consistently.
- Department Code: Department Codes can be used to run non-required supplemental Disparity Analyses, but otherwise do not appear on reports.
- Department Name: Department Names are displayed on Disparity Analyses by Department Code and should therefore be spelled consistently.
- Force Into Location: this is an optional field.
- Disposition Code: Disposition Codes can be used to filter non-required supplemental Disparity Analyses, but otherwise do not appear on reports.
- Pay Analysis Group: this is an optional field.
- Export, Fix, and Re-Import Employment Activity Data
-
- Export Activities Records
By exporting data, you are not physically removing any records. Follow the Add, Edit or Delete Activities Records instructions further down for instructions on deleting records.- Back up: your company.
- Open the Activities window.
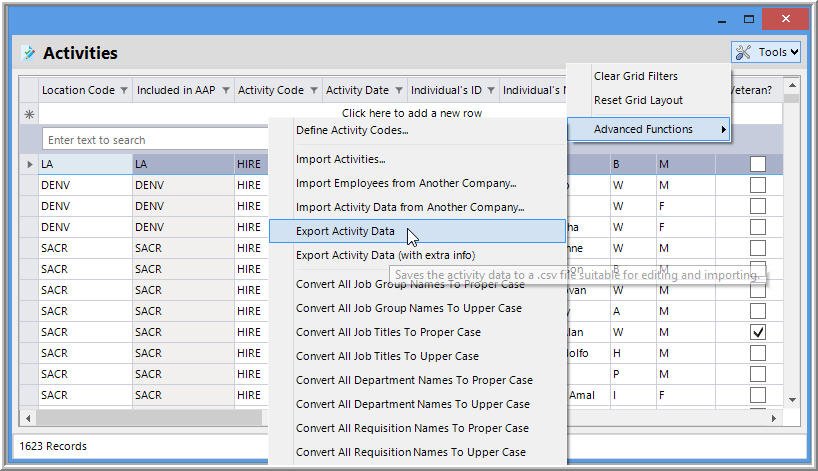
- Click Tools and select Advanced Functions, and then Export Activity Data.
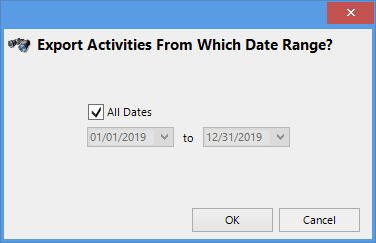
- Select the date range of the data you wish to export. If you are not certain of the date range, click All Dates.
- Click OK to export and open a .csv file, which opens in Excel or other spreadsheet program, but may not pop up in front of The Complete AAP.
- TCAAP automatically saves the .csv file in a specific location where your program’s data is stored, but you should save a copy in .xlsx to a location that you can readily recall.
- Close the Activities window.
- Back up: your company.
- Fix Activities Records
-
- If you have closed the .xlsx export file, locate and open it.
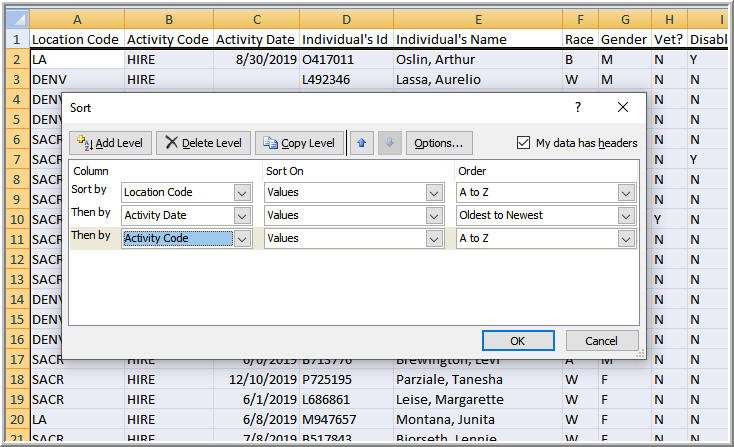
- Sort the file by Location Code, Activity Date, Activity Code, or any other column that helps ensure that you edit the correct data.
- Find and adjust only the data that are wrong, keeping in mind that the exported data may include multiple years’ worth of data.
- Save your work in Excel, and then re-save the file in .csv format keeping in mind that .csv files retain values in only the active tab; formatting such as highlighted or colored text is not retained, and filtered, frozen, or hidden columns and rows may be deleted from your file upon saving it.
- Close the export file.
- If you have closed the .xlsx export file, locate and open it.
- Re-Import Activities Records
-
- Return to the company in question in The Complete AAP.
- Open the Activities window.
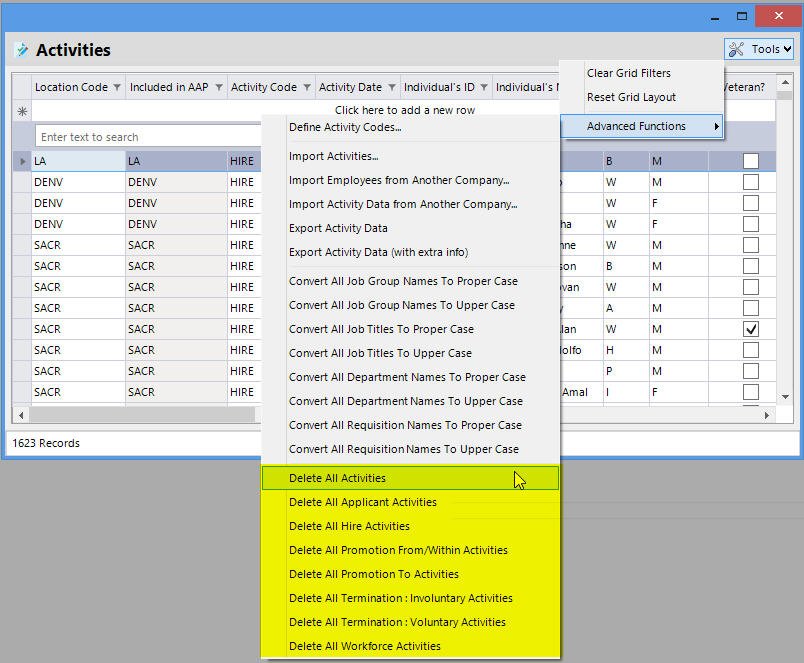
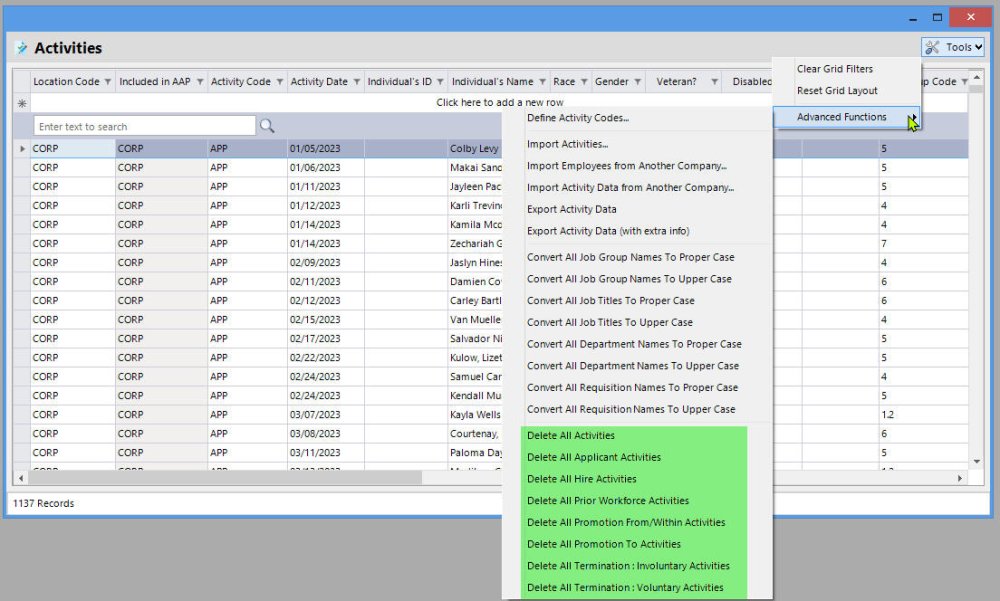
- Select Tools and Advanced Functions, and then select the appropriate Delete… function. IMPORTANT: in order to prevent duplication of data, it is very important that you repeat this and the next step for every activity in your import file; also be careful not to delete data that are not in your import file.
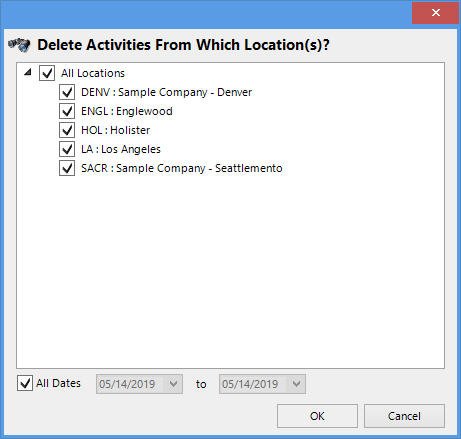
- Select the dates and locations of the data you wish to delete and press OK. IMPORTANT: it is crucial that you delete activities in only the location and date range that you are re-importing.
- Select Tools and Advanced Functions, and then select Import Activities.
- Click the Browse (…) button to locate and open the edited .csv file, and then click Import.
- Double-check the data to ensure that your changes were captured.
- Close the Activities window.
If at any point you need to begin the above process again, you may restore your backup and start with step #2 above.
- Return to the company in question in The Complete AAP.
- Add, Edit or Delete Activities Records
Utilize the Add, Edit and Delete functions knowing that connections may exist between the Activities and Location tables. The connections are denoted by read-only fields that are grayed out. The one Read-only field in the _Activities table ties back to the Locations table.- Edit a Record
- Open the Activities table.
- Search for the record that you wish to edit, or filter data to locate a group of records.
- Click into an individual cell to use a pull-down or to overwrite what is shown. To edit only a portion of a cell’s content, click twice into it.
- Press the Enter key on your keyboard or simply click off the row to capture the edited data.
- Open the Activities table.
- Add a Record
- Open the Activities table.
- Click the area that reads Click here to add a new row.
- Click into any white cell and use the provided drop down menu to select an item, or simply start typing, filling every possible cell.
- Press the Enter key on your keyboard or click out of the row you’re editing to add the record to the table. You can search for the record to edit further.
- Open the Activities table.
- Delete a Record
-
- Open the Activities table.
- Search for the record that you wish to delete.
- Right-click on the record and select _Delete ______. _
- Resolve any pop-ups that appear.
- Open the Activities table.
- Delete All Records
The instructions for deleting all records from the Activities table are different than those in the Review Workforce Data chapter. Proceed with caution.
- Open the Activities table.
- Click Tools->Advanced Functions, and select Delete All _____.
- A pop-up will appear from which you may select all locations’ or a specific location’s data for all dates or only within a specific date range.
If you have a filter applied in the Activities window when you selected this Tool, click the Visible Records Only? box to delete only those records you’ve filtered.
- Click OK.
- You may re-import or manually key in replacement data if necessary.
- Open the Activities table.
Review Weights ![Weights Icon Weights Icon]()
If new to the concept of “weights” in affirmative action, click What Are Weights below.
- What Are Weights?
-
The OFCCP requires contractors to sets goals by comparing percentages of women and minorities in its workforce (i.e. utilization) against percentages of women and minorities available to fill positions in the company (i.e. availability). The availability of women and minorities depends entirely on the company’s weighted recruiting methods and source selections; therefore, “weights” in the world of affirmative action refer to the importance contractors place on different recruiting methods.
Recruiting Methods and Sources
The OFCCP posits that there are two general methods that contractors utilize to recruit employees: external and internal recruitment.
- External recruitment sources are places outside of your company, including but not limited to:
- individuals in a selected U.S. Census Area who possess similar job titles, and
- individuals who have recently graduated from selected schools with selected awards in specified disciplines.
- Internal sources include but are not limited to employees within the company who are promotable, transferable, and trainable to move into a higher-level EEO-1 category or Job Group.
The Complete AAP has two data sources built in for external recruitment and one data source built in for internal recruitment. The program has a third custom source for which you must provide demographic data.
- External: U.S. Census EEO-1 Tabulation Data.
- External: Schools (i.e. IPEDS data).
- Internal: Promotables (i.e. job groups within your workforce also referred to as “feeders”).
- Custom (internal or external): Custom factors can include any internal or external formal group of potential recruits, such as those in an internal specialized training program or in an external labor union.
How Does Your Company Recruit?
Setting weights can often involve an educated guess, but for a more concrete method of determining recruiting methods, consider:
- Historic Recruiting:
- Consult with your company’s recruiter to determine external sources used to recruit individuals, and review promotion records to determine internal movement among job groups. You can then determine the internal versus external ratio by calculating raw hire and promotion totals. The program has a built-in Dynamic Weights function that can determine internal versus external historic recruiting by analyzing the employment activities imported into the Activities table; the Set Weights for Me Section below provides instruction.
- Consult with your company’s recruiter to determine external sources used to recruit individuals, and review promotion records to determine internal movement among job groups. You can then determine the internal versus external ratio by calculating raw hire and promotion totals. The program has a built-in Dynamic Weights function that can determine internal versus external historic recruiting by analyzing the employment activities imported into the Activities table; the Set Weights for Me Section below provides instruction.
- Future Recruiting:
- Set your recruitment weights and sources to reflect how your company anticipates addressing trends of underutilization of women and minorities.
- Set your recruitment weights and sources in anticipation of an expected surge or reduction in workforce.
- Set your recruitment weights and sources to reflect how your company anticipates addressing trends of underutilization of women and minorities.
- External recruitment sources are places outside of your company, including but not limited to:
Follow one of these methods to assign weights:
- If you trust the program to set weights by using whatever resources are available to it, follow the Set Weights for Me instructions below.
- If you wish to have more involvement in the weight setting process, follow the I’ll Set My Own Weights instructions below.
- Set Weights for Me
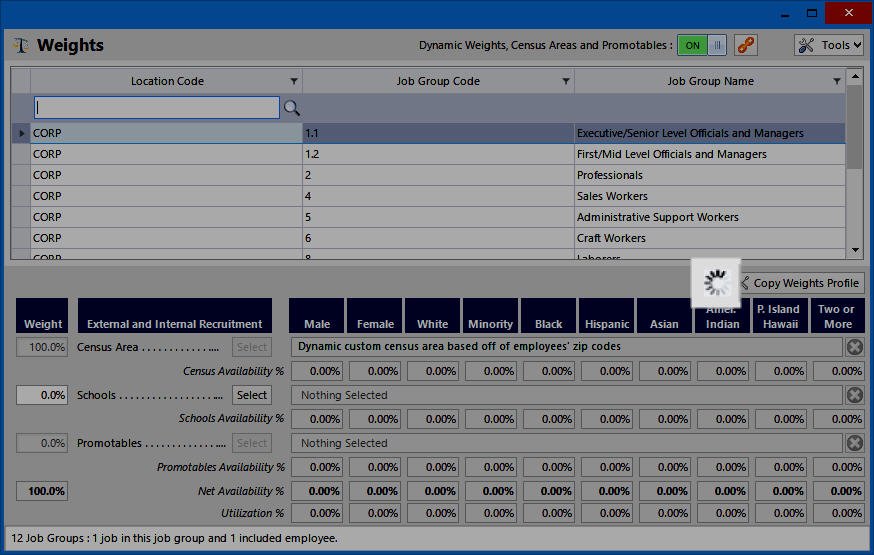
- Click the Weights icon. You may see the program thinking for a moment as it works through calculations.
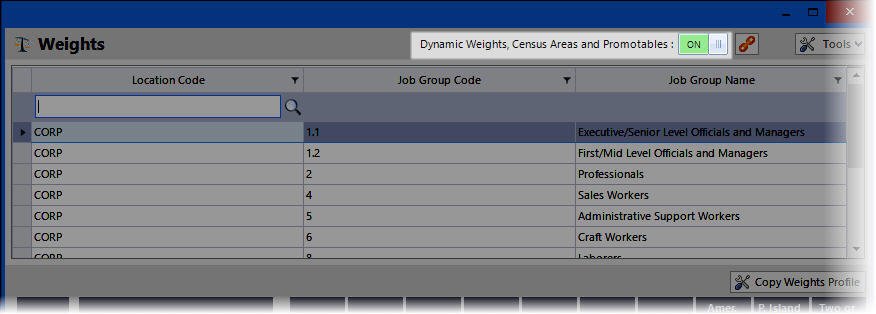
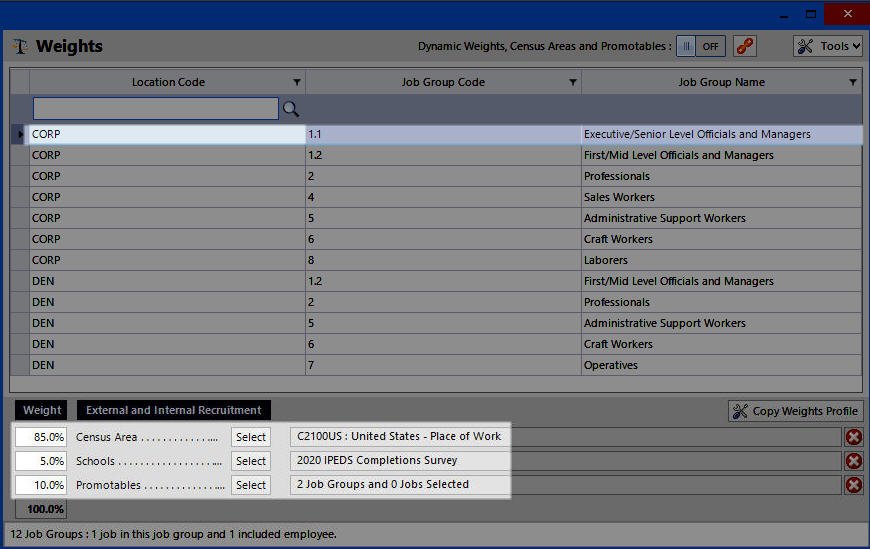
- The Dynamic Weights, Census Areas and Promotables switch is by default set to On, but if it’s off, that signals that it was switched off when the prior year’s AAPs were prepared. If it’s off, review the weights to make sure that you are okay to overwrite them with what the program assigns. Click the sliding bar
to switch on Dynamic Weights.
- Review the weights. If adjustments are needed, switch off the Dynamic Weights function and use the I’ll Set My Own Weights below to make adjustments. Do not switch back on the Dynamic Weights if you make adjustments, as they will be overwritten if you do.
- Close the Weights table.
- Continue the review process with Review Prior Goals.
- Click the Weights icon. You may see the program thinking for a moment as it works through calculations.
- I’ll Set My Own Weights
-
Review Existing Weights
- Click the Weights icon.
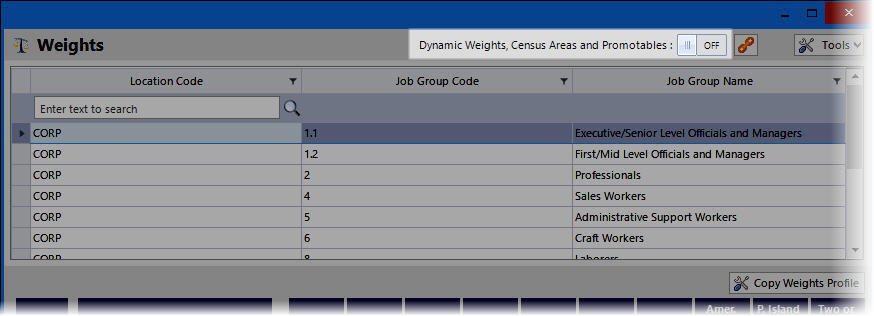
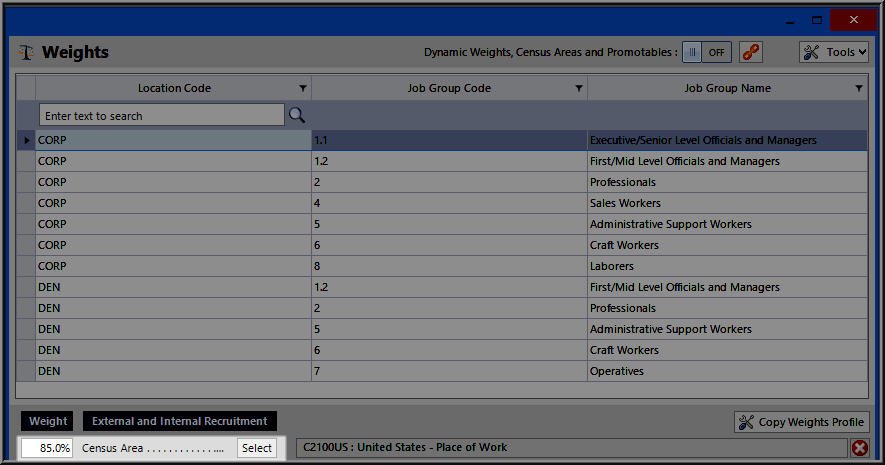
- In the window that pops up, switch off the Dynamic Weights, Census Areas and Promotables tool if it is set to On.
- Click on the first job group listed; the weights and data sources you see below the listing of job groups are assigned only to the selected job group. As you click on the other job groups, the weights and data sources may change.
- Review the weights and sources of each job group to determine whether they reflect the reality of your company’s recruiting practices. If they are satisfactory, proceed to Review Prior Goals. If you see that adjustments need to be made, follow the Set or Adjust Recruitment Weights instructions below.
Set or Adjust Recruitment Weights
- If the Dynamic Weights, Census Areas and Promotables tool is on when you enter the Weights table, click the sliding bar
to switch it off.
- Click on the first job group that needs adjustment.
- Under the Weight column, double-click into the cell beside the first relevant factor.
- Type the percentage that represents how much of the current location’s total recruitment is focused on that factor.
- Assign the remaining weight, if any, to another factor or factors.
- Make sure that the total in the bottom-most cell under the Weight column adds up to 100%.
- Click the Select button beside the first weighted factor. Click on Sources below to view instructions for source selection for the given factor.
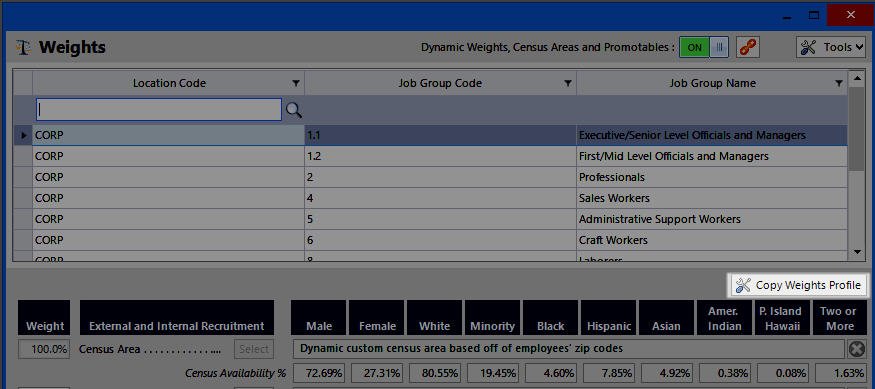
- Once your source is selected, click on the next job group in your Weights screen and repeat these steps, or click the Copy Weights Profile button to assign your weights and/or sources to some or all other job groups.
- Sources
The source window for each factor is different. Click on the …Source buttons below to learn more about each.
- Census Area Source
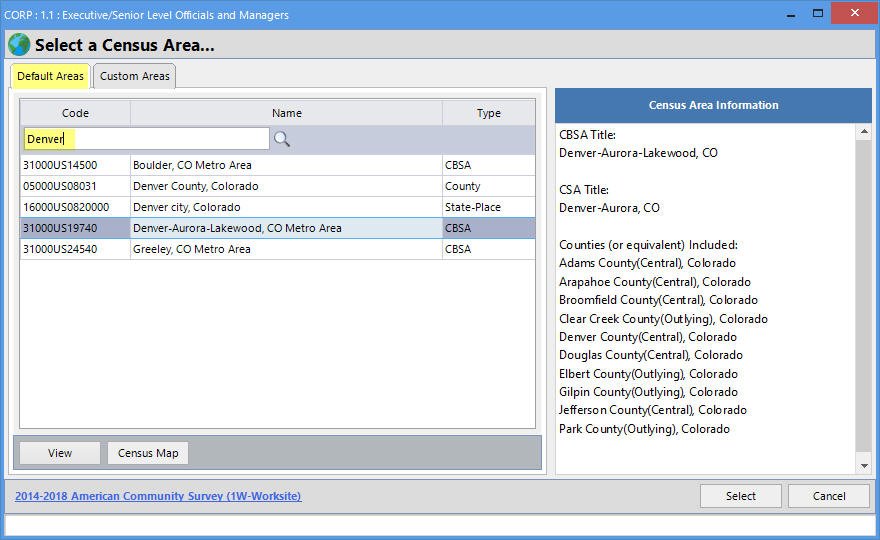
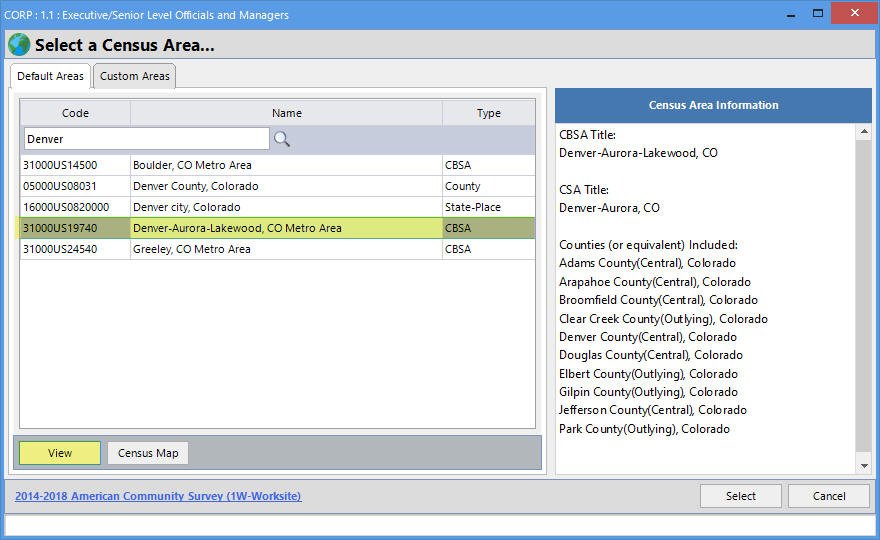
For the Census Area factor, search for and choose a U.S. Census Area that represents the geographic area from which individuals are/were/will be recruited to fill positions in the job group in question. See Census Area Options below for more advanced census area options such as combining census areas and switching to Residence data if you are not able to find the desired census area under Worksite.
Once you find the census area that you wish to use, double-click on it to select it or single-click it and press Select.
Census Area Options
- Force Dynamic Census Areas
-
Follow the instructions below If you would like the program to create a custom census area using the zip codes of employees’ work locations.
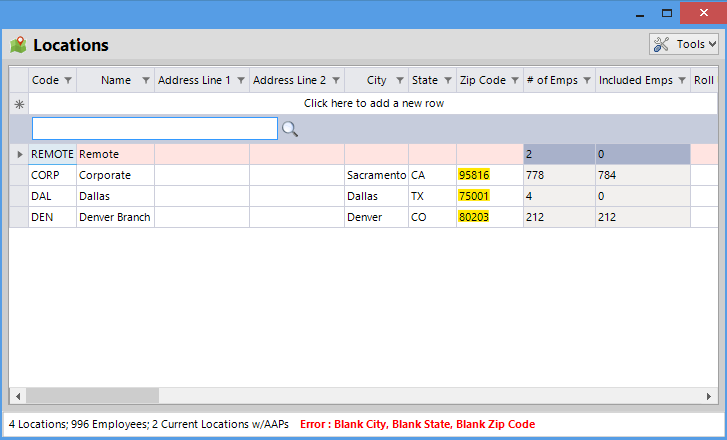
- Click the Locations icon and make sure that a zip code is assigned to each location in the Locations table. You may leave any remote/work from home locations’ zip codes blank; the program will use the entire U.S. for location codes with no assigned zip code.
- Close the Locations table, and click on the Weights icon.
- Click the Tools button, and select Options.
- In the window that pops up, check the box beside Force Dynamic Census Areas?, and then close the Options window to save the option.
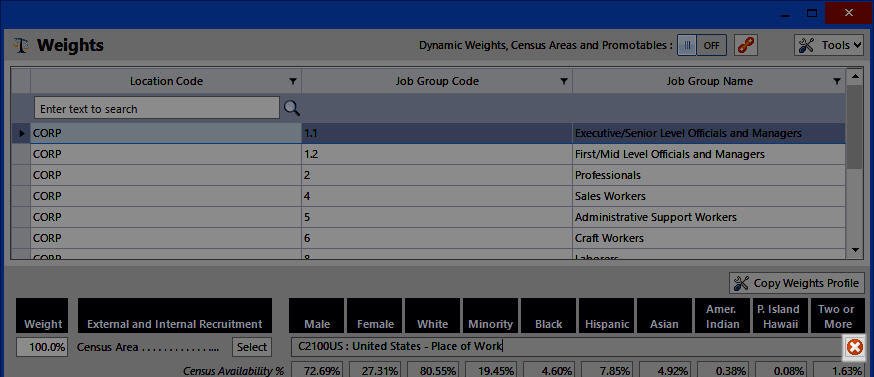
- The Weights window will now display “Dynamic custom census area based off of employees’ zip codes” as each job group’s census area. The makeup of each census area can be viewed by hovering your mouse over the aforementioned text displayed.
- Continue reviewing any remaining job groups’ Weights.
- Click the Locations icon and make sure that a zip code is assigned to each location in the Locations table. You may leave any remote/work from home locations’ zip codes blank; the program will use the entire U.S. for location codes with no assigned zip code.
- Select Census Areas
-
- If you need to select a new or choose a different census area than is shown for the job group on which you are positioned, click the red X on the right side of the Census Area row.
- If the X is grayed out, you may have the Dynamic Weights option turned on. Dynamic Weights must be off in order to select your own census area.
- Click the Select button beside Census Area.
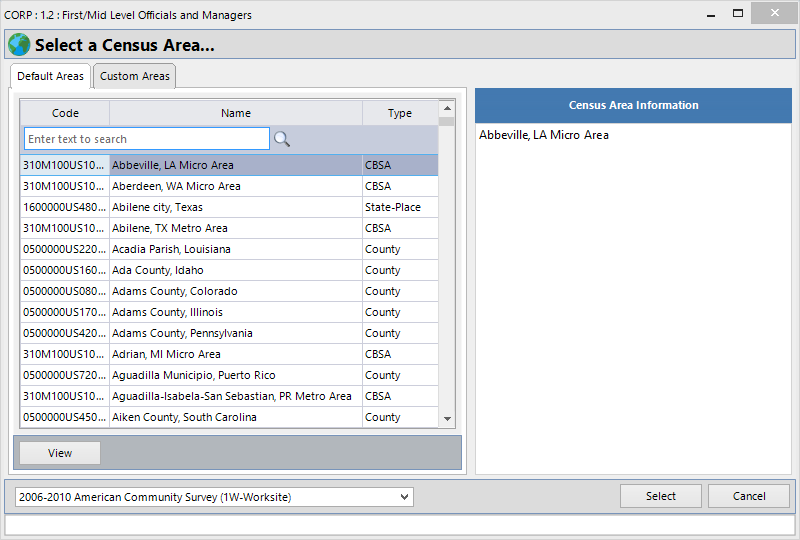
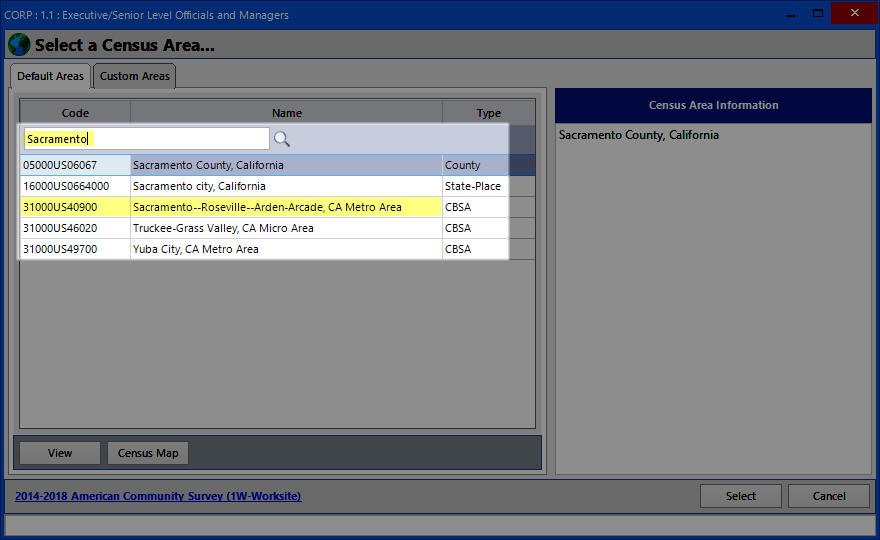
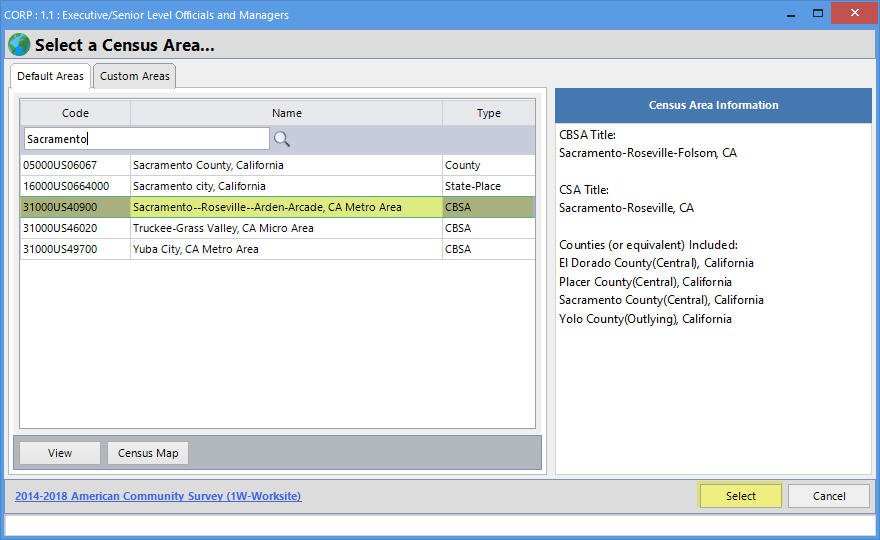
- In the window that pops up, type a search for the census area. You may need to scroll down to find the best fit.
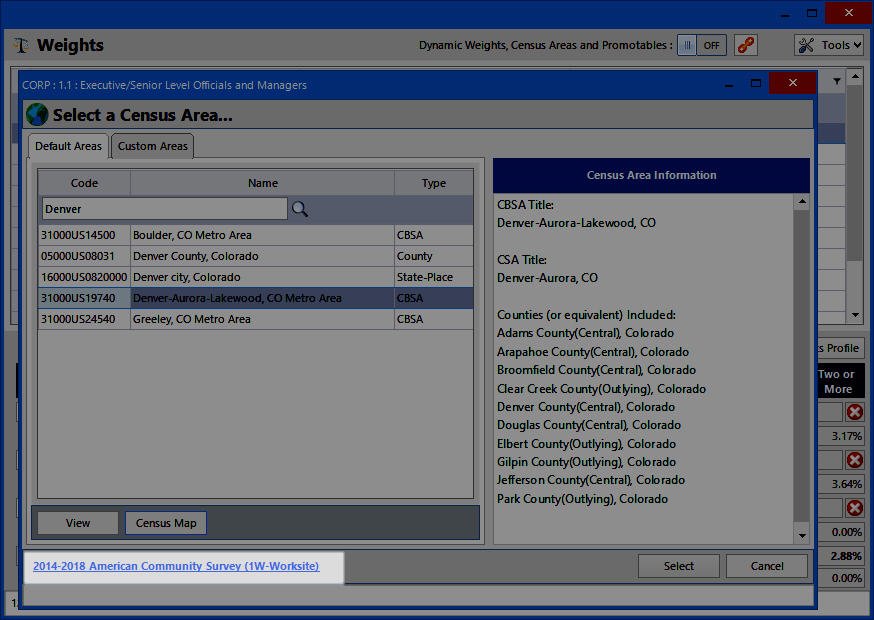
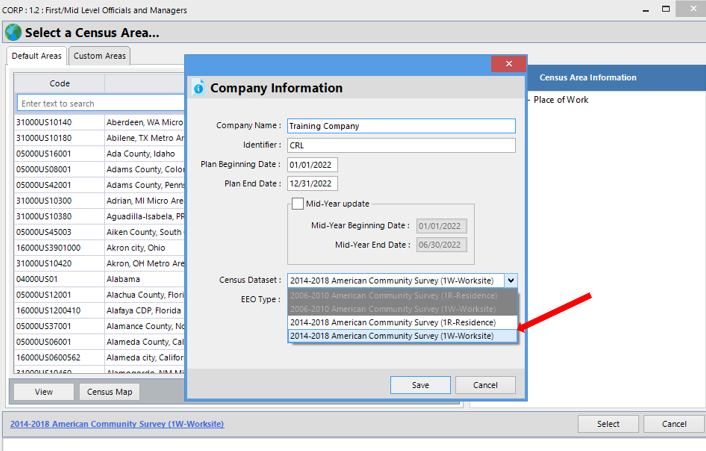
- If you are not able to find the area you are searching for, click on the currently selected census dataset.
- In the window that pops up, try switching to Residence or Worksite ACS.
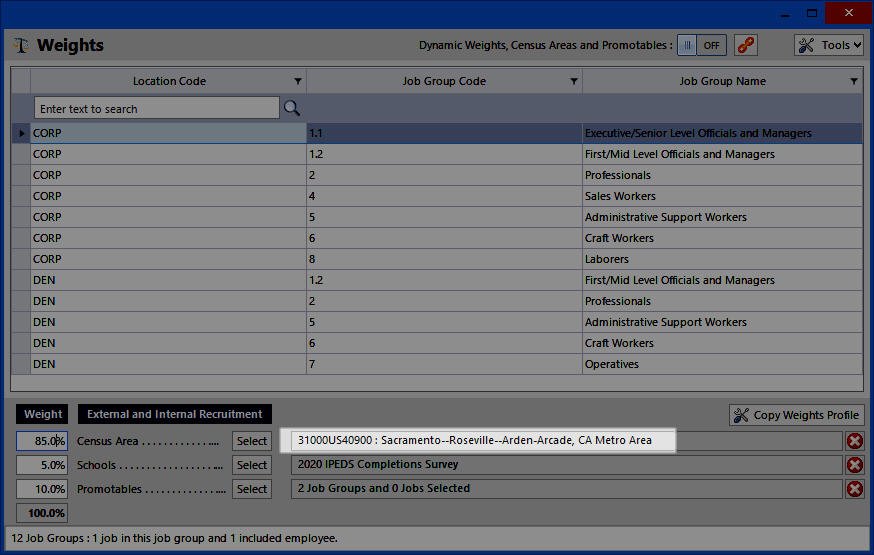
- Once you find and click on the census area you wish to select, click the Select button.
- Your census area will appear in the area beside Census Area.
- Follow the same steps for each job group for which you wish to select a census area, or use the Copy Weights Profile button at center right of the Weights window to set the same area for all job groups.
- If you need to select a new or choose a different census area than is shown for the job group on which you are positioned, click the red X on the right side of the Census Area row.
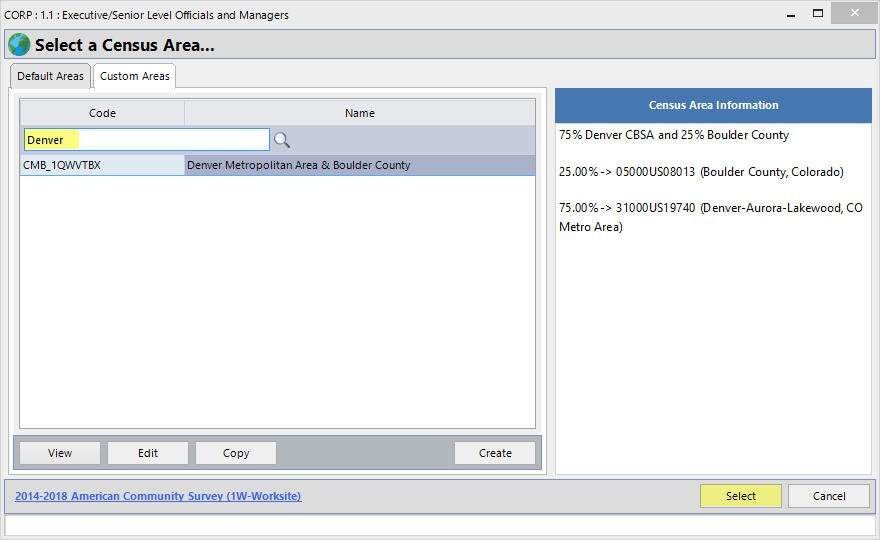
- Combine/Create Custom Census Areas
At times you may find it useful to combine several census areas to better reflect your geographic recruitment area.- Click Select button on the Census Area line.
- Search for the desired census areas to ensure that they exist in the U.S. Census Bureau dataset. If you see any areas highlighted beige, these “collapsed areas” are areas that cannot be combined with any other census area. Please see the FAQ for Weights at the bottom of this page/chapter for more information on collapsed areas.
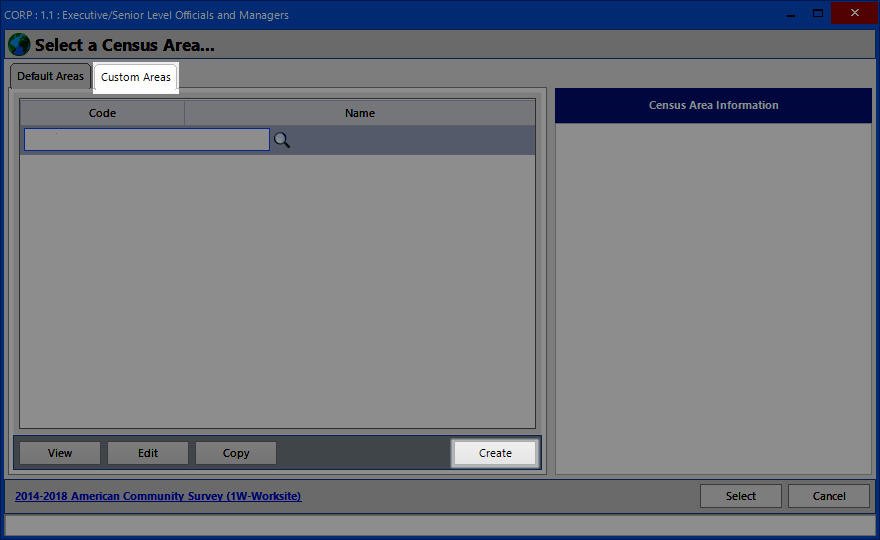
- When ready to combine census areas, click on the Custom Areas tab of the Select a Census Area window.
- Click on the Create button.
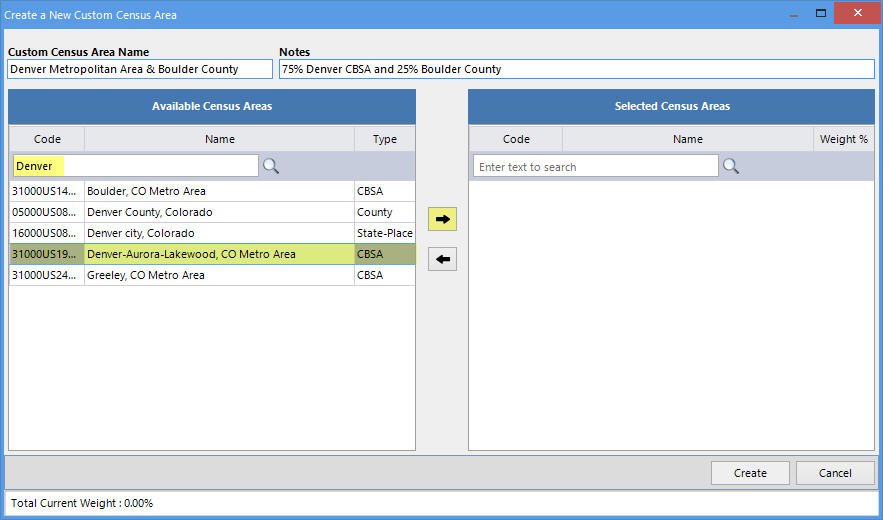
- Type in the Custom Census Area Name in the cell at the top left of the Create a New Custom Census Area window, keeping in mind that this title will appear in various reports.
Type in any notes that help describe the combined area in the cell at the top right of the window. Notes will not appear in any reports.
- Search for an area you wish to combine from the Available Census Areas column.
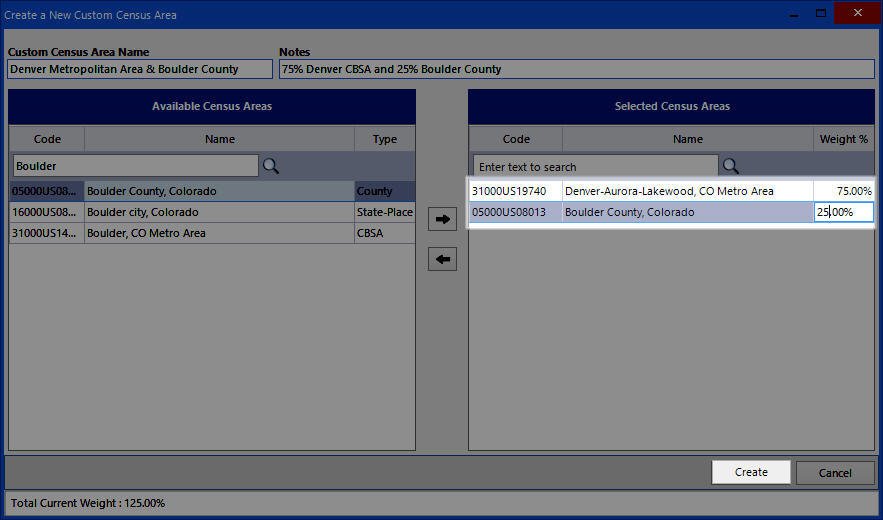
Double click the areas you wish to combine or use the right arrow to move them to the Selected Census Area column.
- Areas will be weighted equally by default, but you may click into the Weight % field to type alternative weights.
- Click Create to create your new custom census area.
- You will be returned to the Select a Census Area window’s Custom Areas list where you may select the newly combined area; the area will be available from that point for indefinite use in any AAP.
- Click Select button on the Census Area line.
- View Census Data
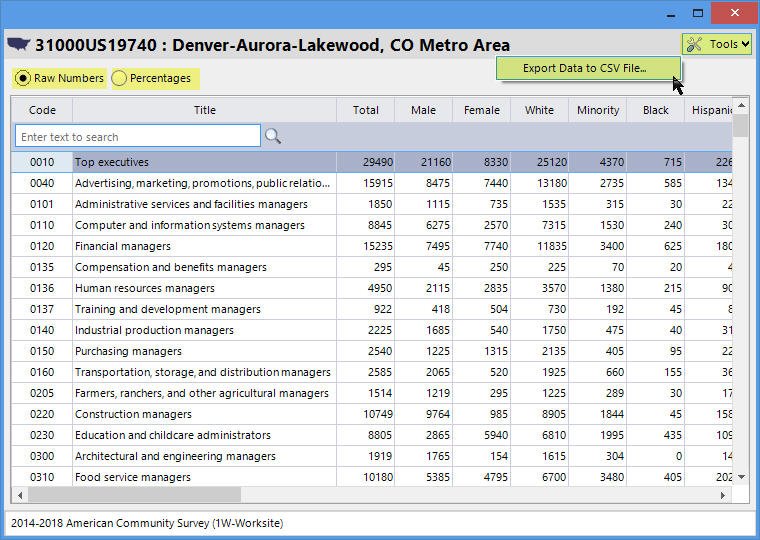
- Click to highlight a Census area and click the View button at the bottom left of the Select a Census Area window to view raw numbers or percentages of the selected area’s demographics.
- Click on the Options menu to print or export the raw numbers or percentages of the selected area’s demographics.
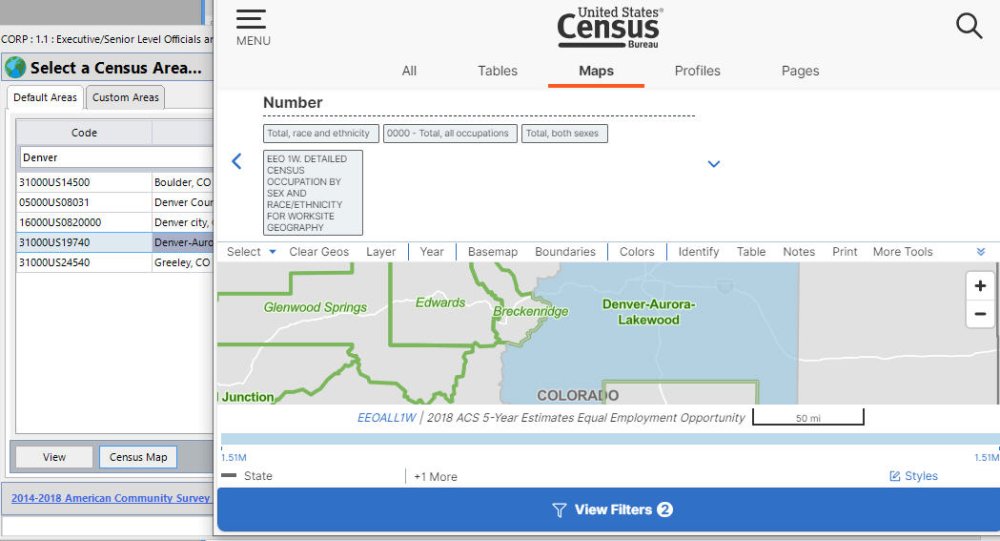
- Click on Census Map if you would like to see a visual representation of the selected area. This will take you to the data.census.gov Census – Map Results website.
This is only available when using the 2014-2018 ACS census data.
- Click to highlight a Census area and click the View button at the bottom left of the Select a Census Area window to view raw numbers or percentages of the selected area’s demographics.
- Worksite / Residence Data
The Complete AAP uses Worksite data by default, but you can easily switch between the two by clicking the selected dataset toward the bottom left of the Select a Census Area window and selecting your preferred dataset in the window that pops up.
- Worksite census data is compiled by the U.S.Census Bureau using Commuting Flow statistics in areas with a population of at least 50,000. Based on towns and cities rather than counties, this data set should be used for companies in larger metropolitan areas.
- Residence census data is compiled by the U.S. Census Bureau by combining data from the decennial census and ACS statistics in areas combined to meet the 50,0000 population minimum. Residence data can include one or more cities or counties. Because of the limitations of the data provided by the Census Bureau, the Assign census areas..ZIP code tools do not work with Residence census data.
- Worksite census data is compiled by the U.S.Census Bureau using Commuting Flow statistics in areas with a population of at least 50,000. Based on towns and cities rather than counties, this data set should be used for companies in larger metropolitan areas.
- Schools Source
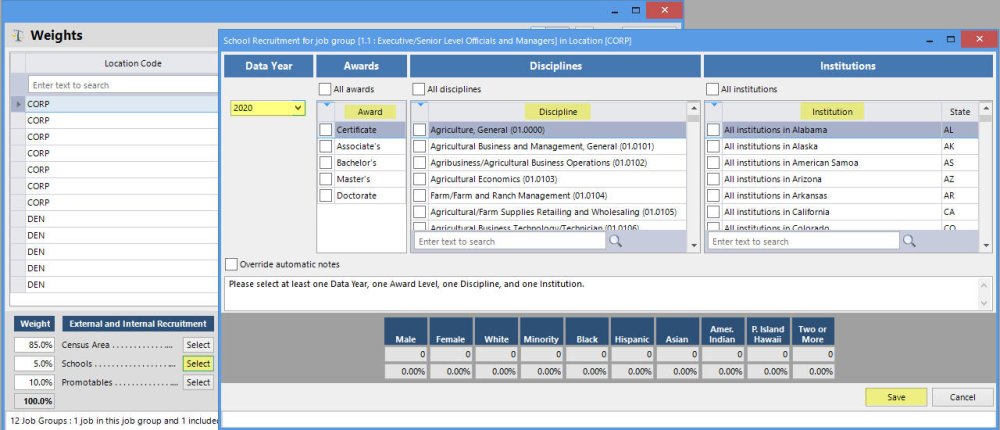
For the Schools factor, search for and choose Institutions, Disciplines, and Awards in the Data Year from which individuals are/were/will be recruited to fill positions in the job group in question.
- Promotables Source
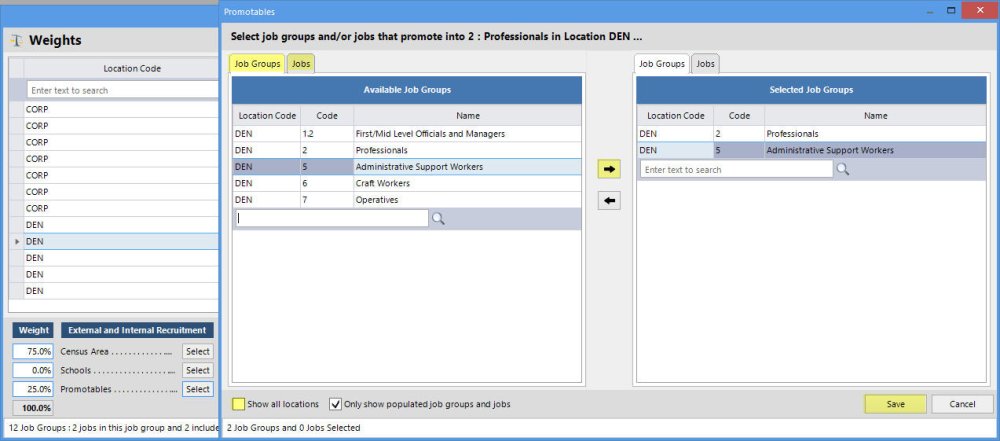
For the Promotables factor, double click one by one on populated job groups or jobs in any locations to choose the group of individuals who are/were/will be recruited to fill positions in the job group in question.
- Custom Factor Source
-
If you do not see this factor in your Weights screen:
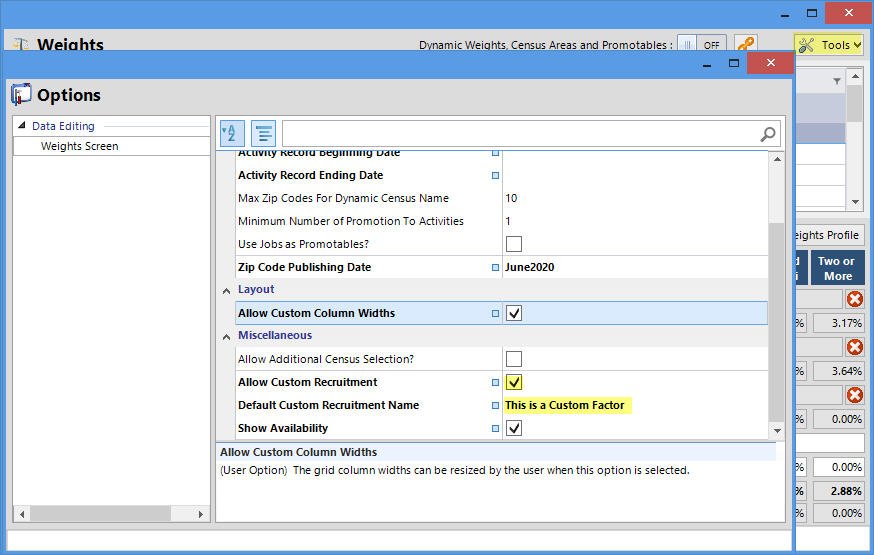
- click the Tools button, and select Options;
- click Allow Custom Recruitment; if you wish to use the same custom factor name for all job groups replace the text “This is a Custom Factor” with your text. Close the Options window.
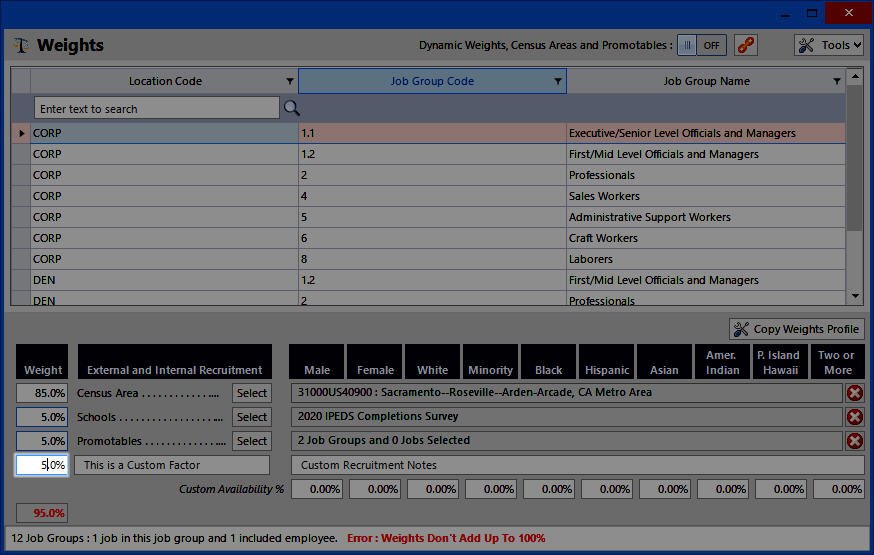
If or when you see this factor in your Weights screen:
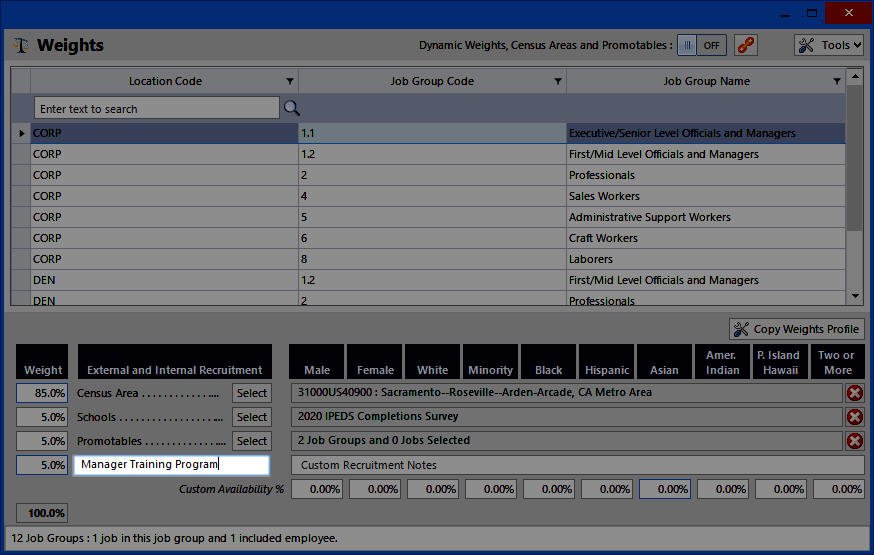
- assign the intended weight to the Custom Factor;
- type a name into the cell for this factor beneath the External and Internal Recruitment column if you want to use one different than the current;
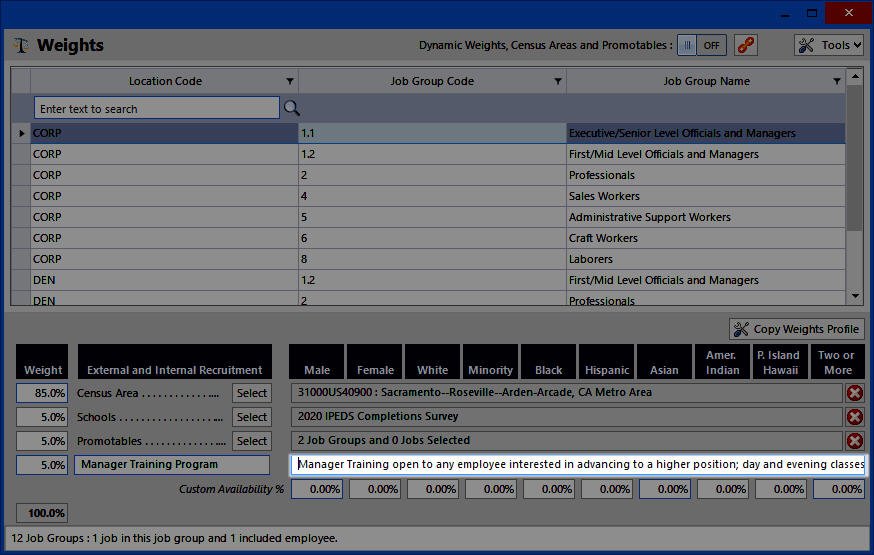
- type any Custom Recruitment Notes that you wish to display as footnotes on your published Availability Analysis;
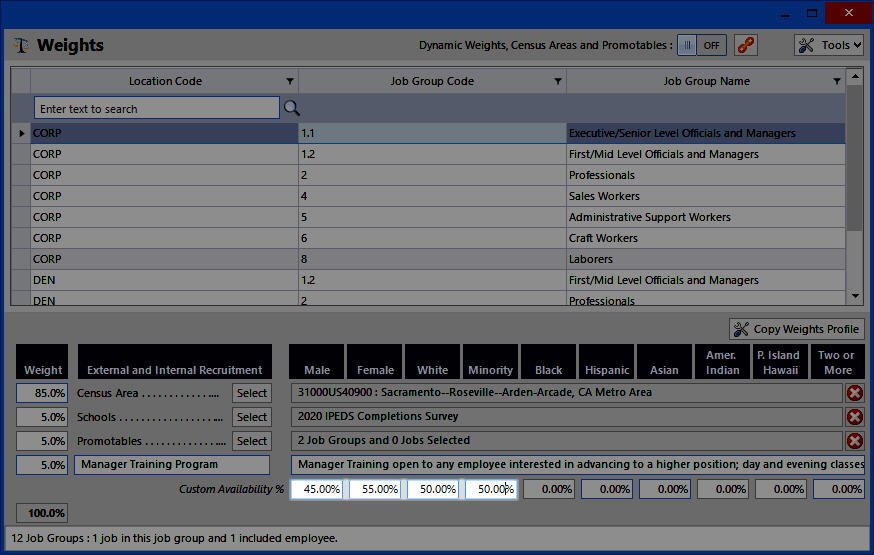
- type in at least the Female and Minority availability percentages beneath the Custom Recruitment Notes cell;
- when done, click on another job group or close the Weights screen to save.
- click the Tools button, and select Options;
- Click the Weights icon.
Review Prior Goals ![Prior Goals Icon Prior Goals Icon]()
If you did not have a prior AAP in place, skip this section and proceed to Review Outreach below. Otherwise, follow the instructions below before proceeding to Review Outreach.
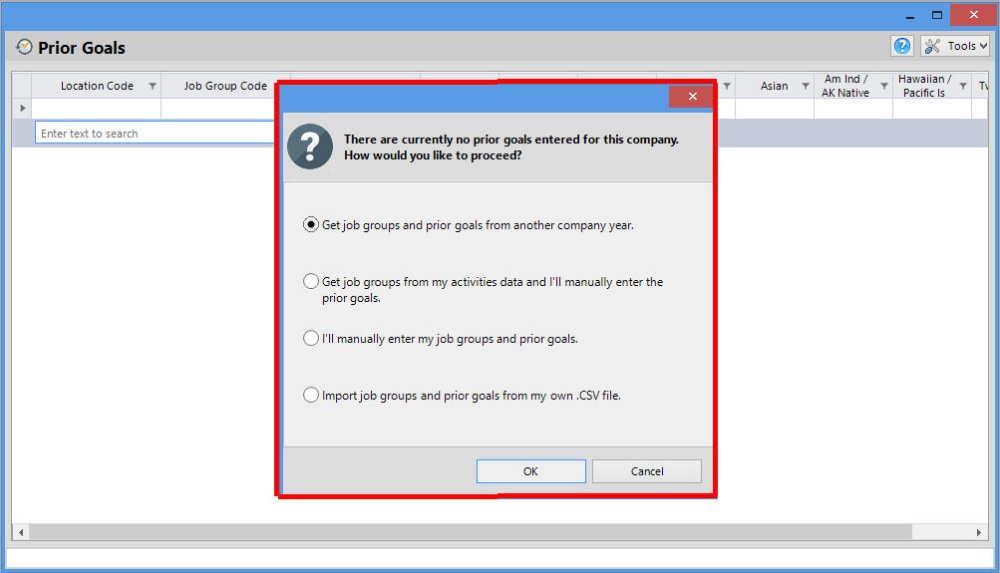
What you see when you click on the Prior Goals icon depends on how you began the process of completing your AAP. If you immediately see a popup reading “There are currently no prior goals…” pop-up, click on Populate Goals Progress Table below to determine which of the pop-up options to choose.
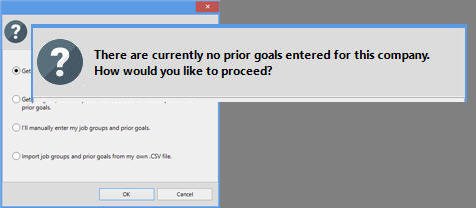
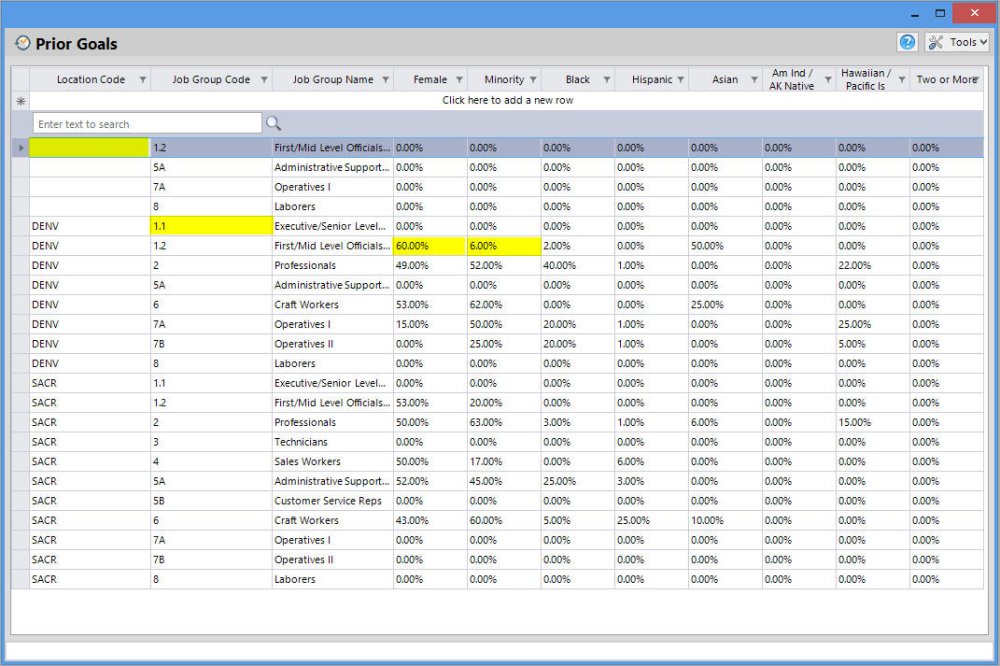
If you don’t immediately see a pop up that begins, consult the Prior Goals Table Fields to clear up any data errors and confirm successful job group and prior goal transfer.
- Populate Goals Progress Table
- Select Get job groups and prior goals from another company year if your company’s previous AAP was prepared in The Complete AAP and available in the Companies window. The Select the Company window will appear after you click this option, and you will need to select the company’s prior year record.
- Select Get Job Groups from my activities data and I’ll manually enter the prior goals if you wish to manually enter the prior goals percentages.
- Select I’ll manually enter my job groups and prior goals if you wish to type in all prior goals data.
- Select Import job groups and prior goals from my own .CSV file if you wish to import the previous goals information. This requires that you download and populate a Prior Goals template, which is redundant to entering prior goals directly into the program manually but helpful if you wish to share the prior goals with another licensed user. Selecting this last shown option will take you directly to the Import window where you will proceed with the usual import instructions. Once you’ve imported your .csv file, you may proceed to Review Outreach below.
- Select Get job groups and prior goals from another company year if your company’s previous AAP was prepared in The Complete AAP and available in the Companies window. The Select the Company window will appear after you click this option, and you will need to select the company’s prior year record.
- Prior Goals Table Fields
There are only a few items you need to review in your populated Prior Goals table.- Location Code: ensure that each entry corresponds with a Location Code that has “Included Emps” in the Locations table. Location Codes that do not match to a location with an AAP will be excluded from all reports.
- Job Group Code: ensure that Job Group Codes correlate to those in the Activities table. The program knows where to count hires and promotions to by matching Job Group Codes.
- Job Group Name: ensure that Job Group Names match those in the prior AAP.
- Female: ensure that the Female percentage goals match what was reported in your prior Annual Goals Report or its equivalent. Click into any cells that display incorrect figures, delete the incorrect figures, and type in the correct figures.
- Minority: ensure that the Minority percentage goals match what was reported in your prior Annual Goals Report or its equivalent.
- Black through Two or More: The Complete AAP by default does not display individual races on its reports, but you may edit these figures if you opt to display them in the Publish options for relevant reports.
Review Outreach ![Outreach Icon Outreach Icon]()
By regulation, federal contractors must undertake efforts to recruit protected veterans and individuals with disabilities (IWD).Recruitment efforts targeting veterans must go beyond the requirement to listing positions at the contractor’s local Employment Service Deliver System (ESDS). In both the Protected Veteran and Individuals with Disabilities AAPs, Government contractors must document which location performs the outreach, the name of the recruitment activity, the date of the activity (or document “ongoing”), a description of the activity, and an evaluation of the activity. These records must be reported in the contractor’s annual AAP. TCAAP has a designated table where users can document the activities, and even include outreach activities for women and minorities. Click the Outreach icon in the program to begin.
The table may or may not be populated when you open it, but in either case, you should import or key in new data, and update evaluations of any ongoing activities. Whether manually entering or importing, read through the Outreach Data Import Template and the Review Outreach Entries; the latter contains information on rolling up outreach activities.
- Outreach Data Import Template
-
Download an Outreach Activities template.
Click here to download the Outreach Activities Template.
Outreach Activities Data Template Definitions
Column Field Description Required? Why You Need It A Location Code The location of the facility to which the recruitment activity applies. Required Locations help us to ensure that recruiting sources are reported in the appropriate AAPs according to guidelines and regulations. B Recruitment Activity Name The names of outreach efforts specific to recruitment of veterans, individuals with disabilities, women, and minorities undertaken in the 12 months prior to your current AAP. Name persons and organizations your company enlists for assistance and support of recruiting, and developing on-the-job training opportunities for veterans. Examples of recruitment activities can include participation in job fairs, listing with advocacy groups, and sponsorship of events aimed to attract members of protected groups. Required In addition to reaching out and recruiting protected veterans and individuals with disabilities, contractors must annually review their outreach and recruitment efforts to determine efforts’ effectiveness in identifying and recruiting protected veterans and individuals with disabilities. If the efforts were not effective, contractors should employ alternative efforts. Affirmative action regulations covering women and minorities require contractors to develop and execute action-oriented programs designed to correct any problem areas identified. Listing recruitment activity helps satisfy that requirement. C Date of Activity The date of the activity if it is not ongoing. Required Data for the recruitment of veterans, individuals with disabilities, women, and minorities should include activity that occurred over the 12 months prior to the current AAP year. D Ongoing? Indicate whether the activity is ongoing. Required Data for the recruitment of veterans, individuals with disabilities, women, and minorities should include activity that occurred over the 12 months prior to the current AAP year. E Description A brief description of the activity, clarifying which protected group was targeted. Required Sample AAPs covering veterans, individuals with disabilities, women, and minorities include descriptors of outreach efforts. F Evaluation An evaluation of the effectiveness of the activity in recruiting members of the protected groups. Required Contractors should document each evaluation, including the criteria it used to evaluate the effectiveness of each effort, and conclusion of whether each effort was effective. G Include in Vets? Indicate whether you wish to include the activity in the AAP for Protected Veterans. Required Providing this information will help ensure that activity is included in the appropriate AAP. H Include in IWD? Indicate whether you wish to include the activity in the AAP for Individuals with Disabilities. Required Providing this information will help ensure that activity is included in the appropriate AAP. I Include In W/M AAP? Indicate whether you wish to include the activity in the AAP for Women and Minorities. Required Providing this information will help ensure that activity is included in the appropriate AAP.
- Format and Import Outreach Data
- Have your Recruitment Outreach Data template open. It is recommended that you save the template file in .xlsx format and in a location readily accessible from within The Complete AAP.
- Copy and paste data values from your list of outreach sources into the appropriate columns in the template file.
- Review your import file, checking for the following:
- ensure that the Location Code of every record in your Recruitment Outreach import file matches the Location Code of the proper location in the Locations table;
- ensure that you have run spell-check in your file;
- ensure that recruitment activities with specific dates include an evaluation on the outcome of the recruitment effort.
- Save your changes in Excel, and then, before saving the file in the required .csv format:
- remember that only the active tab will be saved;
- remember that all formulas will be converted to values when the file is saved to .csv format;
- ensure that all of the columns are visible and remain in the same order as the original import template;
- ensure that there are no blank rows between data; The Complete AAP will read and import data down to the first blank row it encounters;
- remove all filters;
- remember that you may keep the first row of headers in the file if you wish.
- Save your changes in .csv format in the original location where the template automatically saves.
- Close your file.
- Open the Outreach table and click the Tools button. Click Advanced Functions and then Import Locations Using the ‘Locations’ Template.
- Follow the prompts to import data.
- Review your imported data.
- Have your Recruitment Outreach Data template open. It is recommended that you save the template file in .xlsx format and in a location readily accessible from within The Complete AAP.
- Review Outreach Entries
-
Review the following list to ensure that your Outreach data are ready for publishing; pay mind that Outreach Activities may require activation of a Roll-Up function to report all activities.
- Location Code: ensure that each entry corresponds with a Location Code that has totals in the “Included Emps” column in the Locations table. Items with Location Codes that do not match to a location with included employees will be excluded from all reports.
- Included In: this field appears only if the roll-up tool in Locations has been activated. If this field shows the code of a location that will not have an AAP, visit the Locations table and under the Roll Up Outreach Into Location select the location into which you wish to roll the outreach activity.
- Recruitment Activity Name: ensure that the name of the recruitment outreach program, organization, or activity is free of misspellings.
- Date of Activity: ensure that the single date of each activity falls within the 12 months prior to your current AAP year; items dated outside of that 12 month period will be excluded from reports.
- Ongoing: if the activity is ongoing, ensure that the Ongoing checkbox is checked; ongoing activities will be included in relevant reports despite the AAP year.
- Description: ensure that the description is accurate and free of grammatical mistakes and typos.
- Evaluation: ensure that this essential component is present, and ensure that the evaluation is accurate and free of grammatical mistakes and typos.
- Include in Vets?: ensure that items intended to recruit veterans have a check in this column’s checkbox.
- Include in IWD?: ensure that items intended to recruit individuals with disabilities have a check in this column’s checkbox.
- Include in W/M AAP?: ensure that items intended to recruit women and minorities have a check in this column’s checkbox.
Other Items to Review
The bulk of the AAP is done, and you’re just about ready for publishing. All that is left is to visit the final three areas where you can address some common aesthetic issues.
- Review Company Information Window
Open the Company Information window from the main File menu, and review all fields. If selected or filled out, all fields except Identifier appear throughout your published reports.
Company Information Window Fields
- Company Name: the name you enter into this window appears on the cover page of various documents; ensure that it appears as you wish for it to be represented.
- Identifier: this is for your internal purposes and will not appear on any reports.
- Plan Beginning Date: this date is what the program uses to determine which data to report in your published reports; therefore it is critical that it be accurate. Review Establish Your AAP Dates in the AAP Basics chapter of this manual if you are unsure.
- Plan End Date: this date is what the program uses to determine the end data of data to report in your published reports.
- Mid-Year update section: unless you are needing to report data from the first six months of your AAP year for audit or internal purposes, ignore this area.
- EEO Type: the selection of EEO Type is selected early in the process, and changing the type after importing data could cause errors and/or compliance issues in reports; however, if the selected EEO Type is incorrect, here is where to change it.
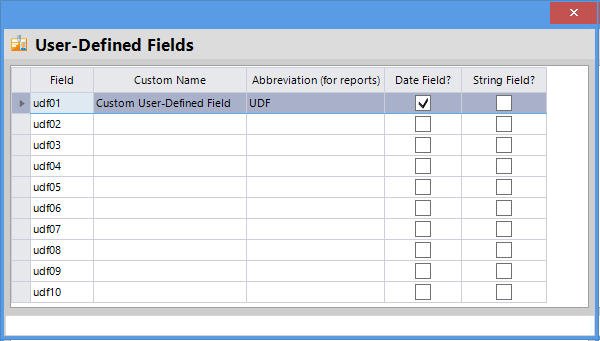
- User-Defined Fields: if you imported user-defined fields, click this button to adjust the Custom Name and Abbreviation (for reports), and, more importantly, to define whether the field is a Date field or a String (alpha and/or numeric).
- Review Departments Window
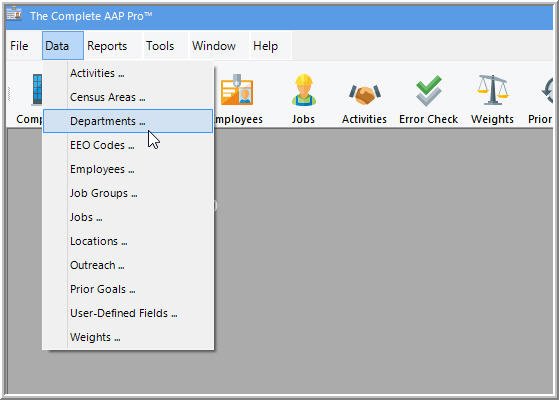
Open the Departments table from the main Data menu.
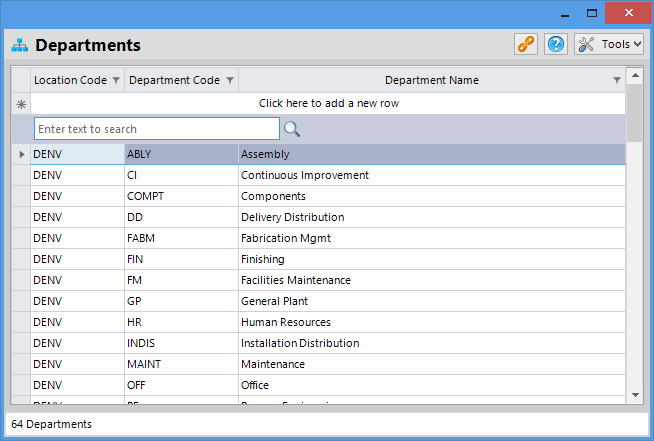
Departments are necessary for slotting employees into supervisory units required to be reported in the Organization Display or Workforce Analysis, and will appear in various documents. It is important to remember that departments are assigned to individuals, so editing fields in the Department window can affect the data in the Employees table. It is recommended that the only actions you take in the Departments window are: adding new department records to then assign in the Employees window, and editing only Department Names as necessary.
Department Table Fields
- Location Code: do not change Location Codes for existing departments; instead add new records as necessary.
- Department Code: do not change existing Department Codes; instead add new records as necessary.
- Department Name: fix misspellings as necessary.
Though manual editing is recommended for small changes in the Departments table, you may export and then re-import revised data using the Departments Data import files. Again, know that changing department codes in an exported file that you intend to re-import may sever ties between departments and employees, causing there to be errors in the Employees table.
- Review Job Groups Window
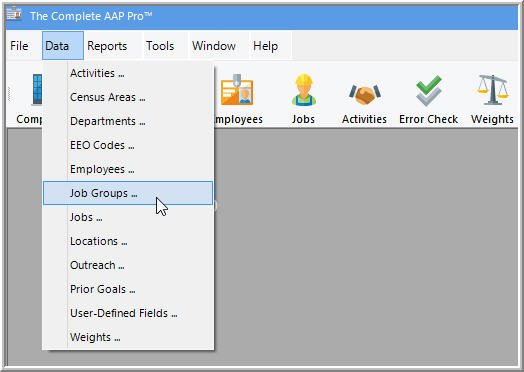
The Job Groups window is accessed through the Data menu.
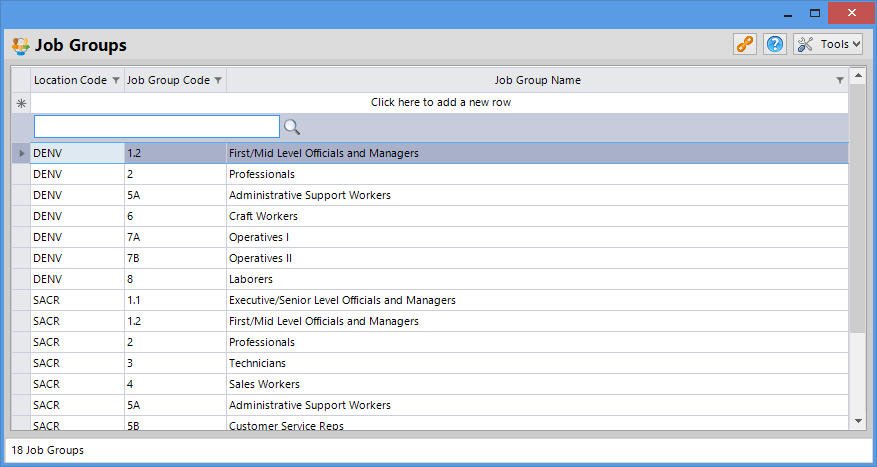
Job groups are the units by which most data are reported in your AAP. The Job Groups window is where you can add, edit, or delete job groups.
Job Group Table Fields
- Location Code: though job groups’ Location Codes can be changed in this window, doing so can cause unintended consequences in other data. It is recommended that rather than changing an existing job group’s location, you add another job group using the intended Location Code.
- Job Group Code: edit job group codes manually by clicking into a Job Group Code cell, deleting its contents, and typing the replacement code. Records for jobs assigned to the edited job group will be automatically updated.
- Job Group Name: edit job group codes manually by clicking into a Job Group Code cell, deleting its contents, and typing the replacement code. Records for jobs assigned to the edited job group will be automatically updated.
Though manual editing is recommended for small changes in the Job Groups table, you may export and then re-import revised data using the Job Group Data import file. Again, know that changing job group codes in an exported file that you intend to re-import may sever ties between job groups and jobs, causing there to be errors in the Jobs table.

Proceed to Publish AAP Documents.
- Frequently Asked Questions: EMPLOYMENT ACTIVITIES
-
- Why are there no
rows in the Activities windows?
The Activities table has the potential to hold an immense amount of data, and the likelihood of conflicts – either intentional or not – is too great for the program to determine on the fly. For this reason, you will see norows in this table. Instead, the program has a special Error Check feature that can be utilized.
* Yellow highlight added for illustration purposes.
- The Activities data does not appear as expected. What happened? What do I do now?
-
If Activities details are not what you expect them to be, check the totals against those in your import file to find where errors may have originated. Assess the volume of mistakes to determine whether you should re-import. If you see minor or a small volume of issues, it is highly recommended that you try to resolve them manually in the Activities window. If issues are extensive, cautiously follow the Export & Re-Import Employment Activity Data instructions at the beginning of this chapter.
- We’ve changed the structure and names of our job groups since the prior AAP was prepared; will this be a problem?
- Nothing in the regulations says that you are not allowed to restructure or rename job groups. There are no guidelines or regulations on how to handle this situation, but it is easiest and safest to report activities in the job groups that were in place when the activity occurred. You may end up with some activities with no base group against which to compare, but this is okay. As long as you don’t restructure your job groups every year, one year of inconsistency should not be perceived by OFCCP to be in violation of any rules.
- Why are there no
- Frequently Asked Questions: WEIGHTS
-
- May I use the zip code tool on its own without using the Dynamic Weights function?
Yes, you can use the zip code tool on its own. See Sources under I’ll Set My Own Weights in the Review Weights section in this chapter.
- How does the program select weights on its own?
- The program searches your Activities table and tallies the number of hires and promotions in each job group that occurred. The program by default looks at all activities, regardless of date, held in the Activities table. Considered dates can be adjusted in the Options window of the Tools button of the Weights table.
- The program then accordingly assigns weight to external (Census Area) and internal (Promotables) factors.
- The census data used for the external factor are formed by combining the zip code(s) in your Locations table according to the number of employees in each. The availability of females and minorities in the custom census area are calculated using the census codes assigned to jobs in the Jobs table.
- The promotables used are the job groups from which employees promoted according to the promotion activities in the Activities table.
- If there are no activities in the Activities table, the program assigns 100% weight to the Census Area factor, and uses the zip code(s) in the Locations table to form custom census areas.
- Why are there already weights in my Weights table?
The recruitment information you see in the Weights window exists already because either a) the Dynamic Weights, Census Areas, and Promotions function (more on this below) is on by default, or b) you copied a prior AAP using one of the two Copy..and Prepare It for a New Plan Year methods when you first created a company in the program; using one of the Copy/Prepare methods pull over weights set in the source AAP.
- Are Weights Importable?
You may import recruitment information by exporting another company’s weights, updating location and job group information in the exported file, and then following the usual importing steps.
- What is the Dynamic Weights, Census Areas, and Promotions function?
This function, when activated, calculates external and internal weights based on the hire and promotion activity in your Activities table. The function also determines your Census Area and Promotables sources by selecting and combining census areas based on zip codes in the Locations window, and by determining from which job groups employees promoted in your Activities window. In other words, it does all this for you.
- Why is my availability showing 0% on this factor?
If you’re seeing 0% male and female and/or white or minority availability, it could be due to one of the factors below.
- No data source selected: for each factor that has totals under the Weights column, you must ensure that you have a source selected. Press the Select button beside the factor to select a data source.
- Truly no availability of a group in the source: if the location on which you are working is in a removed, rural area with a low population, it could be that there truly are no persons in a particular sex or race group available to fill the positions in the job group in question. The same is true for the Schools factor; there may not be persons in certain demographics in the data year, award, discipline, or institution you selected. The same could be true for the Promotable factor; it could be that the feeder job group(s) chosen truly has representation in only one sex and race. You can sort or filter your Employees table to ensure that this is the case.
- Specific to Census Area: no census codes assigned to jobs: the availability of the Census Area factor relies not only on selection of a census area, but also assignment of job census codes. Click on your Jobs icon and ensure that all jobs are assigned census codes. Revisit Assign Census Codes in the Jobs Table section of the Review Workforce Data chapter to learn how to assign census codes for jobs.
- How do I quickly select the same weights and/or recruitment sources for all job groups?
Click on a job group that shows the weights and/or or the recruitment sources that you wish to copy to other job groups, and then click the Copy Weights Profile button.
In the window that pops up, select the desired options, and then click “Copy” to set the profiles.
- I’m not finding the census area that I need. How can I find it?
See “Worksite/Residence Data” under Combine Census Areas, and Other Census Options above to read about switching from worksite to residence data or vice versa. Some areas may show up in one data set but not the other.
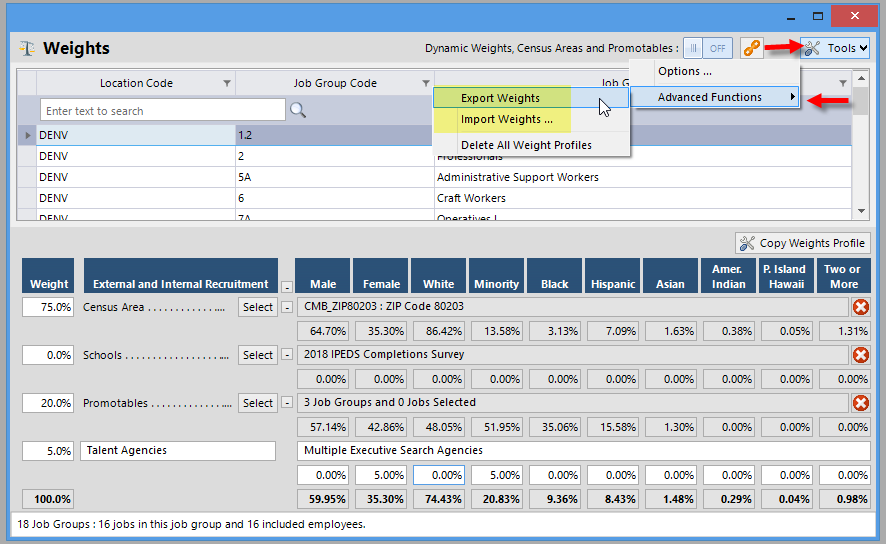
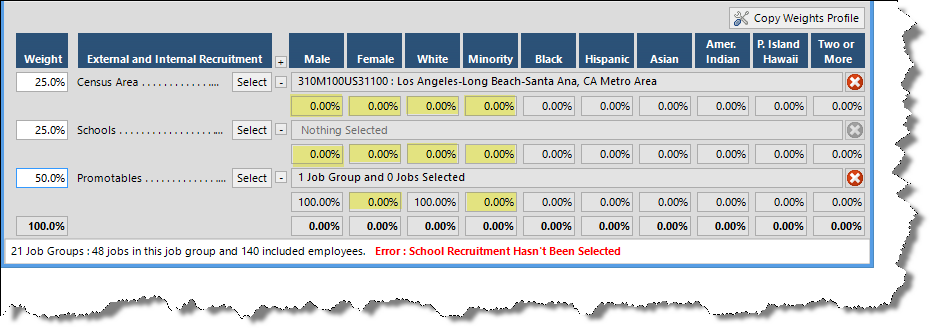
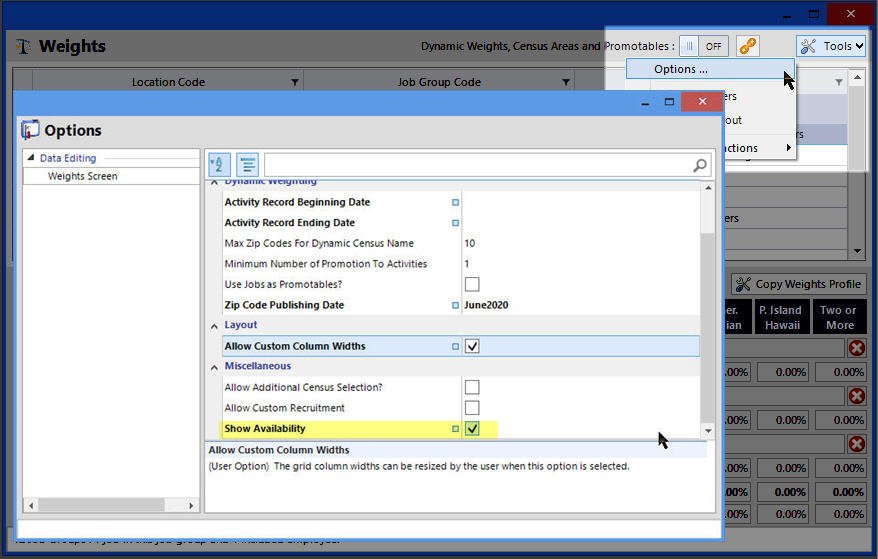
- The first image under Set Weights for Me shows more columns than I see in Weights. How do I do that?
If you wish to see availability and utilization results in real time, you may do so by selecting Tools and then Options in the Weights window. In the window that pops up, scroll down to the last option and check the box.
- What is a “collapsed” census area?
When the Census Bureau compiled data for the EEO tabulation, they published only percentage estimates for certain Core Based Statistical Areas (CBSA’s) rather than actual employment counts. These areas are called “collapsed” percentage areas. These areas can be selected to be used for all reporting purposes but cannot be used within a “combined” area because without actual raw employment counts, the resulting area cannot be accurately created. Click below for a listing of the collapsed census areas.
- List of CBSA Collapsed Census Areas
-
12580 Baltimore-Columbia-Towson, MD Metro Area
12940 Baton Rouge, LA Metro Area
13720 Big Stone Gap, VA Micro Area
13740 Billings, MT Metro Area
14010 Bloomington, IL Metro Area
14700 Branson, MO Micro Area
16020 Cape Girardeau, MO-IL Metro Area
16060 Carbondale-Marion, IL Metro Area
16740 Charlotte-Concord-Gastonia, NC-SC Metro Area
16820 Charlottesville, VA Metro Area
17140 Cincinnati, OH-KY-IN Metro Area
17300 Clarksville, TN-KY Metro Area
17980 Columbus, GA-AL Metro Area
18580 Corpus Christi, TX Metro Area
19060 Cumberland, MD-WV Metro Area
19780 Des Moines-West Des Moines, IA Metro Area
20260 Duluth, MN-WI Metro Area
21780 Evansville, IN-KY Metro Area
22220 Fayetteville-Springdale-Rogers, AR-MO Metro Area
22800 Fort Madison-Keokuk, IA-IL-MO Micro Area
22900 Fort Smith, AR-OK Metro Area
23060 Fort Wayne, IN Metro Area
23540 Gainesville, FL Metro Area
25060 Gulfport-Biloxi-Pascagoula, MS Metro Area
25180 Hagerstown-Martinsburg, MD-WV Metro Area
25620 Hattiesburg, MS Metro Area
26580 Huntington-Ashland, WV-KY-OH Metro Area
27140 Jackson, MS Metro Area
27180 Jackson, TN Metro Area
28700 Kingsport-Bristol-Bristol, TN-VA Metro Area
30300 Lewiston, ID-WA Metro Area
30860 Logan, UT-ID Metro Area
30940 London, KY Micro Area
31140 Louisville/Jefferson County, KY-IN Metro Area
31940 Marinette, WI-MI Micro Area
32620 McComb, MS Micro Area
32820 Memphis, TN-MS-AR Metro Area
34100 Morristown, TN Metro Area
34980 Nashville-Davidson—Murfreesboro—Franklin, TN Metro Area 35020 Natchez, MS-LA Micro Area
36620 Ontario, OR-ID Micro Area
37140 Paducah, KY-IL Micro Area
37460 Panama City, FL Metro Area
37900 Peoria, IL Metro Area
38300 Pittsburgh, PA Metro Area
38580 Point Pleasant, WV-OH Micro Area
38660 Ponce, PR Metro Area
39500 Quincy, IL-MO Micro Area
40060 Richmond, VA Metro Area
40080 Richmond-Berea, KY Micro Area
41140 St. Joseph, MO-KS Metro Area
41980 San Juan-Carolina-Caguas, PR Metro Area
43340 Shreveport-Bossier City, LA Metro Area
43580 Sioux City, IA-NE-SD Metro Area
43900 Spartanburg, SC Metro Area
45180 Talladega-Sylacauga, AL Micro Area
45460 Terre Haute, IN Metro Area
45780 Toledo, OH Metro Area
47260 Virginia Beach-Norfolk-Newport News, VA-NC Metro Area
47900 Washington-Arlington-Alexandria, DC-VA-MD-WV Metro Area
- Frequently Asked Questions: PRIOR GOALS
-
- My company skipped an AAP year, so my prior goals are from two years ago. What do I do?
Even though your prior AAP year is over, the best practice would be to prepare an AAP for the skipped year. If your company is under audit, one of the items you must submit to the OFCCP is a report on progress toward prior goals, so it is imperative that you prepare a prior year AAP under those circumstances. Another good reason to prepare a prior AAP is so that you can at the very least determine whether underutilization and employment activity disparity patterns emerge. If you are under a time crunch and do not currently have time to prepare a prior AAP, for the time being, use the goals from two years prior, and then later update the actual Prior Goals when you’ve had a chance to prepare a proper prior year AAP.
- We’ve changed the structure and names of our job groups since the prior AAP was prepared; how can we determine progress toward prior goals?
- There are no guidelines or regulations on how to handle this situation, but it is easiest and safest to report your prior goals in the job groups that were in place the prior AAP year. The Goals Progress Report automatically includes hires and promotions (to) on the reports to determine progress; if your job groups changed during the prior 12 months, you may have some placement data to report on the Goals Progress report, but if not, there is no need to worry; nothing in the regulations says you are not allowed to restructure or rename job groups. New job groups will not appear on the Goals Progress report, nor should they.
- Frequently Asked Questions: OUTREACH
-
- Is it absolutely necessary to fill in the Outreach table?
- If you are under audit and, in reviewing documents before submission, you notice that you have not met the Utilization Goals for Individuals with Disabilities, yes, it is imperative that you address the underutilization by listing efforts that you have made or will be making to recruit IWD. You should be making efforts beyond listing with your local ESDS to attract qualified veterans as well, and you should list those efforts in the Outreach table to illustrate good faith efforts. Listing outreach efforts for women and minorities in the Outreach table isn’t necessary, but is a convenient place to list targeted efforts to recruit minorities and women in specific jobs within job groups where underutilization is shown.

 symbol beside the first header by which you wish to filter. Uncheck the items in the displayed filter list to narrow down your review, and then click OK. The program allows for multiple filters at one time. Again, a good place to start is to filters activities by Included in AAP OR Location Code, then Activity Code, then by Job Group Code.
 If you have a filter applied in the Activities window when you selected this Tool, click the Visible Records Only? box to delete only those records you’ve filtered.
 to switch on Dynamic Weights.






 rows in the Activities windows?



Post your comment on this topic.