Review Workforce Data and Fix Errors
Check for Data Errors
The Complete AAP™ (TCAAP) has a couple of methods of alerting you to errors. The automatic Error Check tool alerts you to all missing or invalid data at one time. Alternatively, a visual error check may be performed by separately visiting the Employees, Locations, and Jobs tables. See instructions below for both the automatic and visual error checks.
- Run Automatic Error Check
-
TCAAP has an Error Check tool available that searches workforce data-related tables for missing or invalid data. Follow the steps below to run a Workforce Error Check.
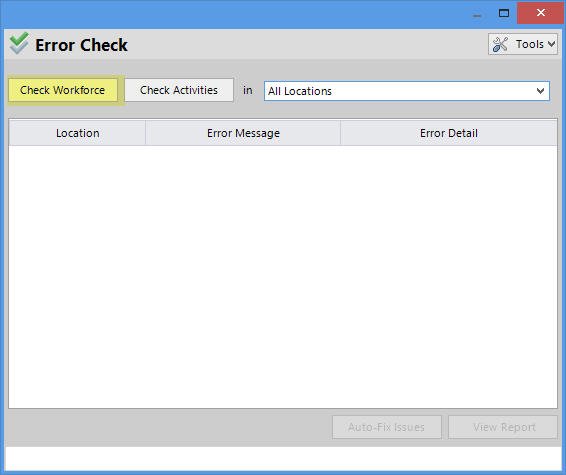
- Click the Error Check icon to open the Error Check window.
- In the Error Check window, click the Check Workforce button. The program works its way through the Employees, Locations, Jobs, Job Groups, and Department tables to find errors while cross-checking data to search for fixes.
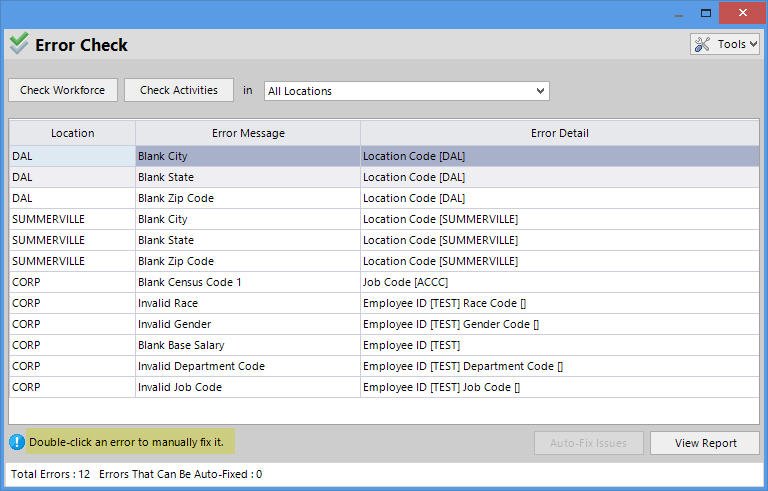
- When the program finishes its run-through, a list of errors appears. The program has the ability to auto-fix some data by creating Codes for Department Names and Job Titles that are lacking them. It can also create Names/Titles for Location Codes, Job Group Codes, Department Codes, Job Codes, and Employee ID’s that are lacking them. If it can auto-fix data, the Auto-Fix Issues button will become active. If the program cannot auto-fix errors, the button will remain gray and you must fix the errors manually.
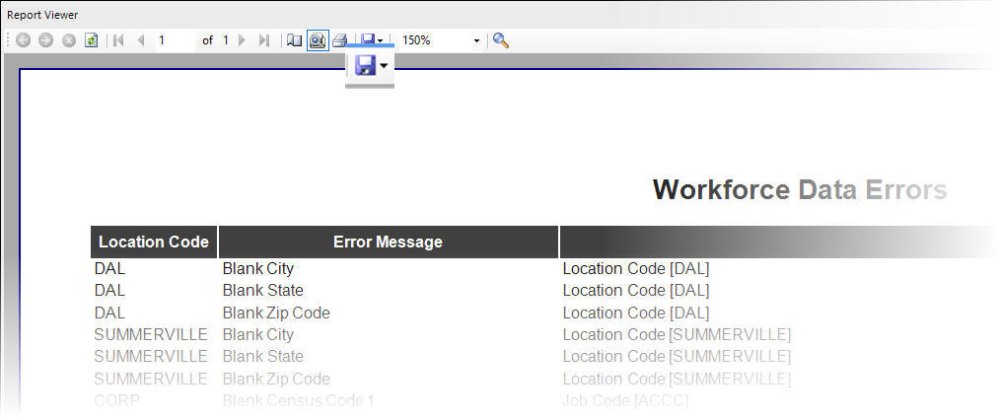
- Click View the Report to preview the list of errors on screen, and save the document in PDF format for later reference.
- Close the preview.
- Open the pdf file and review it to determine how to proceed. It is unlikely that all errors on your list can be auto-fixed, but you can at this point choose to run the auto-fix to clear up some smaller errors and proceed by using the Workforce Data Tables List further down in this chapter as a guide for what’s expected from each field. From there, gauge how to proceed based on the following:
- If there are large amounts of data to fix, close the Error Check window and follow the Export, & Re-import instructions further down in this chapter or start from scratch at Create a Company File.
- If there are only a few, smaller issues, proceed with the next step.
- If you decide that there are only a few minor issues, you can re-run the Error Report. When the list of errors appears, double-click on an error to manually fix it.
- The table where the error is located will pop-up. Follow the Add, Edit, or Delete Records instructions further down in this chapter to fix the error.
- Close the table to return to the Error Check list.
- Repeat the process to address all errors. If you are not able to obtain missing information immediately, you may close the Error Check and return to it after finding your answers.
- Once errors are cleared up, proceed to Format & Import Employment Activities Data.
- Click the Error Check icon to open the Error Check window.
- Perform a Visual Error Check
-
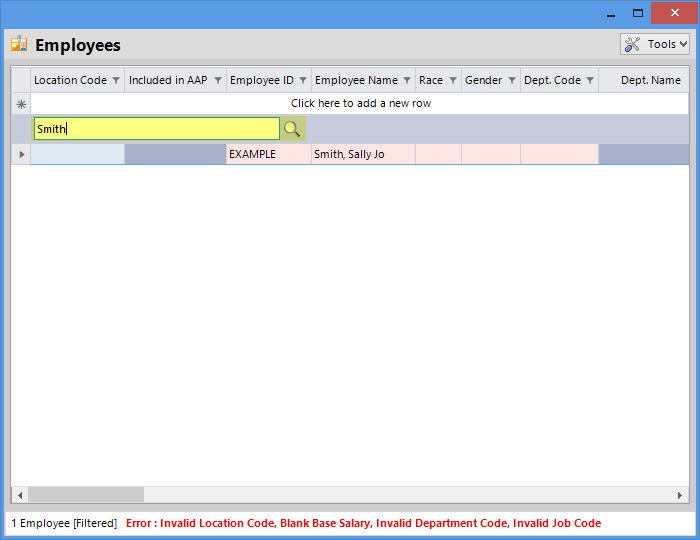
The Error Check tool helps summarize the existing data errors in all relevant tables at one time, but each table also highlights inany records within that have data errors.
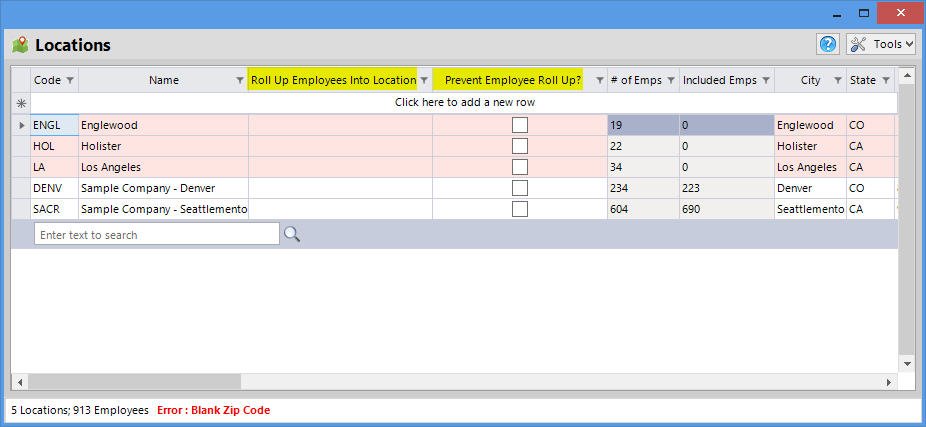
Pink rows are automatically sorted at the top of the table, and the pink highlight disappears when all errors for the record in question are addressed. Read through the Workforce Data Tables lists below to learn more about the contents of each field and how to adjust data within them. Follow the Export & Re-import Workforce Data or the Add, Edit, or Delete Records instructions further down in this chapter to fix data errors in your Employees, Locations, and Jobs tables. If you do not have answers immediately, you may return to each workforce-related table to address the errors later, but it is imperative to do so before importing Activities data and/or publishing reports.
You can use the sorting and filtering features of the program to aid in comparisons, but know that manually filtering data on screens may cause the
rows to temporarily disappear from the top of the screen. Simply clear the filter to make the pink rows reappear.
Troubleshoot Workforce Data Errors
The lists below explain the contents of each field of the three workforce-related data tables. Understanding the contents of these fields can help you troubleshoot individual errors, or at the very least help you decide if re-importing is the better way to go. If your company has locations of fewer than 50 employees that you wish to roll up, be sure to thoroughly read through the Locations Table section.
- Locations Table
Click the Locations button on the main toolbar to open the Locations table.
Locations Aren’t Just Locations
The Locations table holds address and location name information for each of a company’s locations, but more importantly, the table holds control over at least the following crucial elements:
- how many AAPs a company ultimately produces
- where employees are reported
- where employment activities are reported
- where outreach activities are reported
- how the program determines goals for women and minorities
- who is designated as a responsible party overseeing the affirmative action program(s)
Location Table Fields
It is important to monitor the Locations table throughout the AAP-preparation process, as it is most often where reporting discrepancies can be fixed. Below is an explanation and significance of what each column in the Locations table holds, but for further descriptions of some fields, refer back to the Workforce template in Gather Necessary Data.
Fields that generate errors in locations with AAPs are highlighted in red in the Fields in Locations Table below. Most aesthetic issues for a limited number of locations can be fixed within the Locations table, but if changes need to be made to multiple locations’ records, it is best to export and re-import the Locations data. General instructions for exporting and re-importing are included later in this chapter.
- Fields in Locations Table
- Code: This refers to the imported or program-generated Location Code. Location Codes are required for a location record to exist in the Locations table. Edit these codes with the caveat that doing so carries changes globally throughout the company’s tables.
- Name: This refers to the imported Location Name. The program uses Location Name in annotations and in some cases as report headers. If all names reflect the Company Name, consider adding a distinguishing characteristic – such as city and state – to the Name to differentiate one AAP from another in published documents.
- # of Emps: This read-only field shows the total number of employees who are assigned the given Location Code. These totals are dynamic and should reflect the actual physical locations of employees. The physical locations of employees are those you assigned in the Location Code/Location Name of your import file and what are shown in the Location Code column of the Employees window.
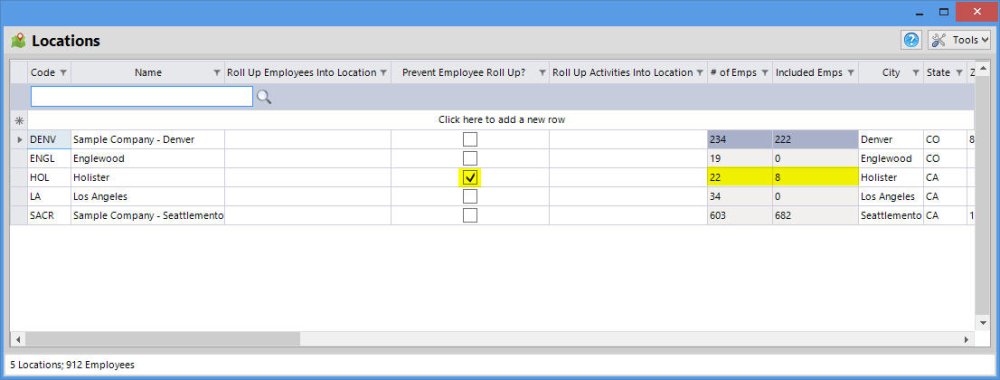
- Included Emps: This read-only field reflects the total number of employees who report to or are rolled into the AAP for the given Location Code less those employees who report to managers at other locations. These totals are dynamic and can change by adjusting field selections in the Employees table including Location Code, Supervisor ID, Exclude Employee?, and Force Into AAP. The totals are likewise affected by changes made in the Locations table, which include changes to the Roll Up Employees Into Location, and Prevent Employee Rollup fields. These last two fields are not immediately visible but can be activated when the Roll Up Small Locations option is utilized. See the Roll Up Small Locations instructions further down in this section.
- Roll up Employees Into Location: This field may or may not be visible on your screen, but if you do not wish to prepare AAPs for locations of fewer than 50 employees, you may activate it by following the instructions in the Roll Up Small Locations section further down in this chapter. Use this field only to forcibly roll locations into others in cases where you did not import supervisor ID’s, when you wish to roll up locations into the affirmative action program which covers the location of the personnel function which supports the establishment.
- Prevent Employee Roll Up?: This field becomes visible on your screen only after you activate the Roll Up Employees option mentioned in the paragraph above. Use this to force the program to publish an AAP for a location of fewer than 50 employees that would otherwise be rolled up to another location upon activation of the Roll Up Small Locations option.
- Roll up Emp. Activities Into Location: This option is different than the Roll up Employees Into Location field described above. You will not use this function at this point in the process, but instructions in the Review Remaining Data chapter of this manual may have you revisit this field.
- Roll Up Outreach Into Location: You may need to revisit this field after you read through the Review Remaining Data chapter further in this manual.
- City: The city should reflect the physical address of the AAP location. The city name appears on cover pages and report headings. City names of locations with AAPs appear throughout AAP reports, and it becomes obvious in published reports when this information is missing.
- State: The state should reflect the physical address of the AAP location. The state appears on cover pages and report headings. State abbreviations of locations with AAPs appear throughout AAP reports, and it becomes obvious in published reports when this information is missing.
- Zip Code: The zip code here should reflect the postal code of the physical address of the given location. The program is able to use zip codes to determine a company’s recruitment areas, which help establish availability of women and minorities. For that reason, the program encounters errors when faced with missing zip codes or zip codes of P.O. boxes. Zip codes of locations with AAPs appear throughout AAP reports, and it becomes obvious in published reports when this information is missing.
- Address Line 1: The address line should reflect the physical address of the AAP location. The address appears on cover pages and in report headings.
- Address Line 2: This address line can be used to add additional information about the physical address of the AAP location, such as Suite or Floor numbers. If this field is utilized, it appears beneath the Address Line 1 on cover pages and in report headings.
- EEO Coordinator Name: The EEO Coordinator should be the person who assumes the responsibility for the development, implementation and monitoring of the affirmative action program. This person’s responsibilities are listed in the Designation of Responsibility section of the Women & Minorities AAP. This individual’s name appears on the contact information page and in several other places throughout the narrative text in all three AAPs and in the Support Data document.
- EEO Coord. Email: If you wish to include the EEO Coordinator’s email address, it appears on contact information pages in the AAPs for Women & Minorities, Protected Veterans, and Individuals with Disabilities.
- EEO Coord. Company: If the EEO Coordinator’s work location goes by a name other than the one for the given AAP, fill in his or her company’s name. This appears on the contact information page.
- EEO Coord. Address: If the EEO Coordinator’s work location address is different than the one for the given AAP, fill in his or her company’s address. This appears on the contact information page.
- EEO Coord. City: If the EEO Coordinator’s work location is in a city different than the one for the given AAP, fill in the appropriate city. This appears on the contact information page.
- EEO Coord. State: If the EEO Coordinator’s work location is in a state different than the one for the given AAP, fill in the appropriate state. This appears on the contact information page.
- EEO Coord. Zip Code: If the EEO Coordinator’s work location is in a zip code different than the one for the given AAP, fill in the appropriate zip code. This appears on the contact information page.
- Executive Officer [Name]: The Executive Officer has overall responsibility for implementation of the Equal Employment Opportunity Policy; this person is generally understood to have an executive position and should be the EEO Coordinator’s superior. This person’s name appears in several places throughout the narrative text.
- Executive Officer Title: The Executive Officer’s actual job title should be used in this field. It appears in several places throughout the narrative text.
- EIN: If you wish to have the Employer Identification Number of the location appear on AAP cover pages and/or in EEO-1 files, include it in this cell.
- EEO-1 #: If you wish to have the EEO-1 number of the location appear on AAP cover pages and/or in EEO-1 files, include it in this cell.
- Parent Company: If you wish to have the Parent Company Name appear on AAP cover pages and/or in EEO-1 files, include it in this cell.
- Parent Company EIN: If you wish to have the Parent Company EIN appear on AAP cover pages and/or in EEO-1 files, include it in this cell.
- Parent Company EEO-1#: If you wish to have the Parent Company EEO-1 number appear on AAP cover pages and/or in EEO-1 files, include it in this cell.
- Logo: If you would like to have a company logo appear on cover pages and header reports, link to it here by clicking into the cell and using the “…” browse button to map its location.
- Code: This refers to the imported or program-generated Location Code. Location Codes are required for a location record to exist in the Locations table. Edit these codes with the caveat that doing so carries changes globally throughout the company’s tables.
Roll Up Small Locations
The OFCCP requires establishments that have 50 or more employees to have a written AAP. Employees at locations with fewer than 50 may be included in:
- An AAP covering their work location (i.e. location has its own small AAP).
- The AAP covering the location of the official to whom employees report.
- In the AAP covering the personnel function that supports their location.
TCAAP can accommodate each, or a combination of the above scenarios. Click Roll Up Small Locations below and follow the appropriate instructions. Follow the Roll Up Employees by Location instructions if you wish to roll up some but not all locations of 50 or more employees.
- Roll Up Small Locations
-
Follow the appropriate instructions below based on which of the two allowable roll up scenarios you choose.
- Roll Up Employees by Manager
- Click on the Locations icon.
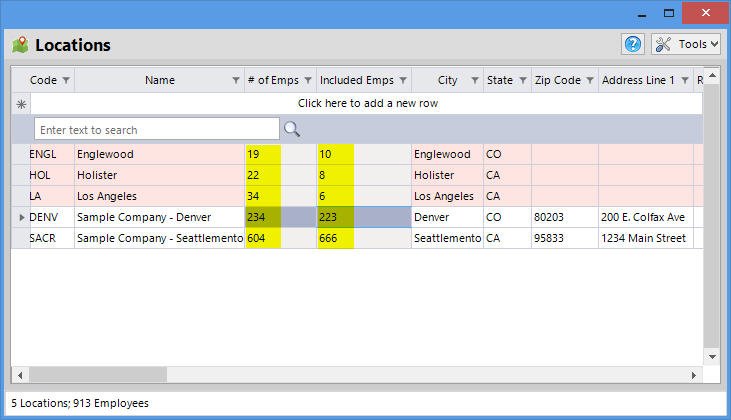
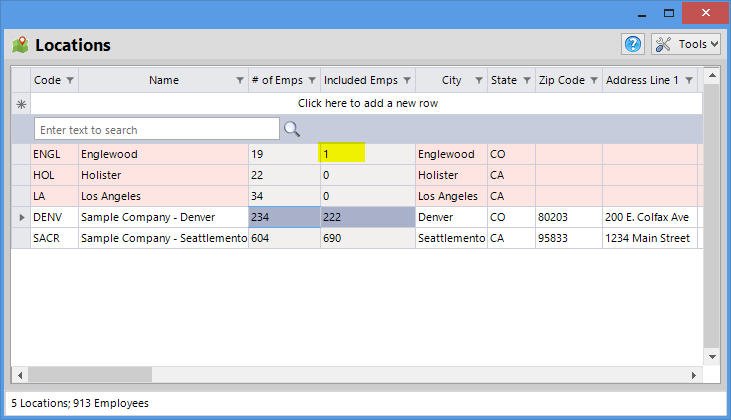
- Compare the total # of Emps and the total Included Emps in each location. The Complete AAP includes individuals in the location of their direct supervisors.
What these fields communicate:- The # of Emps column totals match the totals in each Location Code in your import file.
- The Included Emps column shows the current total employees excluding employees reporting out to managers at other locations and including employees reporting to managers at the given location.
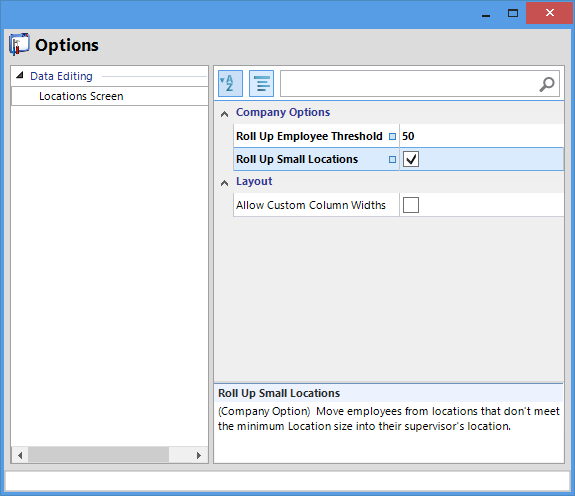
- Click on the Tools button in the Locations window, and then select Options.
- Check the Roll Up Small Locations box.
- Close the Options window.
- Once you close the Options window, you should see the totals in the Included Emps column change.
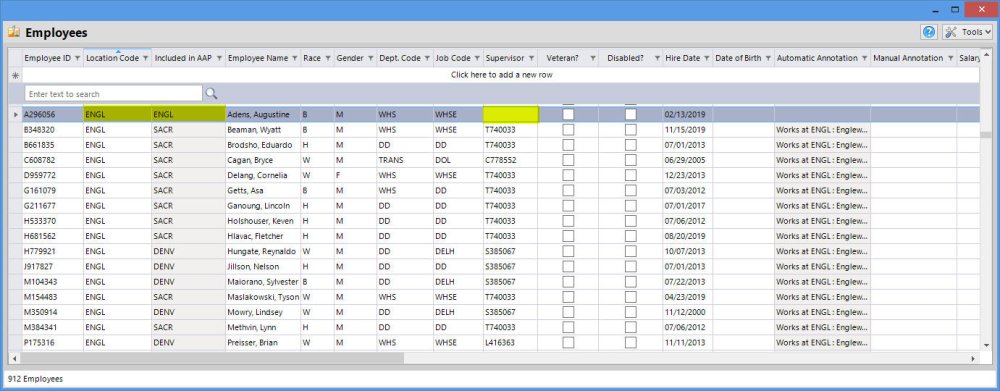
- If you find, as shown below, that not all employees have rolled up, search the Employees window to find which employees at the locations in question are missing valid supervisor ID’s, and then select a valid supervisor. Return to the Locations window to make sure the individual rolled up.
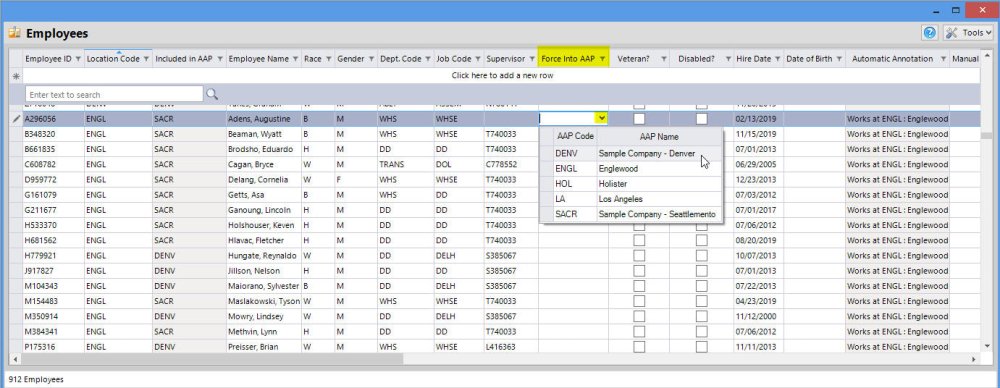
- If you cannot find or cannot assign a valid supervisor you may use the Force Into AAP column in the Employees window to force the employee in question into a specific AAP as shown below. You may need to scroll to the right in the Employees window to locate the Force Into AAP field. Return to the Locations window to make sure the individual rolled up.
- If you find, as shown below, that not all employees have rolled up, search the Employees window to find which employees at the locations in question are missing valid supervisor ID’s, and then select a valid supervisor. Return to the Locations window to make sure the individual rolled up.
- In addition to seeing the Included Emps column change, once you close the Options window, you will see two additional columns: Roll Up Employees Into Location and Prevent Employee Roll Up.
Two New Columns After Rollup
- Roll Up Employees Into Location should be used only when you wish to roll up employees by personnel function; see the Roll Up Employees By Location set of instructions below.
- Prevent Employee Rollup should be used in situations when you wish to prepare an AAP for one or more sites of fewer than 50 while rolling up employees at other such locations.
- Roll Up Employees Into Location should be used only when you wish to roll up employees by personnel function; see the Roll Up Employees By Location set of instructions below.
- Once you have your rollups settled, continue reviewing Locations or proceed to Review Employees below.
- Click on the Locations icon.
- Roll Up Employees by Location (i.e. by Personnel Function)
- Click on the Locations icon.
Notice the total # of Emps and the total Included Emps in each location. The Complete AAP includes individuals in the location of their direct supervisors.
- The # of Emps matches the totals in each Location Code in your import file.
- The Included Emps column shows the current total employees excluding employees reporting out to managers at other locations and including employees reporting to managers at the given location.
- Click on the Tools button in the Locations window, and then select Options.
- Check the Roll Up Small Locations box.
- The Roll Up Employee Threshold default is 50 as required by regulations. Raising the threshold above 50 will render AAPs out of compliance; lowering the threshold is safe, but not recommended.
- Close the Options window.
- Once you close the Options window, you should see the totals in the Included Emps column change.
- You may now enter a location code into the Roll Up Employees Into Location column.
- Again, this should be used only if you wish to roll up employees by personnel function rather than by supervisor.
- The software will continue to report employees in the AAP covering the location of their direct-report managers as per 60-2.1(d)(1).
- Keep in mind that the software is programmed by default to force locations of 50 or more individuals to have their own AAPs as required by 60-2.1(d).
- Once you have your rollups settled, continue reviewing Locations or proceed to Employees Table.
- Click on the Locations icon.
- Employees Table
-
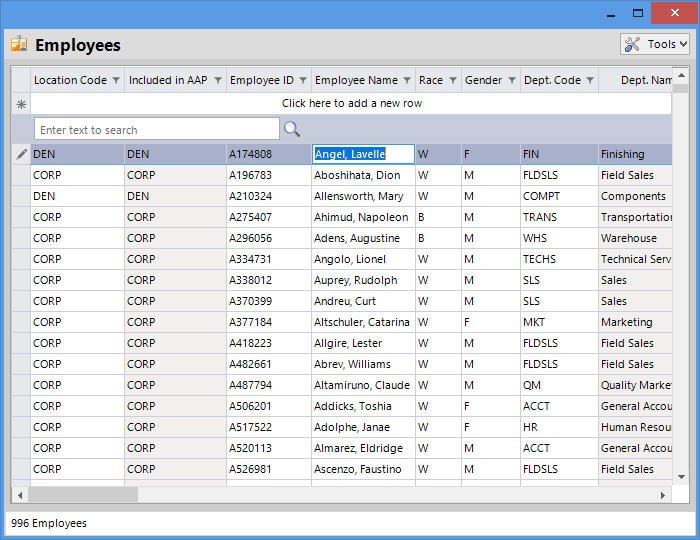
The bulk of the data that you import in your workforce data template ends up in the Employees table accessible from the Employees icon. The program automatically fills in or creates incidental information if it is left blank during import or key-entry. Fields that generate errors are highlighted in red below, but read the descriptions of each field to see where missing data could limit report options.
- Employee Table Fields
-
- Location Code: this code indicates the location where an employee physically works. Click into the Location cell of an employee record and use the pull-down list of locations if you wish to change the employee’s location.
- Included in AAP: the location code shown in the read-only Included in AAP column may differ from the Location Code field of each employee if:
- a) the employee reports to a manager at another location,
- b) the location has been rolled up, or
- c) employees have been forced into other locations.
Explore the appropriate table / field to address any issues: - a) Employees table Supervisor ID,
- b) Locations table Rollup option in Tools, or
- c) Employees table Force Into field.
- Employee ID: The Complete AAP assigns employee ID’s during import if they are not included in the import file. You may edit the codes directly in this cell.
- Employee Name: the name of an employee may be edited directly in this cell.
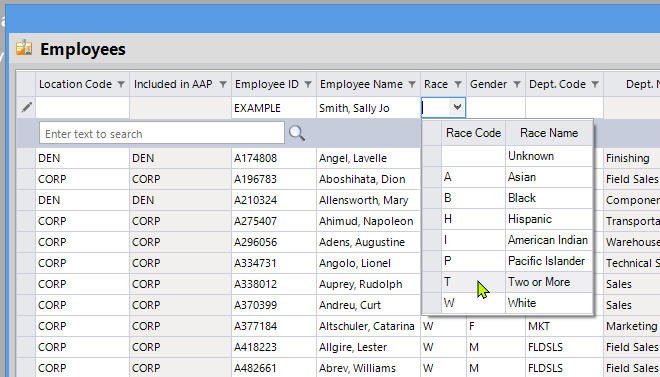
- Race: the races available for selection are those recognized by the U.S. Census Bureau: White, Black, Hispanic, Asian, American Indian, Pacific Islander and Two or More. “Unknown” race is selectable and appears as a blank cell, generating a data error and rendering some required reports non-compliant (but still publishable). If employees decline to identify their race at the applicant stage, it is permissible to visually determine their race.
- Gender: only binary gender currently recognized by the U.S. Census Bureau are available for selection in this field: female and male. “Unknown” gender is selectable and appears as a blank cell, generating a data error and rendering some required reports non-compliant (but still publishable). If employees decline to identify their gender, it is permissible to visually determine it.
- Dept. Code: click into the Dept Code cell and use the pull-down list to assign a department if one is missing. Though you are able to select department codes in the Employees window, you may not add or edit department names in this window. To add or edit department names, double-click in the Department Name field.
- Job Code: click into an employee’s corresponding Job Code cell, and use the pull-down menu to select a job. Though you are able to select job codes in the Employees window, you may not add jobs or edit their names, job groups, EEO-1 codes, or census codes within this window. To edit data associated to jobs, double-click into the Job Group Included In, Census Code(s), or EEO Code fields to pull up the Jobs table.
- Supervisor: the program alerts you when a supervisor ID does not exactly match an existing employee ID in the Employees table; in other words, the program expects supervisors to have current employee records of their own. To select a supervisor for a given employee, click into the corresponding Supervisor ID cell, and use the pull-down list to select a valid supervisor. Blank supervisor IDs are not read by the program as data errors, so if the supervisor in question truly is not in the workforce data set with which you are working, delete out the supervisor ID and use the Manual Annotation field to explain the circumstances (i.e. Reports to board of directors, Reports to expatriate supervisor, Highest-level executive, etc.).
- Veteran?: compare one or two employees flagged as veterans in the Employees table with those in your import file. Check the box if the employee in question is a protected veteran, or uncheck it if the employee is not a veteran.
- Disabled?: compare one or two employees flagged as individuals with disabilities in the Employees table with those in your import file. Check or uncheck the field as necessary.
- Hire Date: spot check one or two employees to ensure that the date field in your import file imported correctly. Change a date by clicking into the cell and selecting a new one using the drop down calendar.
- Date of Birth: spot check one or two employees to ensure that the date field in your import file held and successfully imported the correct birth date. Change a date by clicking into the cell and selecting a new one using the drop down calendar.
- Automatic Annotation: the annotations you see in this field, if any, are automatically generated by the program in one or a combination of two ways: by comparing the location code of an employee against the location code of his or her supervisor; by determining where employees should be included when the Roll Up Employees tool is used.
- Manual Annotation: the program automatically creates annotations by comparing employees’ locations against their supervisors’ locations. Where they are different, the program creates an annotation as required by regulations. Annotations entered here overwrite those automatically created by the program.
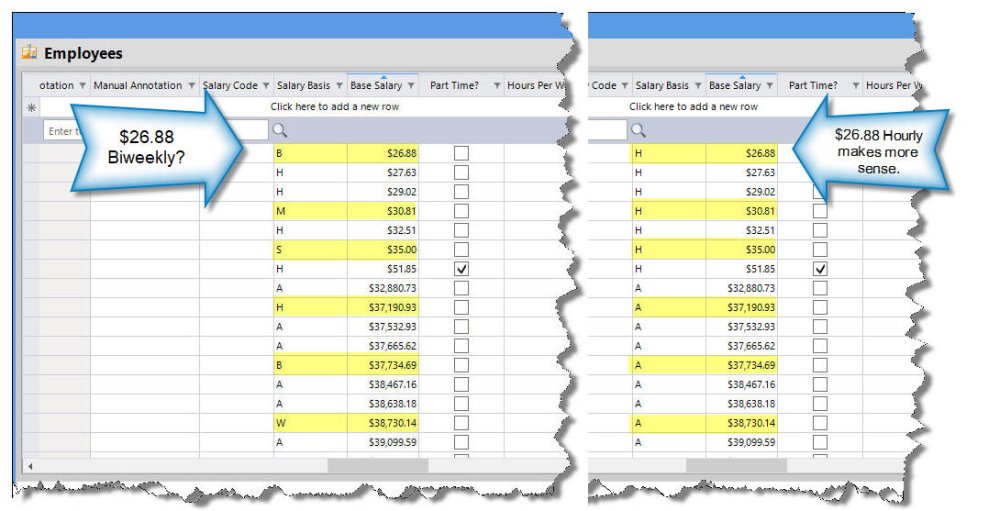
- Salary Basis: ensure that salary bases aptly describe the value in the Base Salary field. For example, as shown in the image on the left below, one record shows a salary of $26.88 is incorrectly classified as salary basis “B,” or Annual, and another record’s salary of $37,190.93 is incorrectly classified as salary basis “H,” or Hourly. Fix individual salary bases by clicking into an employee’s corresponding Salary Basis field, and using the pull-down menu to select the correct basis. The image on the right shows corrected Salary Bases.
- Salary Code: if your company maintains salary codes, grades, ranges, that information should be imported, especially if your company is on a CSAL or under audit. Salary Code among other salary data must be submitted to OFCCP if your company is audited.
- Base Salary: ensure that the base salaries reflect what you expect to see here. Some common problems such as misplaced decimals and zero values can be attributed to conversion of your import file from Excel to .CSV format. Revisit your import file if you see problems.
- Total Salary: if you imported data into this optional field, ensure that the total salaries reflect what you expect to see here.
- Part Time?: sort the table by this field to ensure that employees with this field checked truly are part time workers, and that the values in the Hours Worked Per Week column reflect the status.
- Hours Worked Per Week: ensure that the hours per week truly reflect the average hours per week, and that they correlate to the values shown in the “Part Time?” field.
- Confidential Salary?: this is an optional field and recommended to be used only under rare circumstances, such as when a high-level manager’s salary is not obtainable.
- Commissions: ensure that dollar amounts in this field imported accurately (i.e. decimal placed correctly). Commissions, among other salary data will need to be submitted if your company is audited.
- Overtime: ensure that dollar amounts in this field imported accurately (i.e. decimal placed correctly). Overtime, among other salary data must be submitted if your company is audited.
- Bonuses: ensure that dollar amounts in this field imported accurately (i.e. decimal placed correctly). Bonuses, among other salary data must be submitted if your company is audited.
- Merit Increases: ensure that dollar amounts in this field imported accurately (i.e. decimal placed correctly). Merit Increases, among other salary data must be submitted if your company is audited.
- Locality Pay: ensure that dollar amounts in this field imported accurately (i.e. decimal placed correctly). Locality Pay, among other salary data must be submitted if your company is audited.
- Incentives: ensure that dollar amounts in this field imported accurately (i.e. decimal placed correctly). Incentives, among other salary data must be submitted if your company is audited.
- Exclude Employee: this is an optional field.
- Force Into AAP: this is an optional field not recommended for establishment AAPs except under circumstances such as directing an employee record into a specific AAP if he or she has no manager. The main purpose of this field is to roll employees into FAAPs.
- Pay Analysis Group: this is an optional field, but If your company uses Pay Analysis Groups ensure that they are entered correctly.
- Job Group Included In: this read-only field represents the Job Group Code included in the Workforce Data Import file. This can be edited from the Jobs table.
- Census Code 1: this required field is editable from the Jobs window.
- Census Code 2: this optional field is editable from the Jobs window.
- Census Code 3: this optional field is editable from the Jobs window.
- EEO Code: this required field is editable from the Jobs window.
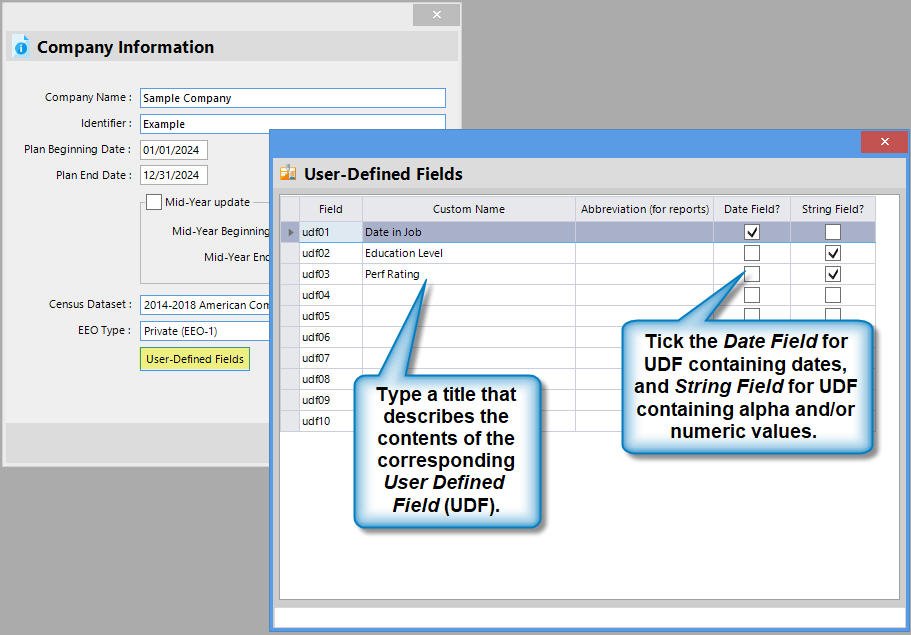
- User Defined Fields 1-10: if imported these fields will not be visible iuntil you use the User-Defined Fields table in the Company Information window (accessible from the top File menu) to define them. The Publish AAP Documents chapter displays the options available in the Salary Regression Analysis to incorporate these UDF in your optional compensation analysis.
- Location Code: this code indicates the location where an employee physically works. Click into the Location cell of an employee record and use the pull-down list of locations if you wish to change the employee’s location.
- Jobs Table
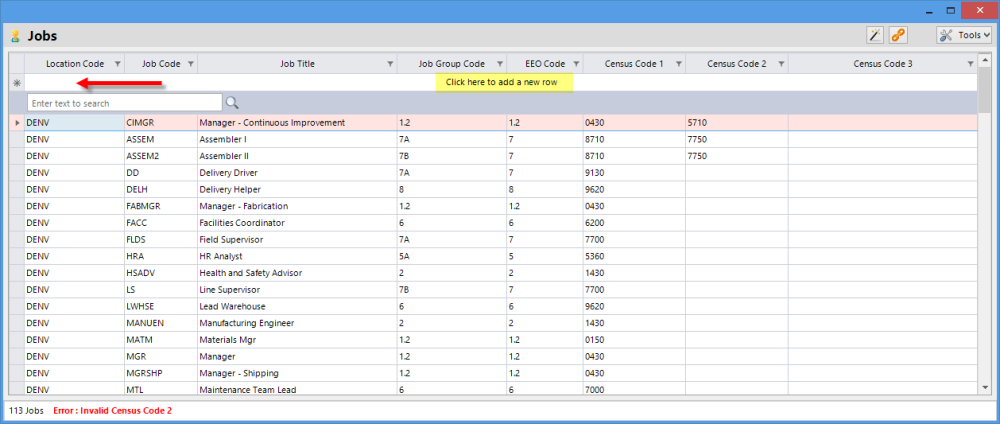
The Jobs table holds job records assigned to the employees listed in the Employees table. Fields in the Jobs table that will generate errors are highlighted in red in the Jobs Table Fields list below. Only populated jobs appear by default, but there may be other, unused jobs hidden in the table that you can view by clicking the chain icon.This show hidden jobs button is especially helpful to find a new, unassigned job record suddenly disappears.
- Jobs Table Fields
- Location Code: the codes in this field indicate the location of the employees holding the jobs; for this reason, you may see a job code/title listed more than once in this table. Be cautious in re-assigning Location Codes, as you may sever the tie between the job and the assigned employee(s). Instead of altering a Location Code, add a new record for a job, selecting the intended Location Code. Enter all required fields, and then open the Employees window to assign the new job record to the appropriate employee.
- Job Code: if you did not import job codes, the codes you see in the table are those assigned by The Complete AAP upon import. To change a job code double-click in the corresponding Job Code cell and begin typing.
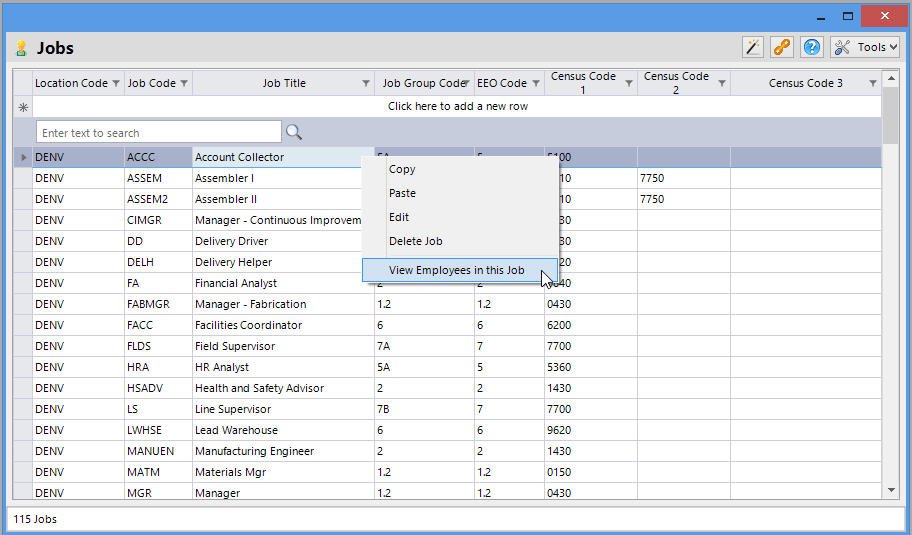
- Job Title: the job titles you see in this field are those belonging to employees as of the current snapshot. You may view a list of employees assigned this title by right clicking on a job title and selecting View Employees in This Job.
- Job Group Code: if a job is missing a job group, an error will be thrown. Use the drop-down to select a valid job group code for the job in question. If you wish to add a new job group, you may do so by opening the Job Groups table from the Data menu item, and adding a new record. You will then need to return to the Jobs window to assign the new code to the appropriate job.
- EEO Code: job groups are offshoots of EEO codes, so it stands to reason that all jobs in a job group share the same EEO category. Sort the table by job group and ensure that the EEO Code is consistently applied to job groups.
- Census Code 1: If you have data errors in this field, you may have missing or invalid census codes for one of the following reasons:
- Census codes were not in your import file. To eliminate data errors caused by entirely missing census codes, follow the Assign Census Codes instructions further below.
- Census codes have fewer than four digits. This could mean that your file dropped leading zeroes (e.g. code “0020” imported as “20”) upon import. Add leading zeroes manually or export your jobs from the Tools->Advanced Functions of the Jobs window to fix the census codes in Excel and then reimport the list. You may need to add an apostrophe before the first leading zero in order for the zeroes to hold in Excel.
- Census Code fields are populated with codes other than those recognized by the program. If the census codes that you imported are not the Census Bureau Special EEO File job census codes, follow the instructions in the *Assign Census Codes*% instructions further below to assign valid census codes.
- Census codes were not in your import file. To eliminate data errors caused by entirely missing census codes, follow the Assign Census Codes instructions further below.
- Census Code 2: these are optional but, if populated, ensure that there are no errors in the format of the selected census code. Either re-type or use the drop down to correct the error.
- Census Code 3: these are optional but, if populated, ensure that there are no errors in the format of the selected census code. Either re-type or use the drop down to correct the error.
- Location Code: the codes in this field indicate the location of the employees holding the jobs; for this reason, you may see a job code/title listed more than once in this table. Be cautious in re-assigning Location Codes, as you may sever the tie between the job and the assigned employee(s). Instead of altering a Location Code, add a new record for a job, selecting the intended Location Code. Enter all required fields, and then open the Employees window to assign the new job record to the appropriate employee.
Assign Census Codes
All jobs must be assigned at least one census code, but may be assigned up to three. You may have the program’s Census Code Wizard quickly assign them for you, or you may Assign Census Codes Manually; use the preferred method below. It is recommended that you have a list of your company’s job descriptions and available census codes handy while assigning census codes.
- Assigning Census Codes Using The Census Code Wizard
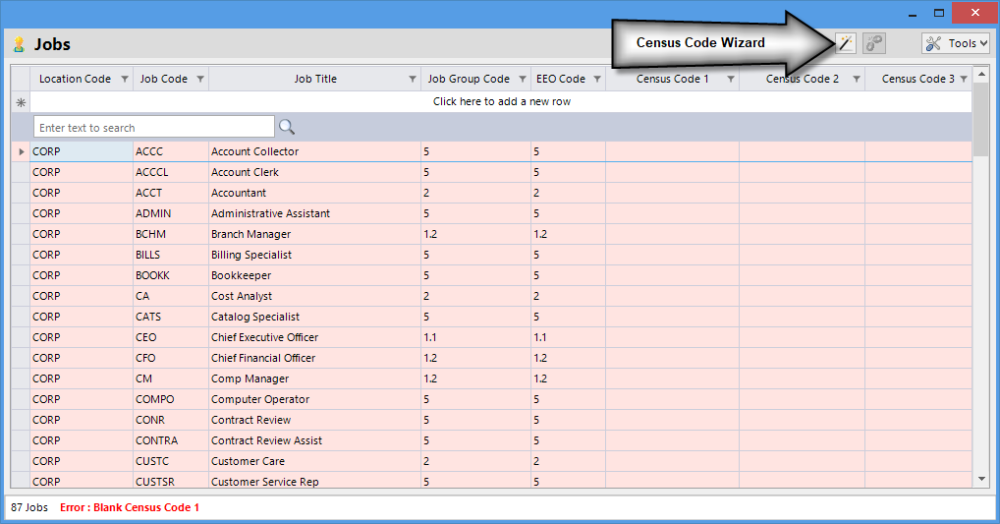
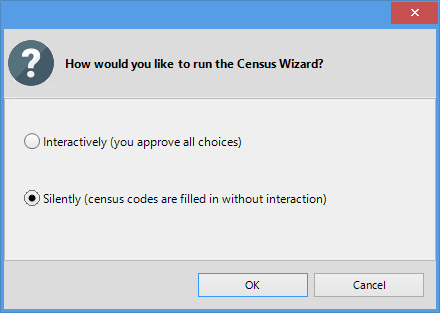
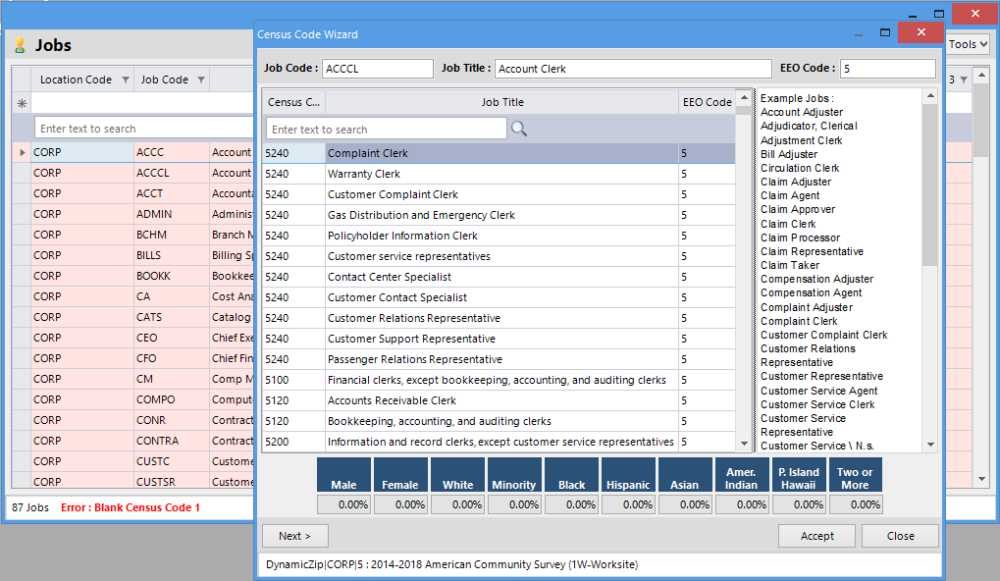
Open the Jobs window to access the Census Code Wizard.- Select one of the following:
- Assigning codes Interactively allows you to approve every census code choice the Wizard suggests for every job.
- Assigning codes Silently allows the Wizard to make all census code 1 selections; it is recommended that you review the Census Code Wizard’s assignments afterward.
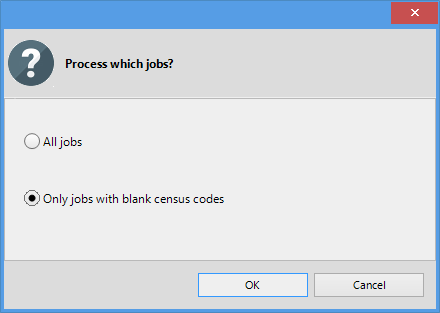
- Select All Jobs or Only jobs with blank census codes when the following message appears.
- In Interactive mode, the Wizard will begin its search and will pop up a window with its top choice based on the title and EEO code of the first job it runs across. The codes appear in descending order from the most relevant to the least.
- After you make a selection, the Wizard will continue to search your job list until it can find no more jobs that need census code assignments.
- When the Wizard reaches the end of the job list, it will close without dialog, and you should see no more jobs with missing census codes.
- Select one of the following:
- Assigning Census Codes Manually
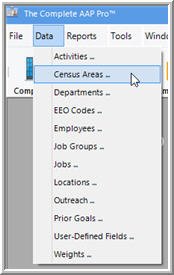
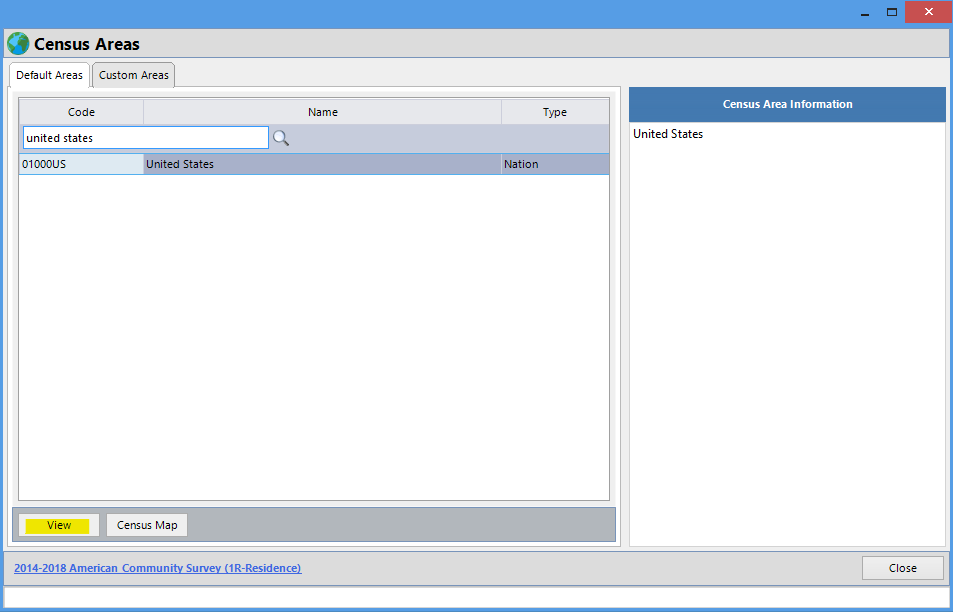
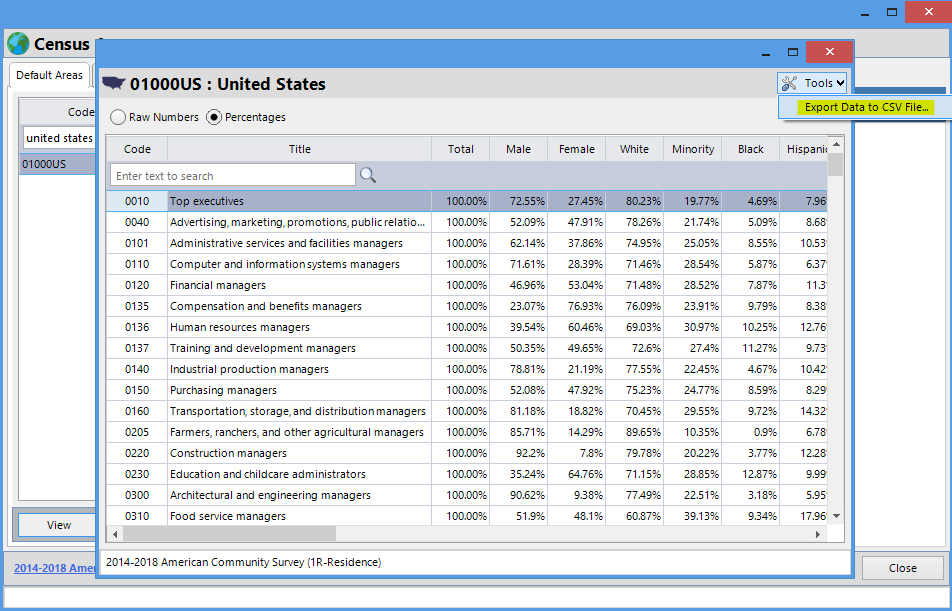
If you wish to be more in control of assigning job census codes, you can either type or browse for census codes. See FAQ below to find out how to access a complete list of available census codes.
Typing A Census Code
- Click into a Census Code cell.
- Type the census code you wish to assign. The cell remains pink if the program does not recognize the census code.
Assigning A Census Code Using The Browse Button
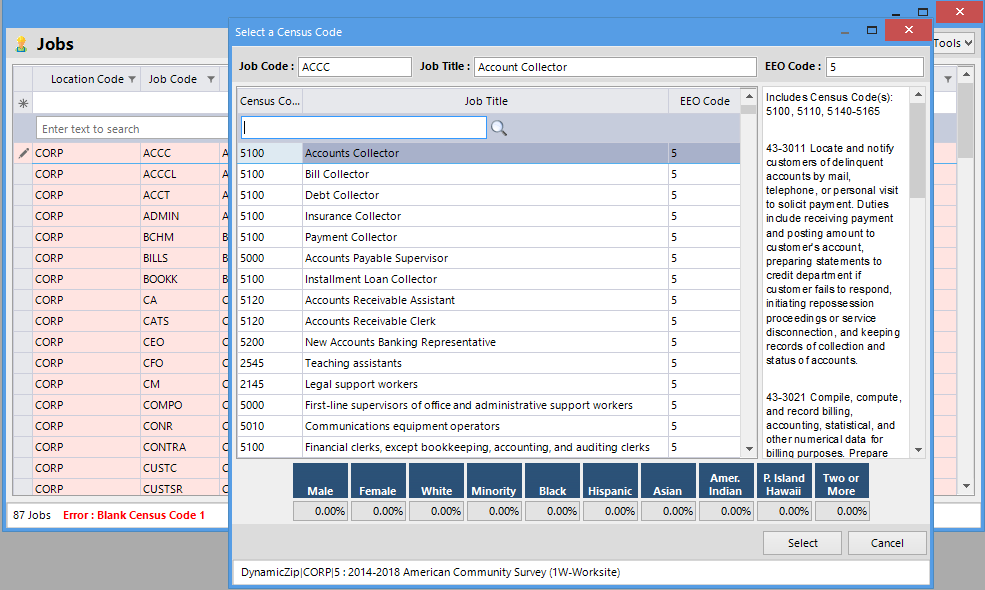
- Click into a census code cell; you will see a browse
button appear.
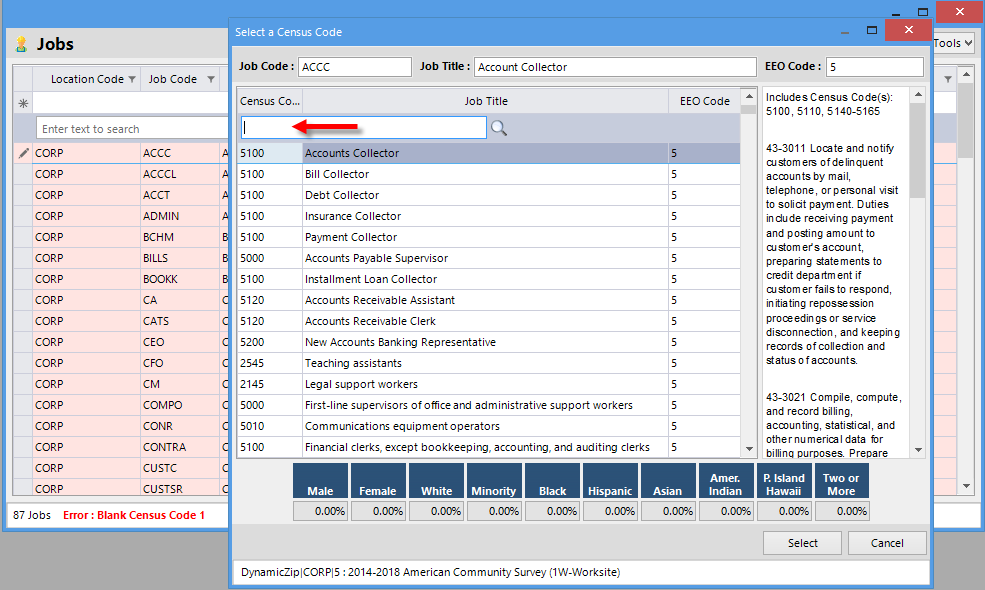
- Click the browse button to pop up the Select a Census Code window. The program searches the database to narrow down your list, and it displays its top choice based on the title and EEO code of the job in question. The list of codes appear in descending order from the most relevant to the least. The “Includes Census Code(s)” column to the right of EEO Code contains the SOC Code(s) that correspond to the selected Census Code.
- Click the Select button if you agree with the suggestion. If you don’t agree with the selection, enter a key word to refresh the search.
- Continue steps 1-3 until at least one census code is assigned to each job in the Jobs table.
- Click into a Census Code cell.
Export & Re-import Data
If you find only one or two small issues in each table, it is easiest to fix the issues manually in The Complete AAP; however, if after finding errors you realize that you need to fix a large amount of data or compliance issues related to employees, it may be best to first export the workforce data, fix the issues in Excel, and then re-import the file. Errors relating to only Locations and Jobs can be fixed by exporting/re-importing those tables individually.
- Export Data
-
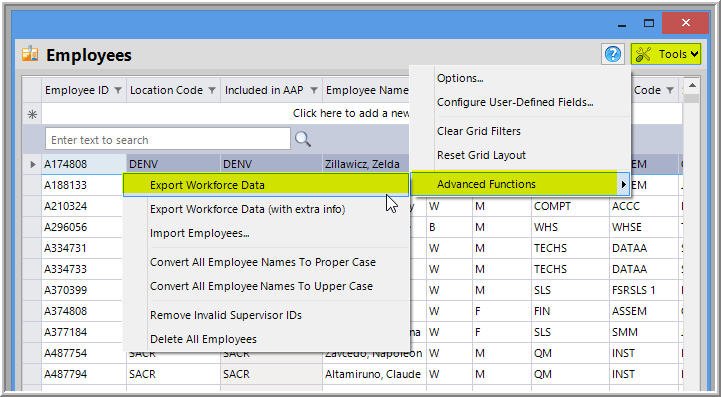
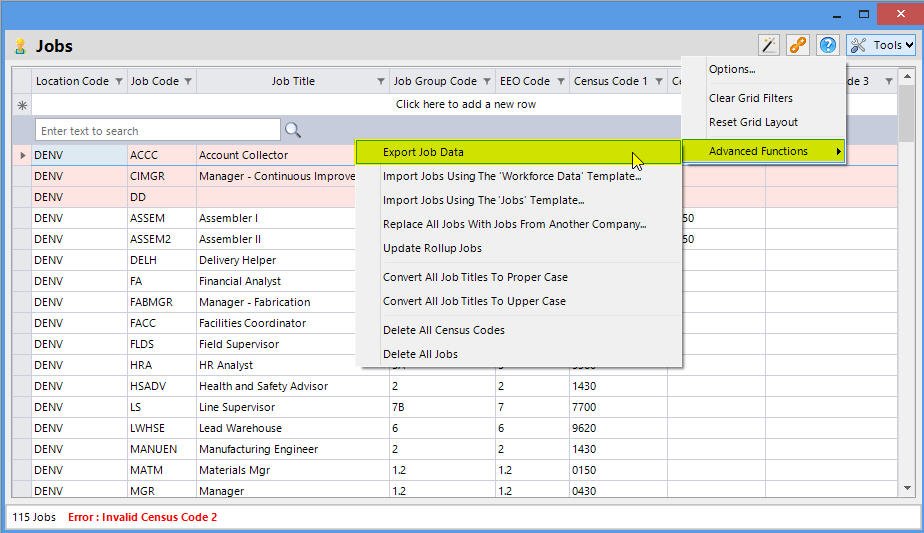
- Click the Employees icon for a full workforce export; or click the “Locations” icon to export only locations data; or click the “Jobs” icon to export only jobs data.
- Click the Tools button.
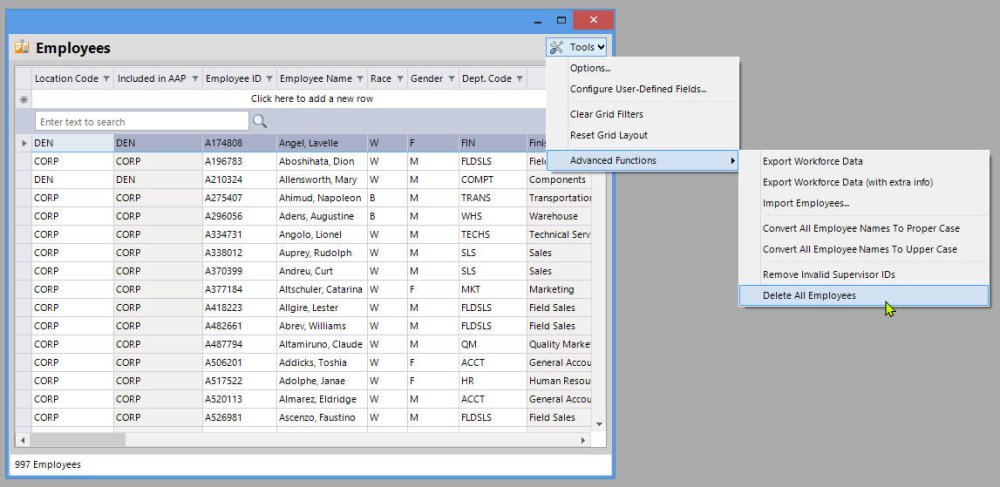
- Select Advanced Functions, and the subitem Export _________ Data.
- Your exported file will automatically open in Excel.
- This file will automatically save to the folder accessible in the lower right corner of the program, but you should save it elsewhere and in .xlsx format; note the location where you decide to save it so that you may direct the program where to find it for import.
- Make necessary changes in the exported file.
- Save the file to capture formulas, etc. in .xlsx and then resave as a .csv file to import.
- Click the Employees icon for a full workforce export; or click the “Locations” icon to export only locations data; or click the “Jobs” icon to export only jobs data.
- Re-Import Data
-
- While in the company into which you wish to re-import, click the Import icon. Select Import Type: select Workforce Data to re-import all workforce data; select Jobs to re-import only jobs data from a Jobs export; select Locations to re-import only locations data from a Locations export.
- Click the
button just below Import File to locate and select the file you wish to import.
- The selected file’s path will appear in the Import File box.
- Click Import.
- Respond to any pop-up messages generated by the software during import.
- An Import Finished window will appear when the import has completed.
- While in the company into which you wish to re-import, click the Import icon. Select Import Type: select Workforce Data to re-import all workforce data; select Jobs to re-import only jobs data from a Jobs export; select Locations to re-import only locations data from a Locations export.
Add, Edit, or Delete Records
Adding, editing, and deleting records is the same in every table of TCAAP. Click Add, Edit, or Delete Records below for instructions on each action.
- Add, Edit, or Delete Records
-
Utilize the Add, Edit and Delete functions knowing that connections formed between tables during import can be affected by changes to any of the workforce tables. The connections are denoted by read-only fields that are grayed out. Read-only fields can be edited in their own proper tables accessible from either the icon ribbon or the Data menu at the top of the screen.
- Edit a Record
- Open the table where you wish to edit a record.
- Search for the record that you wish to edit.
- Click into a cell to use a pull-down or to overwrite what is shown. To edit only a portion of a cell’s content, click twice into a cell.
- Press the Enter key on your keyboard or simply click off the row to capture the edited data.
- Open the table where you wish to edit a record.
- Add a Record
- Open the table where you wish to add a new record.
- Click the area that reads Click here to add a new row.
- Click into any white cell and use the provided drop down menu to select an item, or simply start typing, filling every possible cell.
- Press the Enter key on your keyboard or click out of the row you’re editing to add the record to the table. You can search for the record to edit further.
- Open the table where you wish to add a new record.
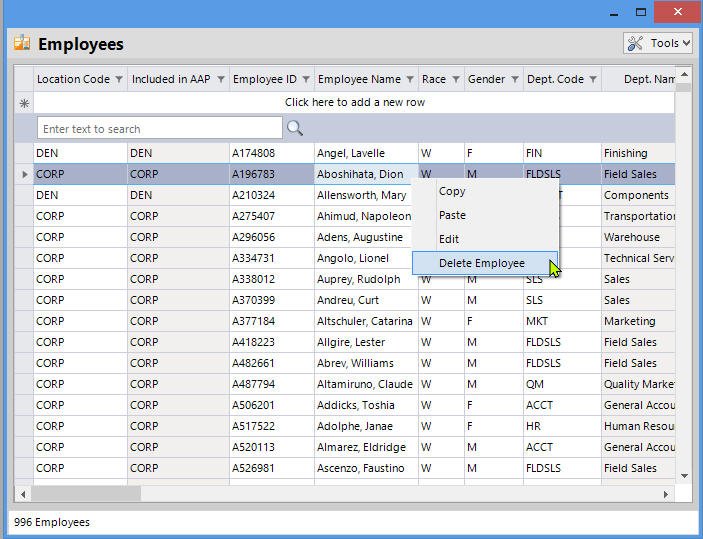
- Delete a Record
- Delete All Records

Proceed to Format & Import Employment Activities Data. If you did not gather employment activities, proceed to Review Remaining Data.
- Frequently Asked Questions: EMPLOYEES
- Nothing is where it should be! What do I do?
If employee details are not what you expect them to be, look through your Automatic Import File Changes report to find out where the error may have originated in your import file. Read the FAQ Should I Re-Import? below to determine whether manual changes, a re-import of workforce data, or starting from scratch would work best to fix the errors.
- Why are some employees’ Location Codes different than their Included in AAP location codes?
As discussed in Roll Up Employees under Locations Table in this chapter, employees can be rolled up to another AAP, and/or must be reported in the AAP of their manager, if different. This column displays the location code of the AAP in which the demographics of employees are counted. The program uses Supervisor ID in the Employees window, and/or the roll up feature in the Locations window’s Tools button to determine where employees are counted.
- How can I edit the names of locations?
To edit the names of location codes, open the Locations window and manually type over incorrect information.
- Where is employee data used?
The demographic information in the Employees table helps establish utilization of protected groups and provides the raw totals for other required reports. Each piece of information plays a different part in various reports, whether required or not, so it is important to ensure that you have the necessary components for at least the required reports.
- Should I Re-Import?
If you find only one or two small errors, it is easiest to fix them manually in The Complete AAP. If after reading through the Items to Review above you find that you need to fix a large amount of data or compliance issues related to jobs, you may want to instead export and re-import your jobs data or your workforce data. What you export and re-import depends on your circumstances:
- If you need to reassign a large number of employees’ job codes, you should export your workforce and make the changes to employee records before re-importing.
- If you need to fix or change a number of job codes’ Titles, EEO Codes, Job Groups, or Census Codes, use the advanced tool Export Job Data in the Tools button of the Jobs window to export your editable .csv file. Edit and save your data in the exported file, and then import the revised file.
- If you need to reassign a large number of employees’ job codes, you should export your workforce and make the changes to employee records before re-importing.
- Frequently Asked Questions: LOCATIONS
-
- What are Locations used for?
Location data is used by the program for several purposes including development of annotations as required by CFR 60-2.1 (e), for EEO-1 reporting as required by the EEOC, for information that appears in report headers, and for determining availability of females and minorities in the census areas that cover locations’ zip codes.
- The total employees in the # of Emps and/or Included Emps columns of one or more locations are off. What happened? What do I do now?
-
If the totals in either # of Emps column or the Included Emps column are not what you expect, there may be something amiss in your workforce import file. If your file contains multiple Location Names for each unique Location Code, for instance, the program alerts you during import; if the import is continued without first fixing the data, the employees may be slotted incorrectly. See the next FAQ for instructions on how to proceed.
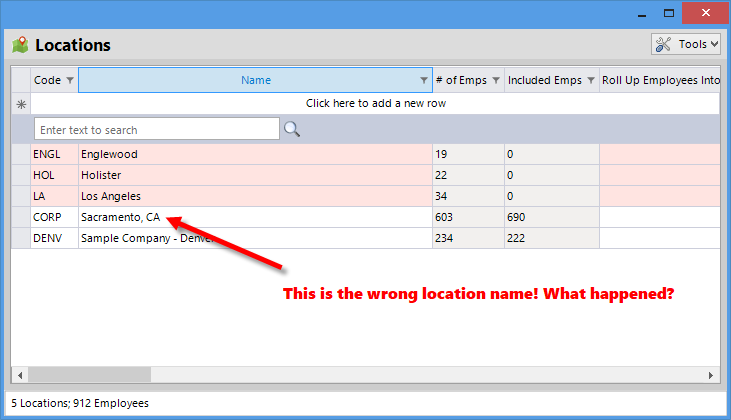
- The Location Codes and/or Location Names of one or more locations are wrong. What happened? What do I do now?
-
Locations are either copied over from a prior AAP or imported. If you imported into the wrong company, like the pre-loaded Sample Company for instance, you may see unfamiliar locations; if you imported into the wrong company, head back to Create a Company File chapter to start over.
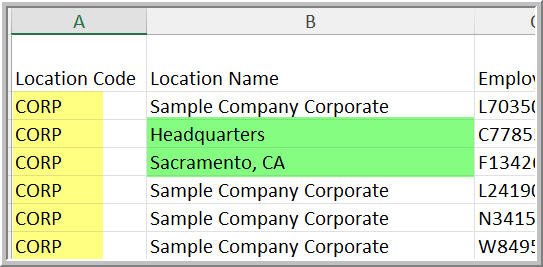
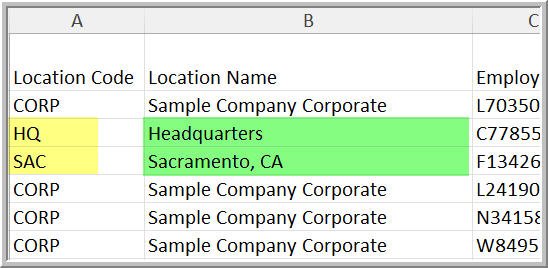
If you see the wrong location name for a code, check your workforce import file to ensure that every employee assigned the same Location Code is also assigned the same Location Name. If the program sees more than one Location Name per Location Code during import, it alerts you during import; if you proceed with the import without first fixing the data, the program selects only one of the names to assign to the single record it creates for each code.Wrong Location Name
Which Location Name is Correct?
If there are many instances where location codes are assigned multiple location names in your original import file, it is imperative to fix the inconsistencies in your original import file or an exported copy, and you must re-import the file after fixing the inconsistencies. This is necessary to ensure that employees end up in the AAP where you intend for them to show up.
This Looks Better
- May I import location data?
Yes. It is recommended that you export the data from the Locations table before re-importing.
- How do I manually edit the information in the Locations table?
-
All except the # of Emps and Included Emps fields can be manually changed by simply clicking into the cell, highlighting the contents, and typing. Press the Enter key on your keyboard to save the new information.
- How can I delete a location from the Locations table?
-
If a location has totals in either the # of Emps or the Included Emps fields of the Locations table, open the Employees window and either sort or filter by Location Code to see which employees are assigned to the location. If you still wish to delete the employees at the location, keep reading.
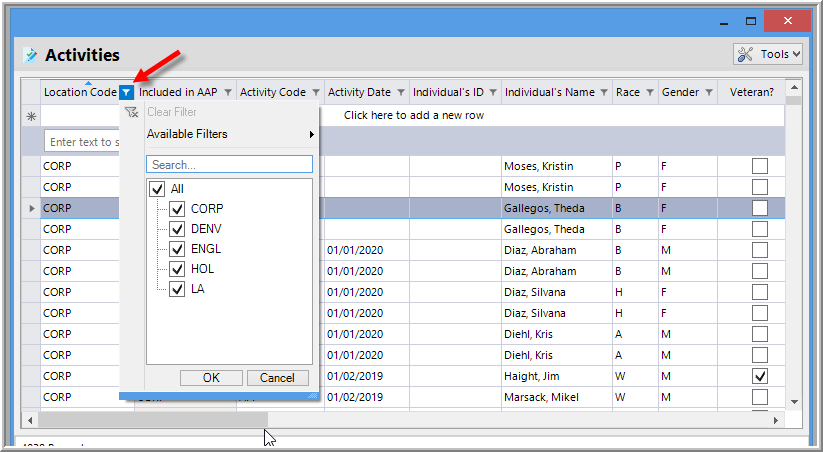
If there are no employees in either the # of Emps or the Included Emps fields of the Locations table, first open the Activities table and filter on Location Code to ensure that no activities are assigned to the location you wish to delete.
If there are activities assigned to the location, it is recommended that you either not delete the location from the Locations table, or that you first right-click on the location in the Locations table to transfer the associated data before deleting the location.
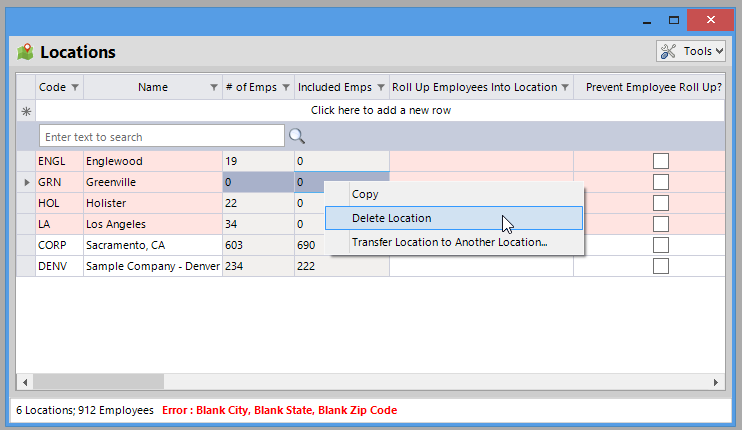
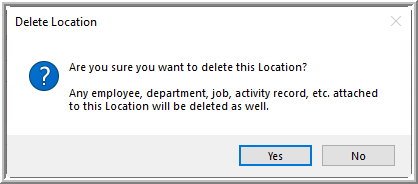
To delete a location, right-click on it in the Locations table, and select Delete Location.
- How can I add a location to the Locations table?
Click into the Location Code cell on the row just below the headers in the Locations table. Type at least the Location Code and Location Name before pressing the Enter key on your keyboard. You may now assign the location code to records in the various editing tables. Fill in additional information for the new location as desired.
- I don’t see all the fields shown in your illustrations. Why are they not showing up?
Try scrolling to the right in the Locations table to see fields that may have been re-ordered by dragging and dropping. Three fields (Roll Up Employees Into Location and Prevent Employee Roll Up and Rollup Outreach) appear only when the function discussed in the Roll Up Employees section is activated. See Locations Table in this chapter for instructions.
- May I use post office box addresses as location addresses?
Zip codes for post offices will result in data errors in the program because U.S. Census data includes zip code data for only physical locations. Furthermore, AAPs must be prepared for physical locations, and the reports must reflect physical addresses.
- Frequently Asked Questions: JOBS
-
- Nothing is where it should be! What do I do?
-
If job details are not what or where you expect them to be, look through your Automatic Import File Changes report to find out where the error may have originated in your import file. Most inconsistencies are caused by multiple titles/names per code, or by spelling variations of titles or names in import files. The program imports only one name/title per code, but warns you prior to doing so. If codes are not included in an import file, during import the program assigns different codes for each variation of a title/name.
- Are Census Code 1, Census Code 2, and Census Code 3 weighted differently?
No, equal weight is given to each census code assigned to a particular job.
- Why would I want/need to assign more than one job census code?
-
If you have positions that have varied duties, assigning two or three census codes to describe up to three duties can help refine the female and minority availability for that particular position, which then contributes to the overall availability for the job group. For example, if your company employs a Chief Financial Officer, you may choose to assign code 0010 Top Executives as Census Code 1, and 0120 Financial Managers as Census Code 2. The availability of females and minorities for each of those codes can vary greatly within a Census Area, so using both codes can provide a more balanced, realistic availability of females and minorities.
- Is there a crosswalk available for the 2006-2010 to 2014-2018 job census list?
Yes. You can download a simple crosswalk here. You can download a list that contains other occupation groups here.
- I have a list of 2014-2018 ACS job census codes that shows census codes that aren’t available in The Complete AAP. Why is your list different?
Numerous agencies use Census data for different purposes, but government contractors are held to the EEO tabulation census data. The list of job census codes in The Complete AAP is what developers are provided by the EEO tabulation. This website is the page that all developers use to gather the data and be informed about what is given. The section “Occupation Crosswalks” has multiple files with the aggregated census codes. Note that #2 in the “EEO-Occupation-Crosswalk-051221.xlsx” file has a good general description:
- 2. This crosswalk should be used in tandem with other code lists and crosswalks linked below. The 2014-2018 EEO Custom Tabulation Occupation Code List is not directly comparable to the 2006-2010 EEO Custom Tabulation Occupation Code List. The 2006-2010 EEO Custom Tabulation Occupation Code List was created from the 2010 ACS PUMS Occupation Code List while the 2014-2018 EEO Tabulation Occupation Code List was created from the 2018 ACS PUMS Occupation Code List. There was an additional ACS PUMS Occupation Code List released in 2012 that must be considered when crosswalking between the 2006-2010 and 2014-2018 EEO Custom Tabulation Occupation Code Lists. Finally, the 2014-2018 EEO Custom Tabulation Occupation Code List is an aggregated version of the 2018 ACS PUMS Occupation Code List, containing 237 occupations compared with 531 in the PUMS list.
In short, our list of job census codes is correct.
- 2. This crosswalk should be used in tandem with other code lists and crosswalks linked below. The 2014-2018 EEO Custom Tabulation Occupation Code List is not directly comparable to the 2006-2010 EEO Custom Tabulation Occupation Code List. The 2006-2010 EEO Custom Tabulation Occupation Code List was created from the 2010 ACS PUMS Occupation Code List while the 2014-2018 EEO Tabulation Occupation Code List was created from the 2018 ACS PUMS Occupation Code List. There was an additional ACS PUMS Occupation Code List released in 2012 that must be considered when crosswalking between the 2006-2010 and 2014-2018 EEO Custom Tabulation Occupation Code Lists. Finally, the 2014-2018 EEO Custom Tabulation Occupation Code List is an aggregated version of the 2018 ACS PUMS Occupation Code List, containing 237 occupations compared with 531 in the PUMS list.
- Why Are Census Codes Required?
The female and minority availability for each of your job groups will likely* be calculated by considering the demographic data in the geographic recruiting area. The availability percentages are derived from the U.S. Census Bureau’s EEO-1 Special File made available by the Census Bureau usually within 5 to 10 years after the completion of a survey. To calculate the availability, the Census Bureau gathers responses to the more detailed census surveys (at one time referred to as the “long form” survey) to determine the most common types of jobs. The Bureau then codes these jobs and calculates the percentage of females and minorities based on survey responses. The Complete AAP then combines the availability percentages of each job’s census codes to determine the overall female and minority availability in each job group.- More on this topic in the Review Remaining Data chapter.
- More on this topic in the Review Remaining Data chapter.

 any records within that have data errors.


 This show hidden jobs button is especially helpful to find a new, unassigned job record suddenly disappears.





Post your comment on this topic.