Difference between revisions of "Jobs Grid Edit"
From YMwiki
Jump to navigationJump to search| (6 intermediate revisions by the same user not shown) | |||
| Line 1: | Line 1: | ||
| − | [[File: | + | [[File:Job Grid Edit Window.png]] |
==General Information== | ==General Information== | ||
| − | The editing grid works much like an Excel spreadsheet. It allows the user to quickly view and edit some of the jobs within the currently selected plan. This window may be re-sized and the software will remember the position upon returning. All of the columns in the grid may be reordered by using the mouse to click, hold and drag the column to the desired position. Columns may also be re-sized. The window can be accessed by clicking the '''Jobs''' icon on the toolbar | + | The editing grid works much like an Excel spreadsheet. It allows the user to quickly view and edit some of the jobs within the currently selected plan. This window may be re-sized and the software will remember the position upon returning. All of the columns in the grid may be reordered by using the mouse to click, hold and drag the column to the desired position. Columns may also be re-sized. The window can be accessed by clicking the '''Jobs''' icon on the toolbar or selecting '''Grid Edit''' from the '''Tools''' menu. Missing or invalid codes are highlighted in yellow. |
==Controls== | ==Controls== | ||
| Line 14: | Line 14: | ||
:Brings up a menu that will allow the user to perform various tools/tasks on the jobs. | :Brings up a menu that will allow the user to perform various tools/tasks on the jobs. | ||
| − | :'''''Single Record Edit''''' - Closes the | + | :'''''Single Record Edit''''' - Closes the Grid Edit window and shows the [[Job Single Record Edit]] window. |
:'''''Print Job List''''' - Enables the user to print, preview or export a job list for the currently open plan. | :'''''Print Job List''''' - Enables the user to print, preview or export a job list for the currently open plan. | ||
| Line 28: | Line 28: | ||
:'''''Import Jobs From Employees Reporting Into This Plan''''' - Creates jobs for all employees that work in other plans but report in to a manager in this plan. The '''Job Group Code''' field is left blank on these newly added jobs so the user can assign the jobs to the appropriate job groups. | :'''''Import Jobs From Employees Reporting Into This Plan''''' - Creates jobs for all employees that work in other plans but report in to a manager in this plan. The '''Job Group Code''' field is left blank on these newly added jobs so the user can assign the jobs to the appropriate job groups. | ||
| − | :'''''Census Wizard''''' - This will run the [[Census Code | + | :'''''Census Wizard''''' - This will run the [[Census Code Wizard]] to assist the user in assigning census codes to the jobs. |
| − | :'''''Reset Census Wizard''''' - Resets the Census Wizard so the program will no longer remember the census codes previously assigned to the jobs in this company. | + | :'''''Reset Census Wizard''''' - Resets the Census Code Wizard so the program will no longer remember the census codes previously assigned to the jobs in this company. |
:'''''Delete Census Codes''''' - Deletes all census codes currently assigned to the jobs. | :'''''Delete Census Codes''''' - Deletes all census codes currently assigned to the jobs. | ||
| Line 38: | Line 38: | ||
* '''Census Wizard Button''' [[File:Census Code Wizard Icon.png]] | * '''Census Wizard Button''' [[File:Census Code Wizard Icon.png]] | ||
| − | :Runs the [[Census Code | + | :Runs the [[Census Code Wizard]]. |
* '''Sort Level 1''' | * '''Sort Level 1''' | ||
| Line 68: | Line 68: | ||
* '''Census Code 1''' | * '''Census Code 1''' | ||
| − | :This field allows the user to assign a census code to this job. Clicking on the [[File:Magicon.png]] icon to the right of the field will start the [[Census Code | + | :This field allows the user to assign a census code to this job. Clicking on the [[File:Magicon.png]] icon to the right of the field will start the [[Census Code Wizard]]. The Census Code Wizard will display all 472 census codes from the 2000 census data or all 487 census codes from the 2006-2010 ACS census data with the recommended codes based on job title and EEO category displayed at the top of the list. At least one census code must be assigned to each job. Please refer to [[Census Data Conversion from 2000 to 2010]] for information on selecting the census code set you wish to use in your plan. |
* '''Census Code 2''' | * '''Census Code 2''' | ||
| − | :This field allows the user to assign a second census code to this job. Clicking on the [[File:Magicon.png]] icon to the right of the field will start the [[Census Code | + | :This field allows the user to assign a second census code to this job. Clicking on the [[File:Magicon.png]] icon to the right of the field will start the [[Census Code Wizard]]. The Census Code Wizard will display all 472 census codes from the 2000 census data or all 487 census codes from the 2006-2010 ACS census data with the recommended codes based on job title and EEO category displayed at the top of the list. |
* '''Census Code 3''' | * '''Census Code 3''' | ||
| − | :This field allows the user to assign a third census code to this job. Clicking on the [[File:Magicon.png]] icon to the right of the field will start the [[Census Code | + | :This field allows the user to assign a third census code to this job. Clicking on the [[File:Magicon.png]] icon to the right of the field will start the [[Census Code Wizard]]. The Census Code Wizard will display all 472 census codes from the 2000 census data or all 487 census codes from the 2006-2010 ACS census data with the recommended codes based on job title and EEO category displayed at the top of the list. |
* '''Job Progression''' | * '''Job Progression''' | ||
| − | :This field allows the user to designate the formal line of progression of jobs through which employees promote into this job. | + | :This field allows the user to designate the formal line of progression of jobs through which employees promote into this job. Clicking on the [[File:Magicon.png]] icon to the right of the field will allow the user the select a job code from a list of the available jobs. Or, the user may enter all the job codes that constitute the line of progress separated by a comma. This data is used to print a Line of Progression report. |
* '''SSEG Code''' | * '''SSEG Code''' | ||
| Line 84: | Line 84: | ||
* '''Information Box''' | * '''Information Box''' | ||
:When the cursor is within either the '''Job Code''' or '''Job Name''' field, the information box (at the bottom of the window) will display how many employees have been assigned the job code within the currently selected plan. '''TIP:''' The user can click the information box and be taken to the [[Employee Grid Edit]] window, where only the employees with the currently selected job can be seen. | :When the cursor is within either the '''Job Code''' or '''Job Name''' field, the information box (at the bottom of the window) will display how many employees have been assigned the job code within the currently selected plan. '''TIP:''' The user can click the information box and be taken to the [[Employee Grid Edit]] window, where only the employees with the currently selected job can be seen. | ||
| − | [[File: | + | [[File:Job Grid Edit Window with Info Box.png]] |
© Copyright Yocom & McKee, Inc. | © Copyright Yocom & McKee, Inc. | ||
Latest revision as of 20:08, 22 October 2014

General Information
The editing grid works much like an Excel spreadsheet. It allows the user to quickly view and edit some of the jobs within the currently selected plan. This window may be re-sized and the software will remember the position upon returning. All of the columns in the grid may be reordered by using the mouse to click, hold and drag the column to the desired position. Columns may also be re-sized. The window can be accessed by clicking the Jobs icon on the toolbar or selecting Grid Edit from the Tools menu. Missing or invalid codes are highlighted in yellow.
Controls
- Add Button
- Allows the user to add a job record. If the user has previously selected a plan to work with, that plan code will be inserted into the Plan column automatically. If the user has selected to work with All Plans, the plan code will be the same as the last job record the user was on. The plan code may be changed only if All Plans has been selected.
- Delete Button
- Allows the user to delete the currently selected job record. If there are employees within the plan that are assigned to the job, the software will ask if the user wants to reassign the employees to another job. If the user chooses not to reassign the employees, the job will not be deleted.
- Tools Button
- Brings up a menu that will allow the user to perform various tools/tasks on the jobs.
- Single Record Edit - Closes the Grid Edit window and shows the Job Single Record Edit window.
- Print Job List - Enables the user to print, preview or export a job list for the currently open plan.
- Convert All Names To Uppercase - Converts all of the job names for the currently selected plan into uppercase.
- Convert All Names To Proper Case - Converts all of the job names for the currently selected plan into proper case.
- Delete Unused Jobs - Permanently removes any jobs (from the currently selected plan) that are not assigned to any employees.
- Copy All Jobs to Another Plan - Copies all of the jobs from the currently selected plan to another plan in the company. A window will appear that allows the user to select the plan to copy the jobs to.
- Import Jobs From Employees Reporting Into This Plan - Creates jobs for all employees that work in other plans but report in to a manager in this plan. The Job Group Code field is left blank on these newly added jobs so the user can assign the jobs to the appropriate job groups.
- Census Wizard - This will run the Census Code Wizard to assist the user in assigning census codes to the jobs.
- Reset Census Wizard - Resets the Census Code Wizard so the program will no longer remember the census codes previously assigned to the jobs in this company.
- Delete Census Codes - Deletes all census codes currently assigned to the jobs.
- Search Button
- Opens a search grid that will allow the user to type in the name of a job. Jobs that match the search criteria are displayed in the grid.
- Census Wizard Button

- Runs the Census Code Wizard.
- Sort Level 1
- This drop-down list will set the first sort order for the grid.

- Sort Level 2
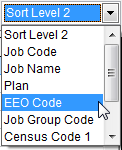
- This drop-down list will set the second sort order for the grid.

- Close Button - Closes the Job Grid Edit window.
Data Columns
- Plan Code
- This field shows the plan code for a specific job. Plan codes can only be changed if All Plans has been selected.
- Job Code
- The job code is an unique alphanumeric code for a job that can be up to 10 characters in length. There cannot be a duplicate job code within a plan. Job codes are automatically converted to uppercase.
- Job Name
- The job name is a description of the job that can be up to 50 characters.
- EEO Code
- This field allows the user to assign an EEO code to this job. Clicking on the
 icon to the right of the field will allow the user the select an EEO code from a list of the available codes.
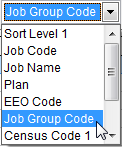
- Job Group Code
- This field allows the user to assign a job group from the currently selected plan to this job. Clicking on the icon to the right of the field will allow the user the select an job group from a list of the available codes.
- Census Code 1
- This field allows the user to assign a census code to this job. Clicking on the icon to the right of the field will start the Census Code Wizard. The Census Code Wizard will display all 472 census codes from the 2000 census data or all 487 census codes from the 2006-2010 ACS census data with the recommended codes based on job title and EEO category displayed at the top of the list. At least one census code must be assigned to each job. Please refer to Census Data Conversion from 2000 to 2010 for information on selecting the census code set you wish to use in your plan.
- Census Code 2
- This field allows the user to assign a second census code to this job. Clicking on the icon to the right of the field will start the Census Code Wizard. The Census Code Wizard will display all 472 census codes from the 2000 census data or all 487 census codes from the 2006-2010 ACS census data with the recommended codes based on job title and EEO category displayed at the top of the list.
- Census Code 3
- This field allows the user to assign a third census code to this job. Clicking on the icon to the right of the field will start the Census Code Wizard. The Census Code Wizard will display all 472 census codes from the 2000 census data or all 487 census codes from the 2006-2010 ACS census data with the recommended codes based on job title and EEO category displayed at the top of the list.
- Job Progression
- This field allows the user to designate the formal line of progression of jobs through which employees promote into this job. Clicking on the icon to the right of the field will allow the user the select a job code from a list of the available jobs. Or, the user may enter all the job codes that constitute the line of progress separated by a comma. This data is used to print a Line of Progression report.
- SSEG Code
- This field allows the user to assign this job to a Similarly Situated Employee Group (SSEG) code. SSEGs are used to group similar jobs in various compensation reports.
- Information Box
- When the cursor is within either the Job Code or Job Name field, the information box (at the bottom of the window) will display how many employees have been assigned the job code within the currently selected plan. TIP: The user can click the information box and be taken to the Employee Grid Edit window, where only the employees with the currently selected job can be seen.

© Copyright Yocom & McKee, Inc.