Difference between revisions of "Layout Designer"
| (3 intermediate revisions by the same user not shown) | |||
| Line 1: | Line 1: | ||
| − | If you wish to insert a new section into a custom layout, is recommended that you follow the directions in '''[[Section Designer]]''' before proceeding with the steps outlined below. | + | If you wish to insert a new section into a custom layout, it is recommended that you follow the directions in '''[[Section Designer]]''' before proceeding with the steps outlined below. |
1) Click the '''Reports''' icon. | 1) Click the '''Reports''' icon. | ||
| Line 8: | Line 8: | ||
2) On the '''Documents''' tab, highlight your custom layout in the list. | 2) On the '''Documents''' tab, highlight your custom layout in the list. | ||
| − | [[file: | + | [[file:Reports-Documents Custom AAP 8-8-14.png]] |
3) Click on the '''Layout Designer''' tab. | 3) Click on the '''Layout Designer''' tab. | ||
| Line 14: | Line 14: | ||
:b. The right side of the window shows all the sections currently included in your custom document layout in the order in which they will appear in the published document. | :b. The right side of the window shows all the sections currently included in your custom document layout in the order in which they will appear in the published document. | ||
| − | [[file: | + | [[file:Layout Designer Tab.png]] |
| Line 30: | Line 30: | ||
7) Changes are saved automatically; there is no “Save” button. | 7) Changes are saved automatically; there is no “Save” button. | ||
| − | 8) When the layout of your custom document is completed, click on the '''Documents''' tab to publish your custom document. Highlight your custom document in the list under the document list and click | + | 8) When the layout of your custom document is completed, click on the '''Documents''' tab to publish your custom document. Highlight your custom document in the list under the document list and click '''Publish''' for either the Adobe Acrobat or Microsoft Word Publish. |
Please continue to [[Publish Your Reports]]. | Please continue to [[Publish Your Reports]]. | ||
Latest revision as of 16:00, 14 December 2015
If you wish to insert a new section into a custom layout, it is recommended that you follow the directions in Section Designer before proceeding with the steps outlined below.
1) Click the Reports icon.
2) On the Documents tab, highlight your custom layout in the list.
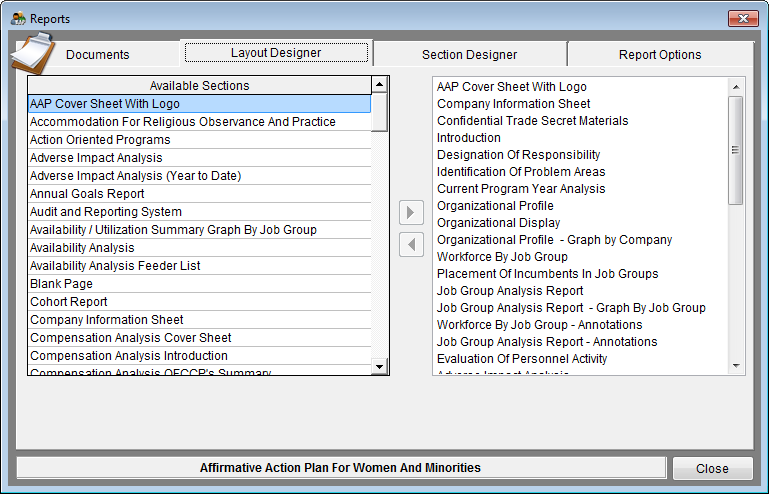
3) Click on the Layout Designer tab.
- a. The left side of the window shows all available sections that can be added to your custom document layout.
- b. The right side of the window shows all the sections currently included in your custom document layout in the order in which they will appear in the published document.
4) To add an available section to your custom document layout, highlight it on the left side and then push the right-pointing arrow button to incorporate it into your custom document layout. It will automatically appear on the bottom of the list on the right side of the window.
5) To re-order the selected sections:
- a. Hover your mouse over the gray box to the left of the section you want to move:
- b. When your cursor turns into a double arrow, click and drag the section to the desired position. Release the mouse when the section is in the desired location.
6) To remove a section, highlight it in the list on the right side, and then click the left-pointing arrow button to remove it from your custom layout.
7) Changes are saved automatically; there is no “Save” button.
8) When the layout of your custom document is completed, click on the Documents tab to publish your custom document. Highlight your custom document in the list under the document list and click Publish for either the Adobe Acrobat or Microsoft Word Publish.
Please continue to Publish Your Reports.
© Copyright Yocom & McKee, Inc.


