Difference between revisions of "Import Adverse Impact"
| (20 intermediate revisions by the same user not shown) | |||
| Line 1: | Line 1: | ||
| − | If you have not already formatted your | + | Before you begin the process of importing your adverse impact data, visit the '''[[Adverse Impact Window]]''' to ensure that base group and reporting dates are present. To do so, click the '''Adv. Impact''' icon. |
| + | |||
| + | If the message in the image shown below does not appear on your screen, review the totals in the '''Base Group''' tab of the adverse impact window and review the dates for accuracy. Correct the totals by manually overwriting them using your keyboard. When all are correct, proceed to the ''Import Adverse Impact'' section below. | ||
| + | |||
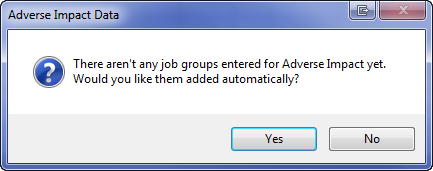
| + | If the message shown below does appear on your screen, you currently do not have Base Group or AAP dates entered. | ||
| + | |||
| + | [[File:AINoJobGroupsMessage.png]] | ||
| + | |||
| + | * If your prior AAP was not completed in The Complete AAP, follow the Enter Base Group and Plan Dates instructions below to enter the necessary data. | ||
| + | * If your previous AAP was completed in The Complete AAP, click '''No''' and follow the [[Import Workforce Data from Previous Plan]] instructions to automatically transfer the necessary data. | ||
| + | |||
| + | == '''Enter Base Group and Plan Dates''' == | ||
| + | |||
| + | 1) Click '''Yes'''. | ||
| + | |||
| + | 2) Type or update the dates. The dates should be exactly one year prior to your current AAP year. | ||
| + | |||
| + | :Example: If current AAP year is January 1, 2016 to December 31, 2016 your adverse impact dates will be January 1, 2015 to December 31, 2015. | ||
| + | |||
| + | [[file:AI Window with Calendar 3-7-14.png]] | ||
| + | |||
| + | ''Double-click on date to close calendar''. | ||
| + | |||
| + | 3) Click the '''Base Group''' tab and type the male, female, White, Black, Hispanic, Asian, Am. Indian, Pac/Hawaiian, and Two or More totals of all employees who were working as of the start date of the reporting period. | ||
| + | |||
| + | :If you will be importing adverse impact data but have no previous plan from which to draw base group data you may utilize the job group totals from the current workforce. Click on '''Tools''' and then select '''Transfer Workforce Data From This Plan'''. | ||
| + | |||
| + | 4) Close your adverse impact window and proceed to the ''Import Adverse Impact'' section of this page. | ||
| + | |||
| + | == '''Import Adverse Impact''' == | ||
| + | |||
| + | If you have not already formatted your '''Adverse Impact Detail File''', please refer to [[Format Your Adverse Impact Data for Import]]. You must format your file before importing. Have the appropriate AAP open before performing the following steps. Pro users may import using the '''Work with All Plans''' option, or you may import into one AAP at a time. To import, have no windows open in The Complete AAP, and follow the steps below. | ||
Follow these steps to import: | Follow these steps to import: | ||
| − | 1) Click the Import icon. | + | 1) Click the '''Import''' icon. |
[[file:Import_Icon.png]] | [[file:Import_Icon.png]] | ||
| − | 2) | + | 2) Click the '''Adverse Impact Detail File''' if it is not selected. |
| − | [[ | + | [[File:New Import Wizard with AI Detail Import Mapped.png]] |
| − | 3) | + | 3) The '''Import File''' box displays the location of your '''ai_detail__import.xlsx''' file. If your import file is not mapped correctly, click the [[File:Browse.jpg]] button to locate it. |
| − | + | :a. Use the '''Look in''' pull-down menu to indicate the drive where your file is stored. | |
| − | file | + | [[File:Lookin for import file.png]] |
| − | + | :b. Select your '''Adverse Impact Detail File''' and then click '''OK'''. | |
| − | + | [[File:Import Wizard - AI Detail Selected.png]] | |
| − | + | :c. You’ll see your path appear in the '''Import File''' box. | |
| − | + | 4) Click '''Import'''. | |
| − | + | 5) If it applies, click '''Yes''' when you see the following message. | |
[[file:HeaderRowMessage.png]] | [[file:HeaderRowMessage.png]] | ||
| − | [[File:ProTag.jpg]] | + | [[File:ProTag.jpg]] 6) Pro users will see the following message. |
| + | * Click '''No''' to import all AAPs and/or locations. | ||
| + | * Click '''Yes''' if you wish to import data for only the AAP you have open. | ||
[[file:SinglePlanImportMessage.png]] | [[file:SinglePlanImportMessage.png]] | ||
| − | + | 7) The Complete AAP might ask you to clarify information that it does not recognize. These are not errors. Do not cancel the import. | |
| − | a | + | |
| − | b | + | :a. Identify the item that is in question. |
| − | + | :b. Select the correct corresponding selection from the provided list. | |
| − | + | ||
| + | [[file:ImportMapping-Race.png]] | ||
| − | + | 8) Click '''OK'''. | |
| − | + | :a. If the software asks you to clarify Unknown or blank race or gender, select the '''Unknown''' option. | |
| + | :b. If importing transfers (as shown in the illustration below) or any other user-defined activity, select one user-defined button for each activity. | ||
| − | + | [[file:Import Mapping - Transfer.png]] | |
| − | + | 9) When import is complete click the '''Adv. Impact''' icon. | |
| − | + | 10) If dates are not populated, type dates in the date boxes or use the calendar to select them. | |
| − | + | 11) If the '''Base Group''' of each job group is not populated, type totals for males, females, Whites, Blacks, Hispanics, Asians, American Indians, Pacific Islanders/Hawaiians and Two or More. You may select '''Transfer Workforce Data From Previous Plan''' from the '''Tools''' menu if you have a previous plan prepared in The Complete AAP software from which to draw the Base Group totals. If no previous plan has been prepared you may select '''Transfer Workforce Data From This Plan''' from the '''Tools''' menu to bring in the current job group totals as the Base Group totals. | |
| − | + | 12) Review the '''Applicant''', '''Hires''', '''Promotions (From)''', '''Promotions (To)''' and '''Terminations''' tabs to verify that the data was imported correctly. | |
| + | |||
| + | 13) If you wish to change some of the data, it is recommended that you make the changes manually or remove all the data and re-import the corrected data. You may utilize the Adverse Impact '''Tools''' menu to zero out all data prior to re-import. The Complete AAP adds to existing totals. | ||
Continue to: [[Determine Goals Progress]] | Continue to: [[Determine Goals Progress]] | ||
| + | |||
| + | ==See Also== | ||
| + | [[Import Current Midyear Adverse Impact Data]]<br> | ||
| + | [[Import Wizard]] | ||
| + | |||
| + | |||
© Copyright Yocom & McKee, Inc. | © Copyright Yocom & McKee, Inc. | ||
Latest revision as of 21:29, 23 August 2016
Before you begin the process of importing your adverse impact data, visit the Adverse Impact Window to ensure that base group and reporting dates are present. To do so, click the Adv. Impact icon.
If the message in the image shown below does not appear on your screen, review the totals in the Base Group tab of the adverse impact window and review the dates for accuracy. Correct the totals by manually overwriting them using your keyboard. When all are correct, proceed to the Import Adverse Impact section below.
If the message shown below does appear on your screen, you currently do not have Base Group or AAP dates entered.
- If your prior AAP was not completed in The Complete AAP, follow the Enter Base Group and Plan Dates instructions below to enter the necessary data.
- If your previous AAP was completed in The Complete AAP, click No and follow the Import Workforce Data from Previous Plan instructions to automatically transfer the necessary data.
Enter Base Group and Plan Dates
1) Click Yes.
2) Type or update the dates. The dates should be exactly one year prior to your current AAP year.
- Example: If current AAP year is January 1, 2016 to December 31, 2016 your adverse impact dates will be January 1, 2015 to December 31, 2015.
Double-click on date to close calendar.
3) Click the Base Group tab and type the male, female, White, Black, Hispanic, Asian, Am. Indian, Pac/Hawaiian, and Two or More totals of all employees who were working as of the start date of the reporting period.
- If you will be importing adverse impact data but have no previous plan from which to draw base group data you may utilize the job group totals from the current workforce. Click on Tools and then select Transfer Workforce Data From This Plan.
4) Close your adverse impact window and proceed to the Import Adverse Impact section of this page.
Import Adverse Impact
If you have not already formatted your Adverse Impact Detail File, please refer to Format Your Adverse Impact Data for Import. You must format your file before importing. Have the appropriate AAP open before performing the following steps. Pro users may import using the Work with All Plans option, or you may import into one AAP at a time. To import, have no windows open in The Complete AAP, and follow the steps below.
Follow these steps to import:
1) Click the Import icon.
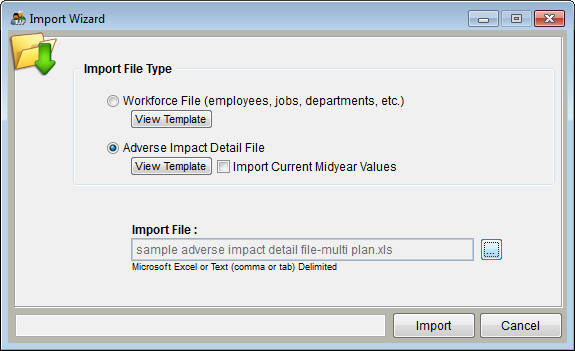
2) Click the Adverse Impact Detail File if it is not selected.
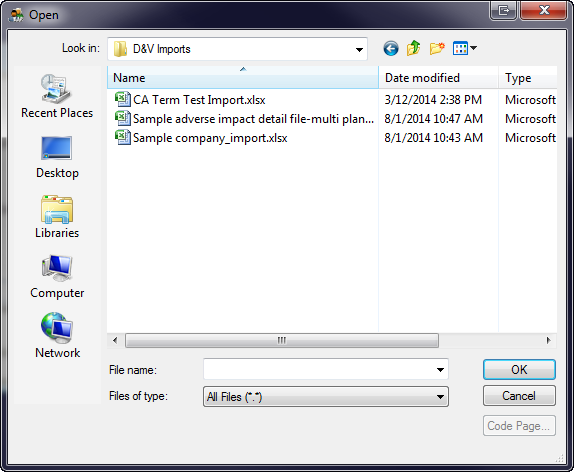
3) The Import File box displays the location of your ai_detail__import.xlsx file. If your import file is not mapped correctly, click the ![]() button to locate it.
button to locate it.
- a. Use the Look in pull-down menu to indicate the drive where your file is stored.
- b. Select your Adverse Impact Detail File and then click OK.
- c. You’ll see your path appear in the Import File box.
4) Click Import.
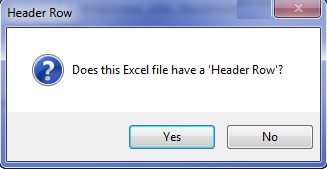
5) If it applies, click Yes when you see the following message.
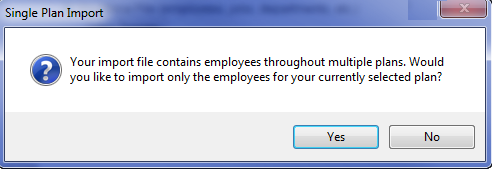
![]() 6) Pro users will see the following message.
6) Pro users will see the following message.
- Click No to import all AAPs and/or locations.
- Click Yes if you wish to import data for only the AAP you have open.
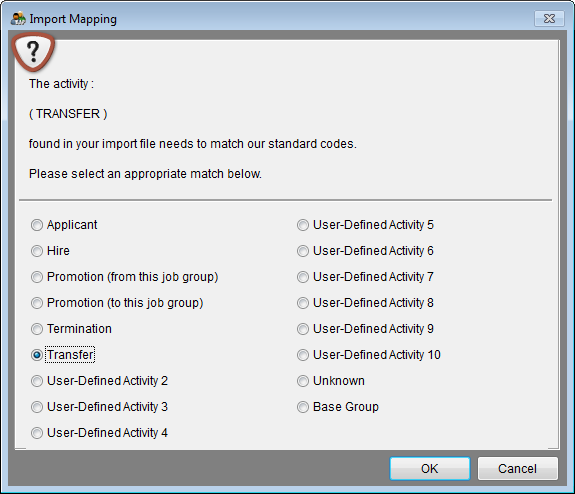
7) The Complete AAP might ask you to clarify information that it does not recognize. These are not errors. Do not cancel the import.
- a. Identify the item that is in question.
- b. Select the correct corresponding selection from the provided list.
8) Click OK.
- a. If the software asks you to clarify Unknown or blank race or gender, select the Unknown option.
- b. If importing transfers (as shown in the illustration below) or any other user-defined activity, select one user-defined button for each activity.
9) When import is complete click the Adv. Impact icon.
10) If dates are not populated, type dates in the date boxes or use the calendar to select them.
11) If the Base Group of each job group is not populated, type totals for males, females, Whites, Blacks, Hispanics, Asians, American Indians, Pacific Islanders/Hawaiians and Two or More. You may select Transfer Workforce Data From Previous Plan from the Tools menu if you have a previous plan prepared in The Complete AAP software from which to draw the Base Group totals. If no previous plan has been prepared you may select Transfer Workforce Data From This Plan from the Tools menu to bring in the current job group totals as the Base Group totals.
12) Review the Applicant, Hires, Promotions (From), Promotions (To) and Terminations tabs to verify that the data was imported correctly.
13) If you wish to change some of the data, it is recommended that you make the changes manually or remove all the data and re-import the corrected data. You may utilize the Adverse Impact Tools menu to zero out all data prior to re-import. The Complete AAP adds to existing totals.
Continue to: Determine Goals Progress
See Also
Import Current Midyear Adverse Impact Data
Import Wizard
© Copyright Yocom & McKee, Inc.
