Difference between revisions of "Section Designer"
| (5 intermediate revisions by the same user not shown) | |||
| Line 1: | Line 1: | ||
| − | + | If you have not already created an editable document, follow the steps in '''[[Create A New Document]]''' above before proceeding. | |
| − | 1) Click the Reports icon. | + | 1) Click the '''Reports''' icon. |
[[file:Reports_icon.png]] | [[file:Reports_icon.png]] | ||
| − | |||
| − | + | 2) Click on the document that you created. | |
| − | + | [[file:Reports-Documents Custom AAP 8-8-14.png]] | |
| − | |||
| − | + | 3) Click the '''Section Designer''' tab. The list of available sections is shown on the left side. | |
| + | :a. If you want to make changes to one of the existing sections, click on it in the list, and then click the '''Copy''' button. This copies the section you highlighted, and automatically names it '''COPY OF: _____________'''. | ||
| + | :b. If you want to create a new section, click the '''Add''' button. | ||
| + | [[file:Report Options Section Designer.png]] | ||
| − | |||
| + | 4) Edit the section text using the ''Text Entry Field'' descriptions below as a guide. | ||
| − | [[file: | + | [[file:Reports Section Designer Copy AOP.png]] |
| − | |||
| − | Text | + | ==Text Entry Fields:== |
| − | '''Section | + | The sections below can be changed in the '''Section Designer''' tab by typing new or overwriting the text in the boxes beside them. While you are editing the fields, keep in mind the following: |
| − | ''' | + | • Some of the document sections listed on the left side of the '''Section Designer''' tab cannot be copied or edited. <br> |
| + | • There are no editing functions available in the '''Section Designer''' tool, such as bold, indent, etc. If you plan extensive editing and wish to use word processing functions, we suggest that you publish your final AAP to Word rather than PDF format. <br> | ||
| + | • Text entered into the fields is saved automatically when the '''Close''' button is pressed.<br> | ||
| − | '''Page Sub-Header:''' | + | '''Section Description:''' The text in the '''Section Description''' field serves to distinguish the section from others in the '''Sections''' list. This title does not appear on published reports. |
| + | |||
| + | '''Page Header:''' The text entered into the '''Page Header''' field appears in bold text at the top of the section’s page in the narrative of the AAP. This header is represented by the words “Action Oriented Programs” in the example below. | ||
| + | |||
| + | '''Page Sub-Header:''' The text entered into the '''Page Sub-Header''' field appears in bold directly under the page header. This header is represented by the words “41 C.F.R. Section 60-2.17(c)” in the example below. | ||
::[[file:Action_Oriented_Program_Heading.png]] | ::[[file:Action_Oriented_Program_Heading.png]] | ||
| − | '''Bookmark Text:''' | + | '''Bookmark Text:''' Text entered into the '''Bookmark Text''' field is the name that is given to the section’s bookmark in the published PDF document. An example is shown below. |
| − | |||
[[file:Action Oriented with Bookmark.png]] | [[file:Action Oriented with Bookmark.png]] | ||
| − | |||
| − | |||
| − | |||
| + | '''Content:''' This text appears in the main body of the published section. The text is standard and cannot be formatted to be bold, italic, etc. Items that appear in the '''General Info''' & '''Narrative Info''' tabs of the '''Plan Information''' window can be inserted automatically into the narrative by using “@@”symbols as shown in the '''Content''' box of the image below. | ||
| − | [[file: | + | [[file:Reports Section Designer Copy AOP.png]] |
| − | |||
| − | |||
| − | |||
| − | To insert | + | To insert fields into the '''Content''' text, type them exactly as they appear in the list below. The @@Company@@ entry pulls text directly from the '''Plan Name''' field of the '''Plan Information''' window’s '''General Info''' tab. The @@User_Name@@ entry pulls from the '''User''' tab of the '''Utilities''' menu’s '''Options''' window. The @@Date@@ entry inserts the current date when the document is published. All others listed below are pulled directly from the '''General Info''' tab of the '''Plan Information''' window. |
@@Company@@<br> | @@Company@@<br> | ||
| − | @@Company_Dunn__Bradstreet_@@ <br> | + | @@User_Name@@<br> |
| − | @@Employer_ID_@@ <br> | + | @@Date@@<br> |
| + | @@Company_Dunn__Bradstreet_@@<br> | ||
| + | @@Employer_ID_@@<br> | ||
@@Company_EEO1@@<br> | @@Company_EEO1@@<br> | ||
@@EEO_Contact@@<br> | @@EEO_Contact@@<br> | ||
| Line 70: | Line 72: | ||
@@Executive_Officer@@<br> | @@Executive_Officer@@<br> | ||
@@Executive_Officer_Title@@<br> | @@Executive_Officer_Title@@<br> | ||
| + | @@PlanStartDate@@<br> | ||
| + | @@PlanEndDate@@<br> | ||
| − | + | After you create custom sections, insert them into the layout of your document by using the '''Layout Designer''' tool. | |
| − | |||
| − | |||
| − | |||
| − | |||
| − | |||
| − | |||
| − | |||
| − | |||
| − | |||
| − | Please note: | + | Please note: Some of the sections listed on the left side of the Section Designer tab cannot be copied for edit because they are for use by the software only to generate standard reports. A list of these sections may be found in [[Document Sections]]. |
| − | + | Proceed to [[Layout Designer]]. | |
© Copyright Yocom & McKee, Inc. | © Copyright Yocom & McKee, Inc. | ||
Latest revision as of 21:38, 8 August 2014
If you have not already created an editable document, follow the steps in Create A New Document above before proceeding.
1) Click the Reports icon.
2) Click on the document that you created.
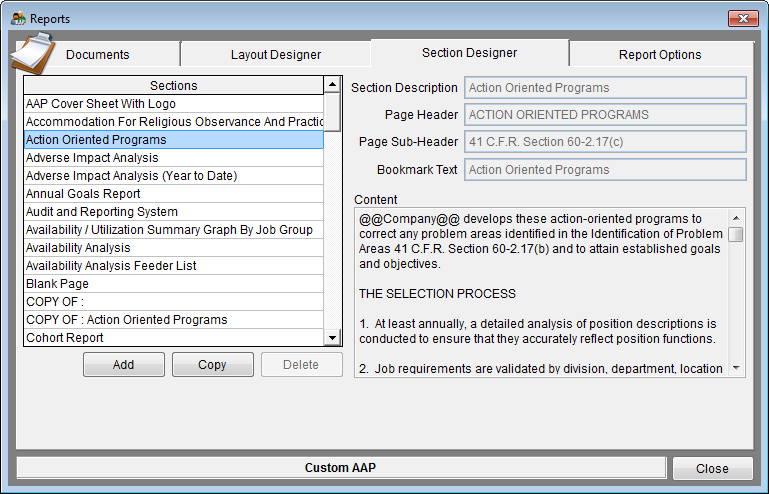
3) Click the Section Designer tab. The list of available sections is shown on the left side.
- a. If you want to make changes to one of the existing sections, click on it in the list, and then click the Copy button. This copies the section you highlighted, and automatically names it COPY OF: _____________.
- b. If you want to create a new section, click the Add button.
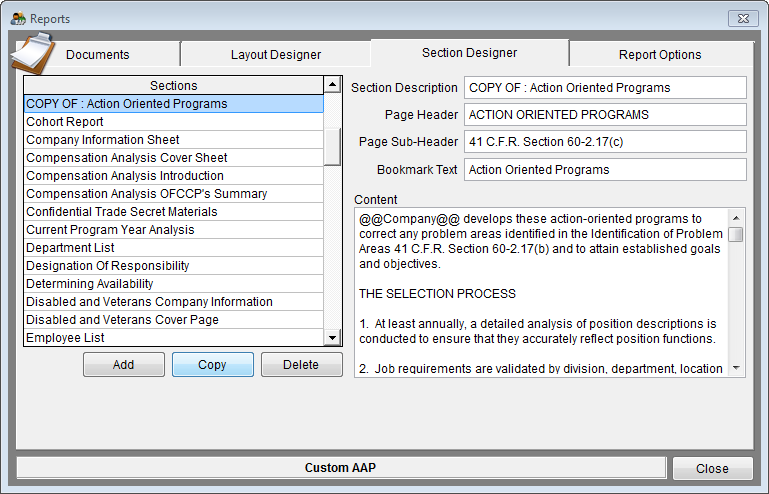
4) Edit the section text using the Text Entry Field descriptions below as a guide.
Text Entry Fields:
The sections below can be changed in the Section Designer tab by typing new or overwriting the text in the boxes beside them. While you are editing the fields, keep in mind the following:
• Some of the document sections listed on the left side of the Section Designer tab cannot be copied or edited.
• There are no editing functions available in the Section Designer tool, such as bold, indent, etc. If you plan extensive editing and wish to use word processing functions, we suggest that you publish your final AAP to Word rather than PDF format.
• Text entered into the fields is saved automatically when the Close button is pressed.
Section Description: The text in the Section Description field serves to distinguish the section from others in the Sections list. This title does not appear on published reports.
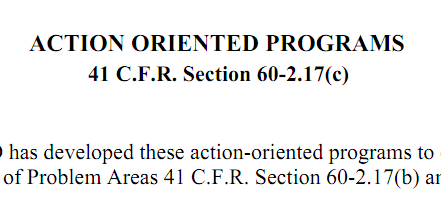
Page Header: The text entered into the Page Header field appears in bold text at the top of the section’s page in the narrative of the AAP. This header is represented by the words “Action Oriented Programs” in the example below.
Page Sub-Header: The text entered into the Page Sub-Header field appears in bold directly under the page header. This header is represented by the words “41 C.F.R. Section 60-2.17(c)” in the example below.
Bookmark Text: Text entered into the Bookmark Text field is the name that is given to the section’s bookmark in the published PDF document. An example is shown below.
Content: This text appears in the main body of the published section. The text is standard and cannot be formatted to be bold, italic, etc. Items that appear in the General Info & Narrative Info tabs of the Plan Information window can be inserted automatically into the narrative by using “@@”symbols as shown in the Content box of the image below.
To insert fields into the Content text, type them exactly as they appear in the list below. The @@Company@@ entry pulls text directly from the Plan Name field of the Plan Information window’s General Info tab. The @@User_Name@@ entry pulls from the User tab of the Utilities menu’s Options window. The @@Date@@ entry inserts the current date when the document is published. All others listed below are pulled directly from the General Info tab of the Plan Information window.
@@Company@@
@@User_Name@@
@@Date@@
@@Company_Dunn__Bradstreet_@@
@@Employer_ID_@@
@@Company_EEO1@@
@@EEO_Contact@@
@@EEO_Company@@
@@Address_1@@
@@City@@
@@State@@
@@Zip@@
@@EEO_Contact_Phone_@@
@@Parent_Company@@
@@Parent_Dunn__Bradstreet_@@
@@Parent_EIN@@
@@Parent_EEO1@@
@@Executive_Officer@@
@@Executive_Officer_Title@@
@@PlanStartDate@@
@@PlanEndDate@@
After you create custom sections, insert them into the layout of your document by using the Layout Designer tool.
Please note: Some of the sections listed on the left side of the Section Designer tab cannot be copied for edit because they are for use by the software only to generate standard reports. A list of these sections may be found in Document Sections.
Proceed to Layout Designer.
© Copyright Yocom & McKee, Inc.


