Difference between revisions of "Create A New Document"
(Created page with "1) Click the Reports icon. file:reports_button.jpg 2) On the '''View or Create a PDF''' tab, click on the New button. file:reportsviewcreatewithnewbutton.png 3) If you are on...") |
|||
| (9 intermediate revisions by the same user not shown) | |||
| Line 1: | Line 1: | ||
| − | 1) Click the Reports icon. | + | 1) Click the '''Reports''' icon. |
| − | file: | + | [[file:Reports_icon.png]] |
| − | |||
| − | + | 2) On the '''Documents''' tab, click the '''New''' button. | |
| − | + | [[file:Reports-Documents Tab 8-8-14.png]] | |
| − | |||
| − | + | 3) Select '''Copy an existing layout''' and choose the existing layout on which you want to base your custom layout. If you want to build a layout from scratch, leave this box un-checked. | |
| − | + | [[file:Create a New Document Layout.png]] | |
| − | |||
| − | + | 4) In the '''Description''' box, type in a unique name you will recognize in the list of printable documents. | |
| − | + | 5) In the '''Filename''' box, enter what your file should be named when you publish this particular documents - do not enter a path or extension. | |
| − | + | 6) Do not select '''Lock this layout''' at this point. If it is checked now, it will be locked and can't be customized. | |
| − | + | 7) Click '''Save'''. The document you created appears in the '''Select a document to publish or view''' list. | |
| + | |||
| + | [[File:Reports-Documents Custom AAP 8-8-14.png]] | ||
| + | |||
| + | |||
| + | 8) Use the [[Section Designer]] tab to edit text in the sections of your new document. Use the [[Layout Designer]] tab to reorder the sections of your new document. | ||
| + | |||
| + | © Copyright Yocom & McKee, Inc. | ||
Latest revision as of 14:15, 19 August 2016
1) Click the Reports icon.
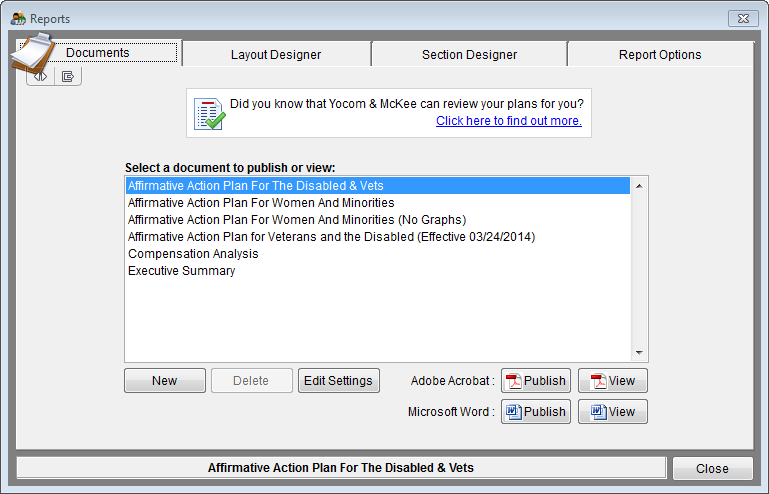
2) On the Documents tab, click the New button.
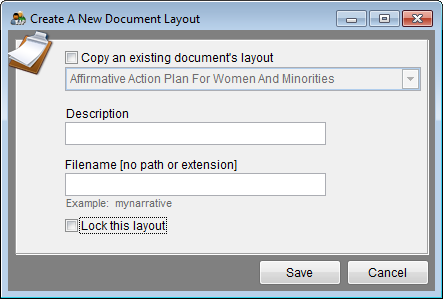
3) Select Copy an existing layout and choose the existing layout on which you want to base your custom layout. If you want to build a layout from scratch, leave this box un-checked.
4) In the Description box, type in a unique name you will recognize in the list of printable documents.
5) In the Filename box, enter what your file should be named when you publish this particular documents - do not enter a path or extension.
6) Do not select Lock this layout at this point. If it is checked now, it will be locked and can't be customized.
7) Click Save. The document you created appears in the Select a document to publish or view list.
8) Use the Section Designer tab to edit text in the sections of your new document. Use the Layout Designer tab to reorder the sections of your new document.
© Copyright Yocom & McKee, Inc.


