Difference between revisions of "Create a New Company with No Data"
| Line 1: | Line 1: | ||
| − | The Create a New Company with No Data instructions are best for companies for which an AAP has never been completed in The Complete AAP software | + | The ''Create a New Company with No Data'' instructions are best for companies for which an AAP has never been completed in The Complete AAP software. |
| − | 1) | + | 1) Launch The Complete AAP. |
2) In the '''Select a company to work with''' window, click '''New'''. | 2) In the '''Select a company to work with''' window, click '''New'''. | ||
| Line 8: | Line 8: | ||
''If a Select a company to work with window similar to the one shown above does not appear upon login, access it by clicking the Company icon. Your software list may be different, and have more or fewer AAPs.'' | ''If a Select a company to work with window similar to the one shown above does not appear upon login, access it by clicking the Company icon. Your software list may be different, and have more or fewer AAPs.'' | ||
| + | |||
| + | 3) Select '''Create a new company with no data'''.<br> | ||
| − | |||
[[file:createacompanywithnodata.jpg]] | [[file:createacompanywithnodata.jpg]] | ||
| Line 24: | Line 25: | ||
:c) Effective and end Dates. | :c) Effective and end Dates. | ||
| − | :d) An EEO type. Unless your company is a government or education agency, choose Private. | + | :d) An EEO type. Unless your company is a government or education agency, choose '''Private'''. |
:e) Indicate whether automatic annotations should be based on Plan Codes or Location Codes. | :e) Indicate whether automatic annotations should be based on Plan Codes or Location Codes. | ||
| + | |||
[[file:Companyinfowithdata.jpg]] | [[file:Companyinfowithdata.jpg]] | ||
| + | |||
6) Click '''OK'''. | 6) Click '''OK'''. | ||
| − | [[File:ProTag.jpg]] 7) There are two ways to add multiple plans to your company shell. You may let the software create the plans when workforce data is imported or you may create the plan shells prior to importing data. Follow the steps | + | [[File:ProTag.jpg]] 7) There are two ways to add multiple plans to your company shell in The Complete AAP's Pro version. You may let the software create the plans when workforce data is imported or you may create the plan shells prior to importing data. Follow the steps a through c below for each plan if you wish to create plan shells prior to importing. |
:a) Click '''Open Plan''' icon. | :a) Click '''Open Plan''' icon. | ||
| Line 38: | Line 41: | ||
:c) Proceed to step 8a. | :c) Proceed to step 8a. | ||
| − | 8) Select '''File''' and then '''Plan Information'''. | + | 8) Select '''File''' from the main menu and then '''Plan Information'''. |
| − | :a) '''[[Plan Information - General Info Tab]]''' - The Complete AAP assigns sequential numbers as plan codes; only Pro users may change these. All users may assign plan names. Plan identifiers do not appear on reports and are not required, but all users may assign them for the purpose of differentiating your AAPs. All users should type the address, city, state and zip code, which appear in the header of each published AAP report. | + | :a) '''[[Plan Information - General Info Tab]]''' - The Complete AAP assigns sequential numbers as plan codes; only Pro users may change these. All users may assign plan names. Plan identifiers do not appear on reports and are not required, but all users may assign them for the purpose of differentiating your AAPs. All users should type the address, city, state and zip code, which appear in the header of each published AAP report.<br> |
[[file:PlanInfowithPrevPlan.png]] | [[file:PlanInfowithPrevPlan.png]] | ||
| Line 53: | Line 56: | ||
[[file:planinfocover.jpg]] | [[file:planinfocover.jpg]] | ||
| + | |||
:d) Click '''OK'''. | :d) Click '''OK'''. | ||
Revision as of 21:37, 29 August 2012
The Create a New Company with No Data instructions are best for companies for which an AAP has never been completed in The Complete AAP software.
1) Launch The Complete AAP.
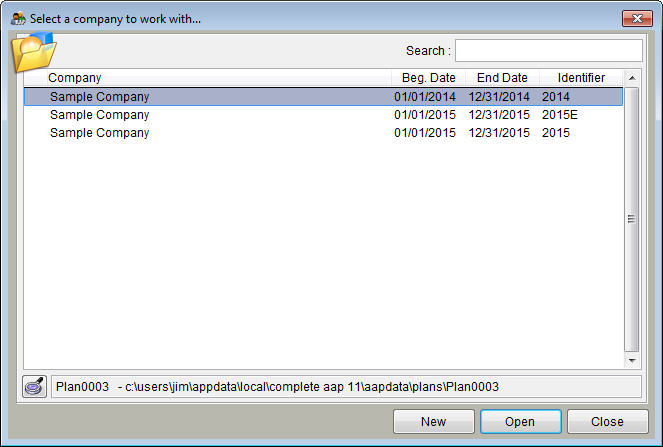
2) In the Select a company to work with window, click New.
If a Select a company to work with window similar to the one shown above does not appear upon login, access it by clicking the Company icon. Your software list may be different, and have more or fewer AAPs.
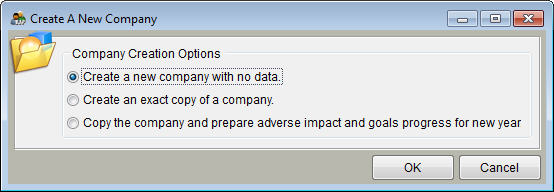
3) Select Create a new company with no data.
4) Click OK.
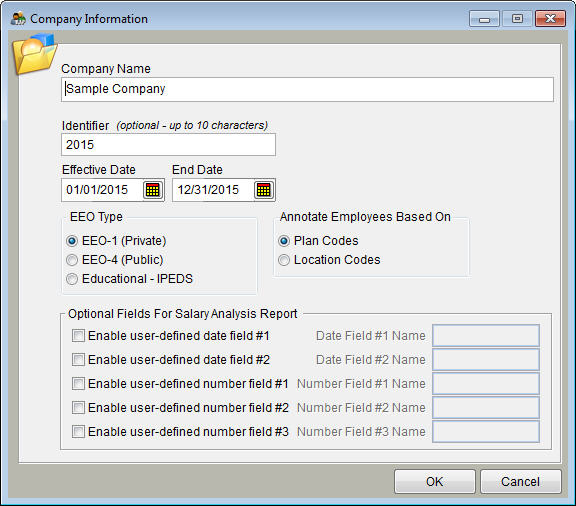
5) In the Company Information window that appears, provide the following:
- a) Your company name.
- b) A unique identifier. (An identifier helps differentiate your AAPs one from another.)
- c) Effective and end Dates.
- d) An EEO type. Unless your company is a government or education agency, choose Private.
- e) Indicate whether automatic annotations should be based on Plan Codes or Location Codes.
6) Click OK.
![]() 7) There are two ways to add multiple plans to your company shell in The Complete AAP's Pro version. You may let the software create the plans when workforce data is imported or you may create the plan shells prior to importing data. Follow the steps a through c below for each plan if you wish to create plan shells prior to importing.
7) There are two ways to add multiple plans to your company shell in The Complete AAP's Pro version. You may let the software create the plans when workforce data is imported or you may create the plan shells prior to importing data. Follow the steps a through c below for each plan if you wish to create plan shells prior to importing.
- a) Click Open Plan icon.
- b) Click Create a New Plan button.
- c) Proceed to step 8a.
8) Select File from the main menu and then Plan Information.
- a) Plan Information - General Info Tab - The Complete AAP assigns sequential numbers as plan codes; only Pro users may change these. All users may assign plan names. Plan identifiers do not appear on reports and are not required, but all users may assign them for the purpose of differentiating your AAPs. All users should type the address, city, state and zip code, which appear in the header of each published AAP report.
- b) Plan Information - Narrative Info Tab - Type in all available narrative information, which will appear throughout the published AAP narrative. Regulations require that an executive officer be named for each AAP. Exclusion of data in the Executive Officer, Executive Officer’s Title, EEO Coordinator, EEO City and EEO State fields will cause awkward verbiage and punctuation in the published narrative.
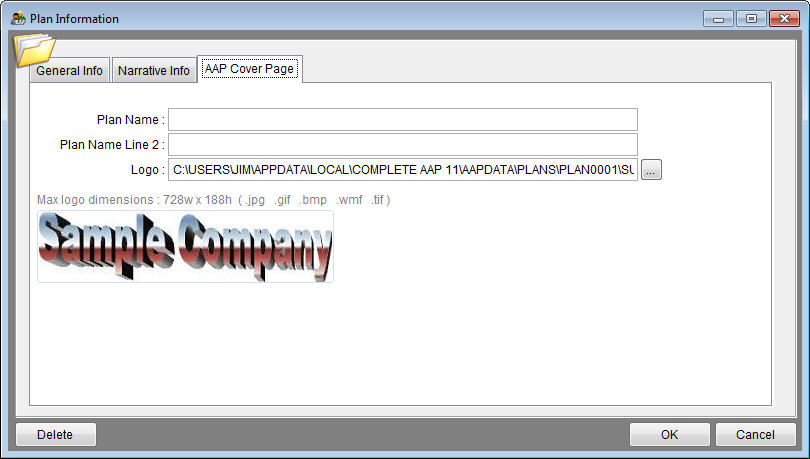
- c) Plan Information - AAP Cover Page Tab - Using the browse button to the right of the Logo box select your logo file. An example of the logo will appear in the large box in the bottom half of the window.
- d) Click OK.
Your next step is to format the data that you gathered in the Before You Begin step and import it into the plan that you just created.
Continue to: Format Your Workforce Data for Import
© Copyright Yocom & McKee, Inc.


