Difference between revisions of "Census Utility"
| Line 5: | Line 5: | ||
1) Open any plan. | 1) Open any plan. | ||
| − | 2) Click Utilities | + | 2) Click Utilities and then Census Utility. |
[[File:Utilitiesmenucensusutility.jpg]] | [[File:Utilitiesmenucensusutility.jpg]] | ||
| Line 11: | Line 11: | ||
3) Below is a description of each button and area of the screen: | 3) Below is a description of each button and area of the screen: | ||
| − | + | [[File:Censusutilityavailablecensusareas.jpg]] | |
| − | ''' | + | :'''Search for''': Type the first few characters of the county/census area you want to view. A list of all census areas that include names with those characters will appear. |
| − | ''' | + | :'''View''': Click on an area then on the View button to preview the female and minority availability raw numbers or percentages by job census code or title. |
| − | ''' | + | :'''Print''': Click on an area then on the Print button to print the female and minority availability raw numbers or percentages by job census code or title. |
| − | ''' | + | :'''Combine''': Use the Combine Census Areas instructions shown below to create your own custom recruitment areas. |
| − | + | :'''Delete''': Click on any census area then the Delete button to remove it. | |
===Combine Census Areas=== | ===Combine Census Areas=== | ||
| Line 34: | Line 34: | ||
4) Select a weight combination option:<br> | 4) Select a weight combination option:<br> | ||
| − | a) Weight all areas equally: The Complete AAP will automatically assign equal weight to each selected area.<br> | + | :a) Weight all areas equally: The Complete AAP will automatically assign equal weight to each selected area.<br> |
| − | b) Weight all areas at 100%: The Complete AAP will use 100% rather than an average of each census area’s female and minority availability.<br> | + | :b) Weight all areas at 100%: The Complete AAP will use 100% rather than an average of each census area’s female and minority availability.<br> |
| − | c) Use manually entered weights: Weight each area as you wish. The weight must add up to 100%. | + | :c) Use manually entered weights: Weight each area as you wish. The weight must add up to 100%. |
5) If you select the option to use manually entered weights, you will need to click on the first area in your queue then enter the desired weight in the “Enter weight for...” box. Do the same for each census area. | 5) If you select the option to use manually entered weights, you will need to click on the first area in your queue then enter the desired weight in the “Enter weight for...” box. Do the same for each census area. | ||
| Line 47: | Line 47: | ||
9) Close and return to Job Groups window to select the newly combined area. | 9) Close and return to Job Groups window to select the newly combined area. | ||
| + | |||
| + | © Copyright Yocom & McKee, Inc. | ||
Revision as of 21:57, 29 August 2011
Census Utility
If you wish to view, print or export a census area’s female and minority availability statistics or if you wish to combine two or more geographic census areas’ female and minority availability statistics, you may do so within The Complete AAP software’s Census Utility window.
1) Open any plan.
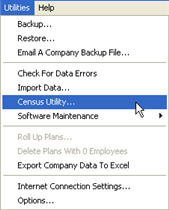
2) Click Utilities and then Census Utility.
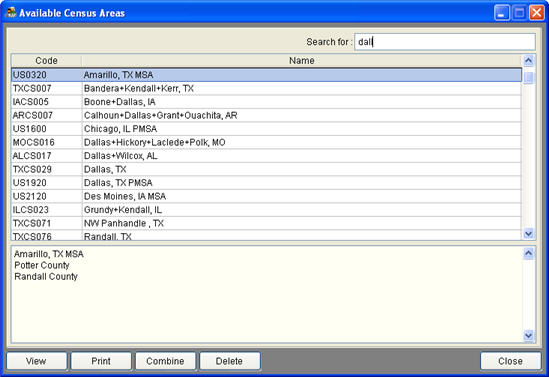
3) Below is a description of each button and area of the screen:
- Search for: Type the first few characters of the county/census area you want to view. A list of all census areas that include names with those characters will appear.
- View: Click on an area then on the View button to preview the female and minority availability raw numbers or percentages by job census code or title.
- Print: Click on an area then on the Print button to print the female and minority availability raw numbers or percentages by job census code or title.
- Combine: Use the Combine Census Areas instructions shown below to create your own custom recruitment areas.
- Delete: Click on any census area then the Delete button to remove it.
Combine Census Areas
1) Select Utilities, then Census Utility and then click Combine.
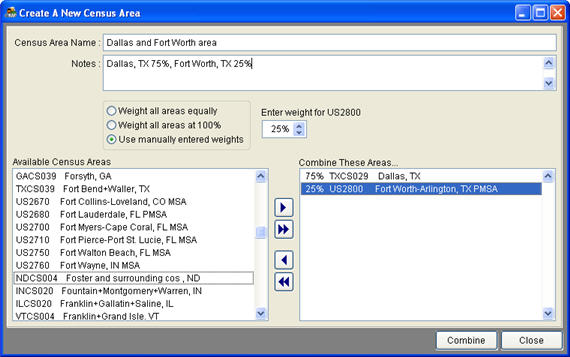
2) In the window that appears, give your new census area a name, and type any additional optional notes into the Notes box. The census area notes will only appear in the Census Utilities window.
3) Scroll through the Available Census Areas to find and queue each area that you want to combine, double-clicking on each to add it to the queue.
4) Select a weight combination option:
- a) Weight all areas equally: The Complete AAP will automatically assign equal weight to each selected area.
- b) Weight all areas at 100%: The Complete AAP will use 100% rather than an average of each census area’s female and minority availability.
- c) Use manually entered weights: Weight each area as you wish. The weight must add up to 100%.
5) If you select the option to use manually entered weights, you will need to click on the first area in your queue then enter the desired weight in the “Enter weight for...” box. Do the same for each census area.
6) Make sure that the weights you type add up to 100%.
7) Click Combine.
8) Click OK.
9) Close and return to Job Groups window to select the newly combined area.
© Copyright Yocom & McKee, Inc.


