Moving The Complete AAP Data To Another Computer
To move a plan or plans from one computer's installation of The Complete AAP to another's installation of The Complete AAP (assuming neither is on a shared network), follow these instructions:
1) On the old computer, find the AapData folder using the steps shown below. This will effectively give you a copy of all companies, plans and settings.
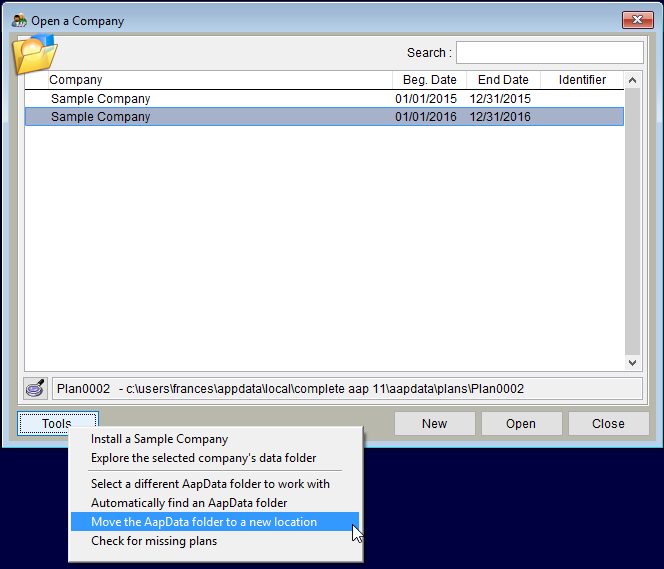
- a) Click on the “Company” icon,
- b) Click the “Tools” button.
- c) Select “Move the AapData Folder to a new location.”.
- d) Follow the prompts and place the folder on a CD, flash drive or network drive.
2) Contact or email Yocom & McKee at 800-765-1176 or ask@yocom-mckee.com during our regular business hours (7:30 AM – 4:00 PM Mountain) to release your software license so that you can use the software on your new computer.
3) On the new computer, manually place the AapData folder on your hard drive or shared network. This location needs to be permanently accessible to the new computer. Make a note of where you placed it.
4) On the new computer:
- a) Launch The Complete AAP.
- b) Click on the Company icon.
- c) Then click the “Tools” button.
- d) Choose Select a different AapData folder to work with and map your software to the AapData folder you brought over from the old computer. You should see your AAPs.
NOTE: You can, also, locate the AapData folder through Windows Explorer. The AapData folder is usually located in a path similar to this: c:\ \local\complete aap 11\aapdata\plans\Plan… If the path is difficult to find you may wish to search for a plan using the plan number assigned by the software. If you are not sure what the last plan number used was searching for Plan0002 should work.
© Copyright Yocom & McKee, Inc.
