Format & Import Employment Activities Data
Follow the steps below to prepare the aggregated employment activities data for import. If you did not gather employment activities data, proceed to Review Remaining Data.
- Format Employment Activities Data
- Have your Employment Activities Data Template open. It is recommended that you save the template file in .xlsx format and in a location readily accessible from within The Complete AAP.
- Copy and paste data values from your exported Applicant Tracking System (ATS) or HRIS file into the appropriate columns in the template file.
- The program’s import process has a mapping function that will have you identify unrecognized data, but unlike the import for workforce data, this employment activities import process does not check for data errors. Save yourself some time by reviewing the items in the list below before attempting to import data.
- Review These Data In Your Import File
-
- ensure that all records have accurate Locations Codes, and that they match the Location Codes in the the Workforce Data template;
- ensure that all Hire, Promotion, and Termination records have race and gender identifications; if an individual’s race or sex is unknown, leave the race and gender fields blank with the goal of obtaining the missing data before publishing reports (Pro edition users have an Error Check tool at their disposal later in the process that cross checks data to fill in blanks)
- ensure that every unique location, department, job group, job code, and requisition code has only one consistent title/name;
- Ensure that job group and job codes and names are consistent with those used in the Workforce Data template;
- ensure that each unique job code has the same consistent job group assigned;
- ensure that you understand the values in the Veteran and Disabled columns so that you may accurately map them to the values Yes or No during import.
- Save your changes in Excel, and then, before saving the file in the required .csv format review these items:
- Review These Formatting Details In Your Import File
-
- remember that only the active tab will be saved;
- remember that all formulas will be converted to values when the file is saved to .csv format;
- ensure that all of the columns are visible and remain in the same order as the original import template, even if not populated with data other than the header;
- ensure that there are no blank rows between data; The Complete AAP will read and import data down to the first blank row it encounters;
- remove all filters;
- remember that you may keep the first row of headers in the file if you wish;
- if your file has leading zeros on any codes (e.g. 0123) you will need to include an apostrophe ( ‘ ) before the first zero in order to retain the leading zeros during import (e.g. ’0123).
- Save your changes in .csv format in the original location where the template automatically saves.
- Close your file and follow instructions below to import your employment activities data.
- Have your Employment Activities Data Template open. It is recommended that you save the template file in .xlsx format and in a location readily accessible from within The Complete AAP.
- Import Employment Activities Data
After populating and formatting your import template, follow the instructions in this section to import your file.- Open the company into which you wish to import.
- In the Activities table, select Tools->Advanced Features->Import Activities.
- Select Employment Activitiesa as the Import Type.
- Click the
button just below Import File to locate and select the file you wish to import.
- The selected file’s path will appear in the Import File box.
- Click Import.
- Respond to any pop-up messages generated by the software during import; see the Employment Activities Import Mapping section below if you encounter messages during import.
- An Import Finished window will appear when the import has completed.
- Proceed to Review Remaining Data.
Employment Activities Import Mapping
As stated in Workforce Import Mapping Message, some prompts, such as race and gender mapping, are normally resolvable during import; nevertheless, the prompts should be read closely, as they may signal inconsistencies in data that are best resolved by stopping the import process and editing your import file.
- Mapping Prompts
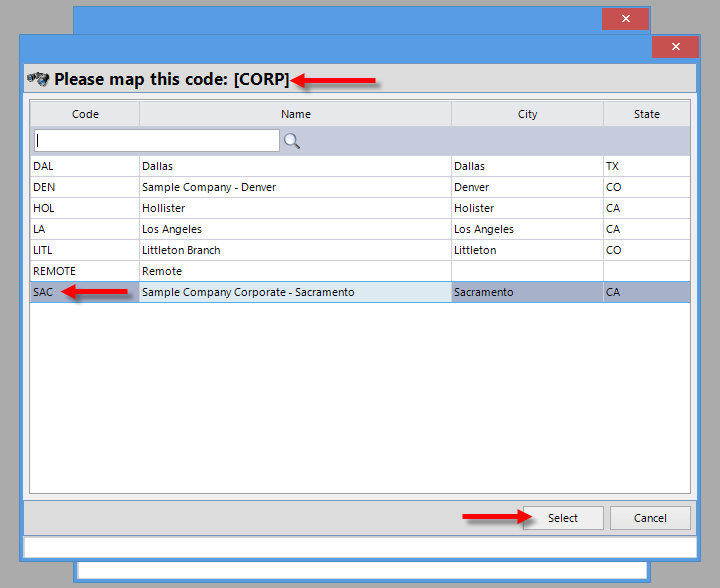
When the program pauses to ask you to map a code, focus on the bracketed section after Please map this code: and consider the list below it. If the code is incongruous with the list – for example, if the code [Asian] appears with a list of locations, you must cancel the import and review your import file to ensure that all of the columns contain the data required by the list in the Gather Necessary Data chapter. Fix the order of the columns, save your changes, and try the import again.Below are the most common mapping requests.
- Location Codes
If the employment activities import file contains a location code that it does not recognize, you will need to select the associated location from the list of codes available, and then click OK.
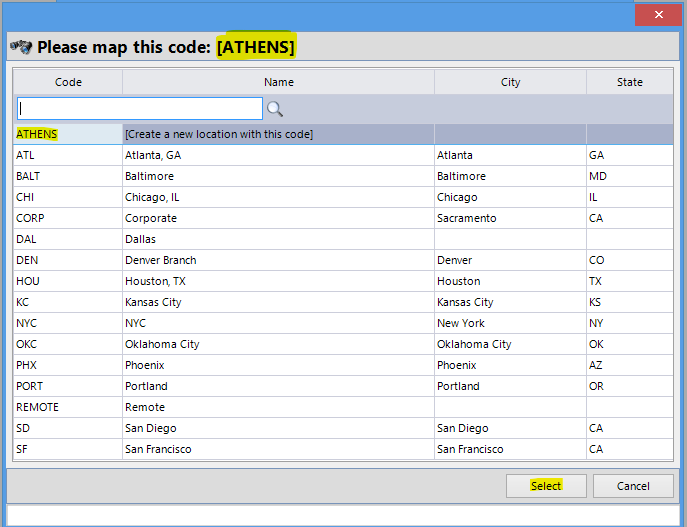
If the shown location does not have a match, the software will prompt you to create a new location to import the activities into. All you’ll need to do is press “Select” to create the new location. Do not map a location to an unrelated existing location during this process, as you will be unable to quickly determine which records were changed.
- Activity Codes
If the employment activities import file contains an activity code that it does not recognize, you will need to select the associated activity from the list of pre-defined activity codes, and then click OK.
If the activity code does not have a match, click Create Custom Activity Code… to type the name of the code and to signify whether it is a negative activity or not. A negative activity means a removal of an individual as opposed to addition of an individual. In the example below, the individual in question is leaving a group/job/location, so it is a negative activity.
Please note that custom activities will not be analyzed by default by the program. To analyze these activities, users may select the activities as Base or Comparator groups in the Options of the Disparity Analyses in the Publish window.
- Race/Sex Codes
If the employment activities import file contains a race or sex code that it does not recognize, you will need to select the associated race from the list of pre-defined race codes, and then click OK. Please be aware that because of report character restraints, predefined races and genders may not be in socially acceptable formats. These can be adjusted as desired before publishing in the Options windows of the Publish window..
If the record contains “unknown” race or sex, or an equivalent, select “Unknown.”TCAAP’s Error Check feature may help to assign these automatically later in the process.
- Veteran/Individual with Disability (IWD) Codes
If the employment activities import file contains a veteran or IWD code that it does not recognize, you will need to select the associated code from the list of pre-defined codes, and then click OK. Please be aware that because of report character restraints, predefined veteran and IWD may not be in socially acceptable formats. These can be adjusted as desired before publishing in the Options windows of the Publish window.
- Open the company into which you wish to import.

Proceed to Review Remaining Data.
Frequently Asked Questions
- May I import activities data separately?
-
Yes, you can import activity data files separately or all together in one file. All you need to remember is that the program does not overwrite data when you import multiple times, so the possibility exists of creating duplicates if you import the same data more than once. You will want to import all employment activities before running the Automatic Error Check tool covered in the next chapter.


 button just below Import File to locate and select the file you wish to import.


Post your comment on this topic.