Difference between revisions of "Factors 1a and 1b"
| (5 intermediate revisions by the same user not shown) | |||
| Line 1: | Line 1: | ||
| − | The availability of females and minorities is determined by the census areas and job census codes selected. Follow the | + | The availability of females and minorities in factors 1a and 1b is determined by the census areas and job census codes selected. Follow the steps below for all job groups that have weight on factor 1a and/or 1b. The steps below illustrate how to assign a local census area. The steps are the same for assigning local or non-local census areas. |
| − | 1) | + | 1) Determine which set of census data you wish to use, Worksite or Residence. You may confirm or change your selection on the '''Census''' tab in the '''Utilities''' menu. You may also see the current setting by clicking on the search icon in the '''Census Code 1''' cell in a job in the '''Jobs''' window. |
| + | :[[file:Utilities Options Worksite 10-12-15.png]] | ||
| − | |||
| − | :[[file: | + | 2) Click the '''Source''' button of factor '''1a. % in Local Census Area'''. |
| + | |||
| + | :[[file:Job Groups Window.png]] | ||
:''A Census Area added in Single Record Edit.'' | :''A Census Area added in Single Record Edit.'' | ||
| − | :[[file: | + | :[[file:Job Groups Grid Edit with Area Selected.png]] |
:''A Census Area added in Grid Edit.'' | :''A Census Area added in Grid Edit.'' | ||
| − | + | 3) A '''Census Area Search''' window will appear. | |
| − | |||
| − | |||
| − | + | 4) Type the name of your local census area in the '''Search for a census area''' box. You may search for cities, counties or states, or you may search for the United States as a whole. | |
| − | |||
| − | |||
| − | : | + | :a) Click the '''View maps and info''' link to access a U.S. Census Bureau page where you may view a state map. |
| + | :b) If you do not find the geographic census area that covers your company’s recruiting area, chances are that it is incorporated in its county’s statistics, or in the statistics of a nearby county. | ||
| + | :c) If you wish to create your own combined census areas using available census statistics, read the Combine Census Areas instructions on the [[Census Utility]] page. | ||
| − | + | 4) Double-click the census area to select it. | |
| + | :[[file:Census Utility showing Worksite & Sacramento 10-14-15.png]] | ||
| − | |||
| − | + | 5) The area you select will appear in the box just below and to the right of the '''Source''' button. | |
| − | [[file: | + | [[file:Job Groups Window.png]] |
| − | Also | + | ==See Also== |
[[Factor 1c]]<br> | [[Factor 1c]]<br> | ||
[[Factor 2a]]<br> | [[Factor 2a]]<br> | ||
Latest revision as of 17:49, 9 December 2015
The availability of females and minorities in factors 1a and 1b is determined by the census areas and job census codes selected. Follow the steps below for all job groups that have weight on factor 1a and/or 1b. The steps below illustrate how to assign a local census area. The steps are the same for assigning local or non-local census areas.
1) Determine which set of census data you wish to use, Worksite or Residence. You may confirm or change your selection on the Census tab in the Utilities menu. You may also see the current setting by clicking on the search icon in the Census Code 1 cell in a job in the Jobs window.
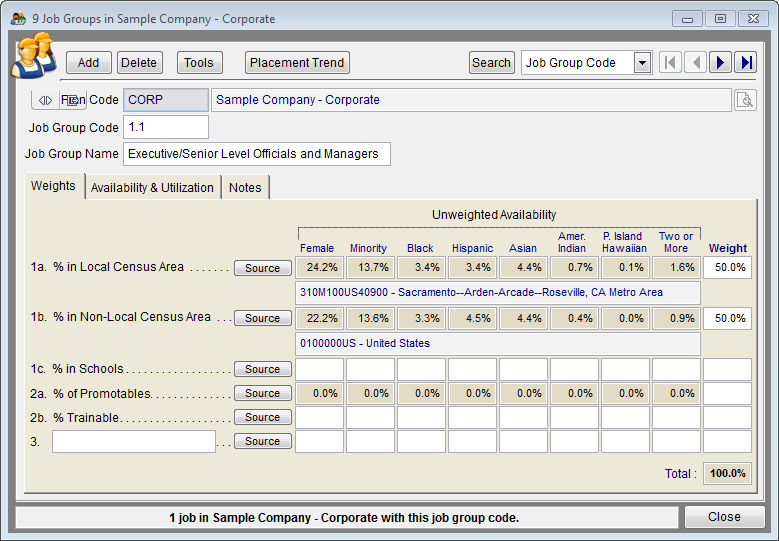
2) Click the Source button of factor 1a. % in Local Census Area.
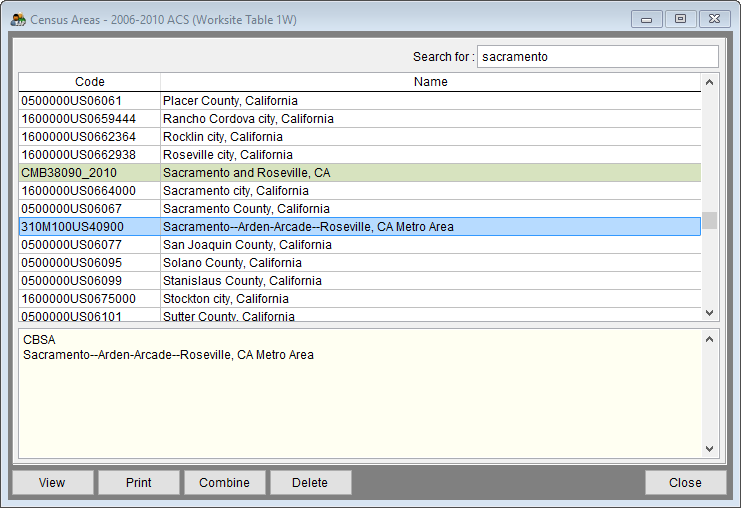
3) A Census Area Search window will appear.
4) Type the name of your local census area in the Search for a census area box. You may search for cities, counties or states, or you may search for the United States as a whole.
- a) Click the View maps and info link to access a U.S. Census Bureau page where you may view a state map.
- b) If you do not find the geographic census area that covers your company’s recruiting area, chances are that it is incorporated in its county’s statistics, or in the statistics of a nearby county.
- c) If you wish to create your own combined census areas using available census statistics, read the Combine Census Areas instructions on the Census Utility page.
4) Double-click the census area to select it.
5) The area you select will appear in the box just below and to the right of the Source button.
See Also
Factor 1c
Factor 2a
Factor 2b
Factor 3
Job Group Edit
© Copyright Yocom & McKee, Inc.


