Difference between revisions of "Prepare Text for Your Narrative"
m (moved Format Your Narrative to Prepare Text for Your Narrative: Rename to more closely match the 8/2012 training manual.) |
|||
| Line 1: | Line 1: | ||
| − | The Complete AAP will incorporate the | + | The Complete AAP will automatically incorporate the following items when you publish your AAP: |
| + | |||
| + | • AAP Name<br> | ||
| + | • AAP Address<br> | ||
| + | • AAP Dates<br> | ||
| + | • Executive Officer Name and title<br> | ||
| + | • EEO Coordinator Name<br> | ||
| + | • EEO Coordinator address<br> | ||
| + | • AAP and Parent Company Dun & Bradstreet<br> | ||
| + | • AAP and Parent Company Tax ID (EIN)<br> | ||
| + | • AAP and Parent Company EEO-1 Number<br> | ||
| + | • AAP logo <br> | ||
| + | |||
| + | The above items are included in the '''[[Company Information]]''' and '''[[Plan Information]]''' windows. Follow these directions to populate the fields: | ||
1) Click '''File''' and then '''Company Information'''. | 1) Click '''File''' and then '''Company Information'''. | ||
[[File:File Menu - Comapny Info.png]] | [[File:File Menu - Comapny Info.png]] | ||
| + | |||
2) Confirm that the company name is correct. Highlight the current text and type the correct text if necessary. | 2) Confirm that the company name is correct. Highlight the current text and type the correct text if necessary. | ||
| Line 12: | Line 26: | ||
''Double-click on date or hit enter to close calendar.'' | ''Double-click on date or hit enter to close calendar.'' | ||
| + | |||
4) Click '''OK''' to save information. | 4) Click '''OK''' to save information. | ||
| Line 19: | Line 34: | ||
[[File:File Menu - Plan Info.png]] | [[File:File Menu - Plan Info.png]] | ||
| − | 6) Confirm that the following items on the '''General Info''' tab are correct. Highlight the current text and type the correct text if necessary. | + | |
| + | 6) Confirm that the following items on the '''[[Plan Information - General Info Tab|General Info]]''' tab are correct. Highlight the current text and type the correct text if necessary. | ||
:a) Pro users only - '''Plan Code'''. | :a) Pro users only - '''Plan Code'''. | ||
:b) '''Plan Name'''. (This will appear in the text of the Narrative and in the report headings). | :b) '''Plan Name'''. (This will appear in the text of the Narrative and in the report headings). | ||
| Line 26: | Line 42: | ||
[[file:PlanInfowithPrevPlan.png]] | [[file:PlanInfowithPrevPlan.png]] | ||
| − | 7) Click the '''Narrative Info''' tab. | + | |
| + | 7) Click the '''[[Plan Information - Narrative Info Tab|Narrative Info]]''' tab. | ||
[[file:planinfonarrative.jpg]] | [[file:planinfonarrative.jpg]] | ||
| + | |||
8) Confirm that all of the information is correct. Highlight the current text and type the correct text if necessary. | 8) Confirm that all of the information is correct. Highlight the current text and type the correct text if necessary. | ||
| − | 9) Click the '''AAP Cover Page''' tab. | + | 9) Click the '''[[Plan Information - AAP Cover Page Tab|AAP Cover Page]]''' tab. |
:a) Use the '''Plan Name 1''' and '''Plan Name 2''' fields for long or alternative plan names. The text in these fields will appear only on the cover pages of both narratives. The Plan name provided in the '''General Info''' tab will appear in the body of both narratives. | :a) Use the '''Plan Name 1''' and '''Plan Name 2''' fields for long or alternative plan names. The text in these fields will appear only on the cover pages of both narratives. The Plan name provided in the '''General Info''' tab will appear in the body of both narratives. | ||
[[file:planinfocover.jpg]] | [[file:planinfocover.jpg]] | ||
| − | : | + | :b) Use the [[File:Browse.jpg]] button to map the location of the corporate logo that you wish to display on the cover pages of both narratives. Click on the logo file and then click '''OK'''. The logo will be displayed in the large box and on the cover pages of you Women & Minorities and Disabled & Veterans narratives. |
| − | 10) Click OK to save the information. | + | 10) Click '''OK''' to save the information. |
==See Also== | ==See Also== | ||
Revision as of 21:53, 4 October 2012
The Complete AAP will automatically incorporate the following items when you publish your AAP:
• AAP Name
• AAP Address
• AAP Dates
• Executive Officer Name and title
• EEO Coordinator Name
• EEO Coordinator address
• AAP and Parent Company Dun & Bradstreet
• AAP and Parent Company Tax ID (EIN)
• AAP and Parent Company EEO-1 Number
• AAP logo
The above items are included in the Company Information and Plan Information windows. Follow these directions to populate the fields:
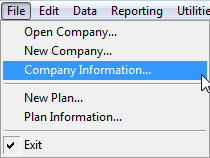
1) Click File and then Company Information.
2) Confirm that the company name is correct. Highlight the current text and type the correct text if necessary.
3) Confirm that the effective and end dates are correct. Highlight the current text and type the correct text if necessary. You may also use the calendar button to correct the dates.
Double-click on date or hit enter to close calendar.
4) Click OK to save information.
5) Click File and then Plan Information.
6) Confirm that the following items on the General Info tab are correct. Highlight the current text and type the correct text if necessary.
- a) Pro users only - Plan Code.
- b) Plan Name. (This will appear in the text of the Narrative and in the report headings).
- c) Address, City, State and Zip. (This will appear in the text of the Narrative and in the report headings).
7) Click the Narrative Info tab.
8) Confirm that all of the information is correct. Highlight the current text and type the correct text if necessary.
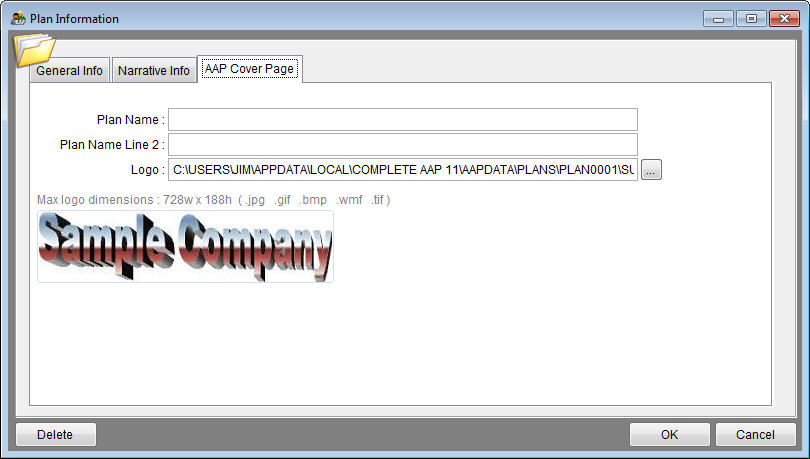
9) Click the AAP Cover Page tab.
- a) Use the Plan Name 1 and Plan Name 2 fields for long or alternative plan names. The text in these fields will appear only on the cover pages of both narratives. The Plan name provided in the General Info tab will appear in the body of both narratives.
- b) Use the
 button to map the location of the corporate logo that you wish to display on the cover pages of both narratives. Click on the logo file and then click OK. The logo will be displayed in the large box and on the cover pages of you Women & Minorities and Disabled & Veterans narratives.
10) Click OK to save the information.
See Also
Customizing Your Plan Layout and Design
Customizing Your Narrative
© Copyright Yocom & McKee, Inc.


